This Cherry Cheesecake Icebox Cake is the ultimate make-ahead dessert layered with creamy filling, cherry compote, and graham crackers. With zero baking required and big summer flavor, it’s a dreamy chilled treat.
Why Cherry Cheesecake Icebox Cake Is A Must-Try No Bake Dessert
When dessert needs to be quick, no bake, and completely satisfying, this cherry cheesecake icebox cake rises to the occasion. It’s layered, creamy, and full of fresh cherry flavor. Each slice gives you a mix of soft graham crackers, fluffy cheesecake filling, and vibrant compote. There’s no baking, no water bath, and definitely no fuss.
This recipe was designed for families and hosts who want something that chills while they relax. And while the results look fancy, the steps are totally doable with just a hand mixer and a loaf pan. It’s simple enough for a weeknight, but impressive enough for guests.
Here’s why this dessert works so well:
- Fresh or frozen cherries make the topping easy to prepare
- The filling firms up just right in the fridge for clean slicing
- Layers set into a loaf pan and flip out easily for serving
- Graham crackers soften into the texture of cake
- Make it ahead and keep your oven off
A Whipped Cheesecake Base That Holds Its Shape
The filling is built from cream cheese and confectioners’ sugar, with whipped cream added in stages. This method gives the mixture volume without thinning it. Each cup of cream adds fluff and structure, turning it into a dreamy texture that slices clean from the fridge.
Fresh Cherry Compote Brings Balance
What makes this dessert more than just creamy is the burst of cherry. You’ll simmer cherries with sugar and cornstarch to thicken them slightly. Then a portion is blitzed for spreading between layers, while the rest is left chunky for topping. The contrast in texture adds real interest, and the tart fruit cuts through the richness of the filling.
Recipe
Print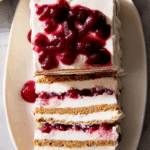
Cherry Cheesecake Icebox Cake
- Total Time: 5 hrs
- Yield: 8–10 servings 1x
- Diet: Vegetarian
Description
A no bake cherry cheesecake icebox cake layered with fluffy cream cheese filling, cherry compote, and graham crackers. Perfect for make-ahead summer desserts.
Ingredients
- 1 lb. fresh or frozen cherries, preferably a mix of tart and sweet
- 1/2 cup (100 g) granulated sugar
- 1/2 cup water
- 4 tsp cornstarch
- 12 oz cream cheese, softened
- 3/4 cup (85 g) confectioners’ sugar
- 2 tsp pure vanilla extract
- 1/4 tsp kosher salt
- 2 1/2 cups heavy whipping cream, divided
- 9 graham cracker sheets, divided
Instructions
- In a medium pot over medium-high heat, bring cherries, granulated sugar, water, and cornstarch to a simmer. Cook, mashing down on cherries, until bubbling and thick. Remove from heat.
- Transfer 1 1/4 cups cherry compote to a food processor and process until mostly smooth. Pour into a bowl and chill.
- Refrigerate remaining chunky compote separately.
- In a large bowl, beat cream cheese, confectioners’ sugar, vanilla, and salt until creamy. Add 1/2 cup cream and beat until smooth. Continue adding cream 1/2 cup at a time, beating to stiff peaks.
- Line an 8 1/2 x 4 1/2 inch loaf pan with plastic wrap. Line bottom with graham crackers.
- Spread 1 cup cheesecake mixture on top. Add 1/2 cup blitzed cherry compote. Dollop and spread another cup cheesecake mixture. Add graham crackers and repeat layers.
- Top with remaining graham crackers. Cover and refrigerate 4 hours or overnight.
- Invert onto platter and remove plastic. Frost with remaining cheesecake mixture. Spoon chunky cherry compote over top.
Notes
- Chill your mixing bowl before whipping cream for best volume.
- You can use an 8×8 square pan for a flatter cake.
- If using frozen cherries, thaw and drain first.
- Prep Time: 10 mins
- Category: Dessert
- Method: No Bake
- Cuisine: American
Nutrition
- Serving Size: 1 slice
- Calories: 482
- Sugar: 30 g
- Sodium: 236 mg
- Fat: 35 g
- Saturated Fat: 21 g
- Trans Fat: 1 g
- Carbohydrates: 39 g
- Fiber: 1 g
- Protein: 5 g
- Cholesterol: 102 mg
How to Layer and Chill Cherry Cheesecake Icebox Cake for Best Results
Building an icebox cake is all about smart layering. Each component serves a purpose, from the creamy filling to the graham cracker base. The real key is letting the cake rest long enough in the fridge to create those clean, structured layers. When it comes out, it slices like a dream and holds its shape beautifully on the plate.
You’ll be using a loaf pan lined with plastic wrap. This step is important because it helps release the cake later without any stress. Once you start layering, the structure builds itself naturally.
Layering Order That Works Every Time
Think of this cake like a lasagna of dessert. Each layer contributes to both taste and presentation. Here’s the foolproof flow:
- Start with graham crackers on the bottom of the lined pan
- Spread 1 cup of the whipped cheesecake mixture evenly
- Add 1/2 cup of the smooth cherry compote on top
- Gently dollop and spread another 1 cup cheesecake layer
- Repeat the cracker-cheesecake-compote-cheesecake stack once more
- Finish with a final layer of graham crackers on top
This format creates three major layers and gives the loaf pan structure. You’ll use all but a bit of the filling, which is saved for frosting the cake after chilling.
If you’re craving more creative twists, this layering method also works well for other treats like the No Bake Twix Cheesecake where caramel layers add extra flair.
Chilling and Flipping the Cake Like a Pro
After layering, cover the whole pan with plastic wrap and chill for at least 4 hours. Overnight is even better. During this time, the graham crackers absorb moisture and soften to a cake-like texture, while the filling firms up.
When you’re ready to serve:
- Peel back the top layer of plastic wrap
- Place a flat serving platter on top of the loaf pan
- Invert confidently so the cake flips out
- Peel off the plastic wrap carefully
At this point, you’ll frost the top and sides with the reserved filling. This adds that bakery-style finish. Then spoon on the chunky cherry compote you saved earlier, right down the center or over the entire top.
Your cake is ready to slice and serve. Each piece holds its shape, shows off those pretty layers, and gives you all the flavor of a full cheesecake with half the effort.
Toppings, Ingredient Swaps, and Creative Serving Tips
This cherry cheesecake icebox cake is amazing as written, but it’s also flexible. Once you understand the core structure, you can change the flavor profile, switch up the fruit, or style it for different seasons and crowds. Whether you’re serving it at a summer BBQ or just want to mix things up, here’s how to make this dessert fit your needs.
Smart Ingredient Swaps That Still Taste Great
One of the best parts about icebox cakes is how easily they adapt. Here are a few smart swap suggestions that don’t mess with the structure but let you play with flavors:
- Fruit: Swap cherries for blueberries, blackberries, or raspberries. All work beautifully, but make sure to cook them briefly into a compote first to get the right texture.
- Cream cheese: Want something lighter? Use whipped cream cheese or even mascarpone for a softer filling.
- Graham crackers: Try vanilla wafers, digestive biscuits, or thin tea cookies instead. Just choose something that softens well as it chills.
- Sugar: For a deeper flavor, you can replace granulated sugar in the compote with light brown sugar or maple syrup.
If you’re experimenting with different flavors, the method used in these No Bake Pistachio Cheesecake Bars shows how to bring a nutty twist into no bake cheesecakes without changing the structure.
How to Style and Serve This Icebox Cake Like a Showstopper
When it comes to presentation, this cake has a major advantage: it slices clean and shows off gorgeous layers. But you can dress it up even more for guests or special occasions:
- Drizzle extra cherry compote right before serving so it looks freshly finished
- Add curls of white or dark chocolate for contrast and a bakery-style feel
- Sprinkle crushed graham crackers over the top for texture
- Top with whipped cream rosettes and fresh cherries for a polished finish
To keep your slices neat, run a sharp knife under warm water and wipe between cuts. You can prep the cake fully a day in advance, which makes it the perfect dessert when you want low effort and high reward.
This cake is great chilled but not frozen. For warm weather parties, just pop it back in the fridge after serving if you have leftovers.
Storage, Nutrition Tips, and Common Questions About Icebox Cakes
Now that you’ve layered, chilled, and sliced your cherry cheesecake icebox cake, let’s talk about what comes next. From keeping leftovers fresh to making it suit your dietary needs, this dessert is just as convenient after serving as it is during prep.
Whether you’re planning ahead for a crowd or saving slices for later, here’s what you need to know.
How to Store and Keep This Dessert Fresh
Because of the dairy base, it’s important to store the cake properly. Here’s how to do it safely while keeping flavor and texture intact:
- Refrigerate: Store any leftover slices in an airtight container for up to 4 days. The texture stays soft, and the flavors even deepen slightly.
- Avoid freezing: While some icebox cakes freeze well, this one contains whipped cream and fresh fruit, which don’t thaw with the best texture.
- Slice first if needed: If you plan to serve the cake over multiple days, slice it in advance and store individual portions with parchment between them.
This chilled style of dessert is especially helpful when hosting. For instance, if you’re also planning on serving something fruity like the No Bake Banana Split Dessert, having both prepped and waiting in the fridge keeps things stress-free and sweet.
Common Icebox Cake Questions Answered
Can I make this ahead?
Yes, and you should. It needs at least 4 hours in the fridge to set properly, but overnight is even better. The layers firm up, flavors blend, and slicing becomes easier.
What type of cherries should I use?
A mix of tart and sweet cherries works best for balanced flavor. Frozen cherries are a good option too. Just thaw and drain them before cooking down into the compote.
Can I make it in a different pan?
Absolutely. You can use an 8×8 inch square baking dish or a round springform pan if preferred. Just be aware that layering will differ slightly, and you may not get the loaf shape.
How can I reduce the sugar?
You can cut the confectioners’ sugar in the filling by a quarter without affecting texture. For the cherry compote, try swapping half the sugar with maple syrup or using naturally sweeter cherries.
Final Thoughts
This cherry cheesecake icebox cake checks all the right boxes. No baking. Big flavor. Creamy, fruity, and satisfying in every bite. It’s the kind of dessert that makes people ask for the recipe, and the kind you’ll be glad you can make in advance.
With a chilled cake like this in your fridge, dessert is always ready. Whether you’re prepping for guests or just treating yourself on a warm evening, it’s the perfect sweet escape.