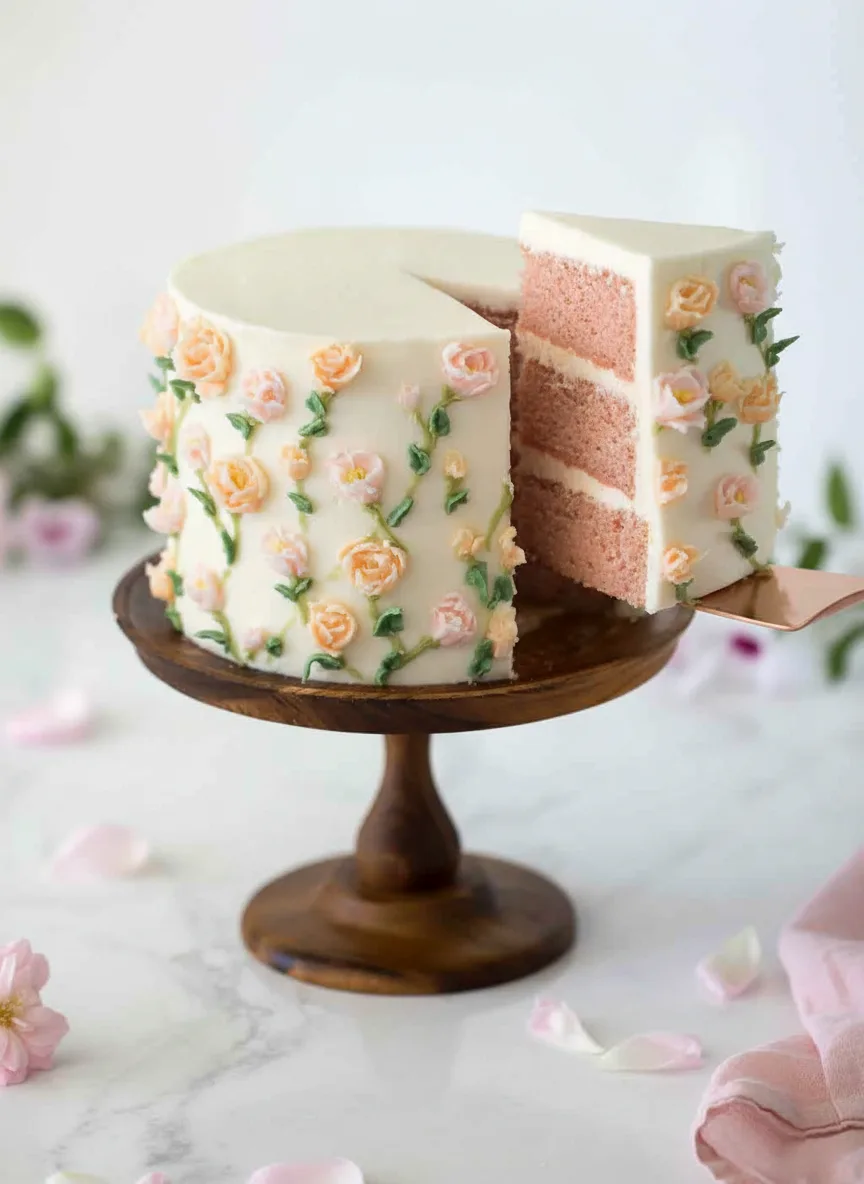
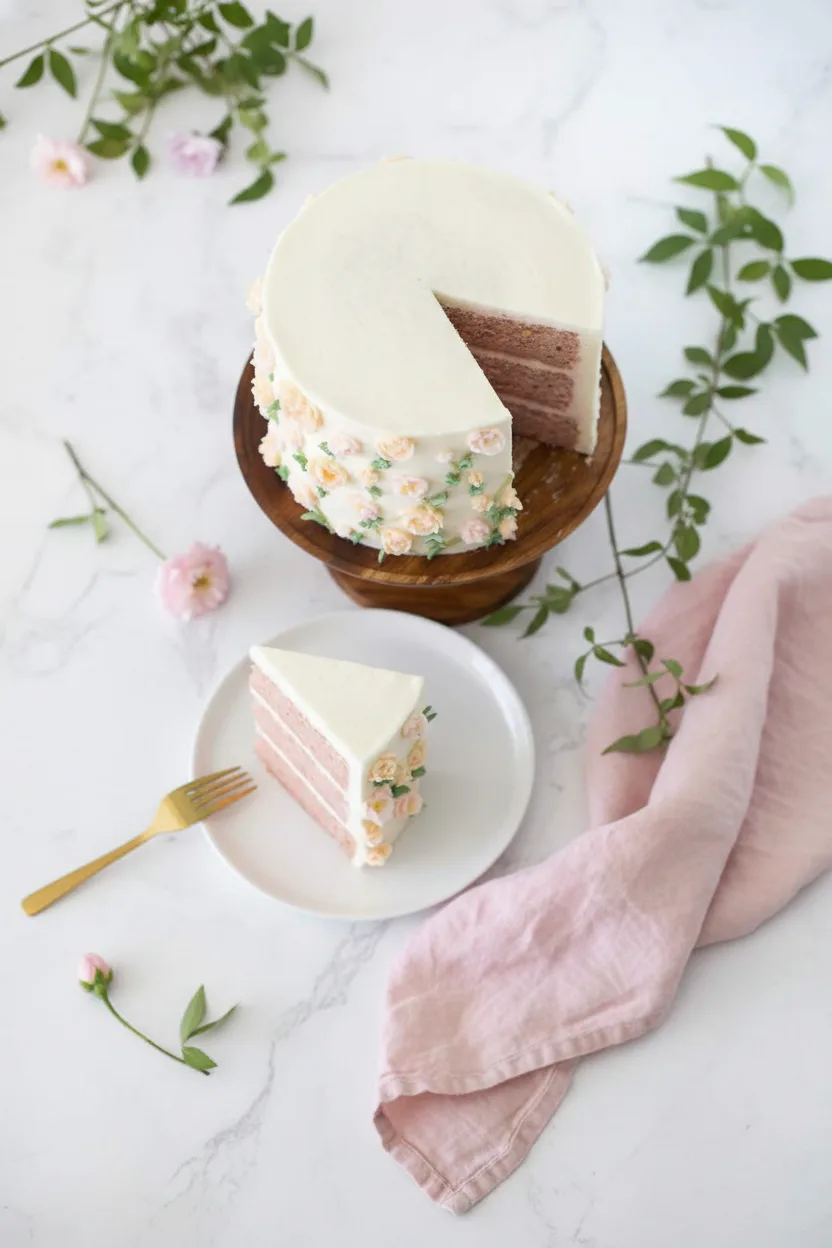
Celebrate the sweetest moments with this stunning Baby In Bloom Painted Cake. This gorgeous dessert features a tender vanilla cake with a hint of strawberry, all wrapped in a velvety, artistically painted buttercream frosting.
The result is a breathtaking cake that looks like a delicate watercolor painting, making it the perfect centerpiece for a baby shower, first birthday, or any special family gathering. Most importantly, this beautiful cake is surprisingly easy to make.
With a few simple techniques and some food coloring, you can create a professional-looking masterpiece right in your own kitchen. Let us dive into the world of edible art and bake something unforgettable.
Why You Will Love This Painted Cake
You will absolutely adore this Baby In Bloom Painted Cake for so many wonderful reasons. Firstly, it offers the perfect balance of stunning visual appeal and delicious, comforting flavor. The cake itself is incredibly moist and tender, thanks to the combination of sour cream and a touch of strawberry.
Secondly, the process of painting the buttercream is a fun and creative activity that feels more like an art project than a baking chore. It is a fantastic way to personalize a cake for a specific theme or color scheme. Finally, you do not need any special artistic skills or fancy tools to achieve the beautiful watercolor effect.
If you can swirl a paintbrush, you can create this gorgeous cake. It is a show-stopping dessert that is sure to receive endless compliments and smiles from everyone who sees it.
Recipe
Print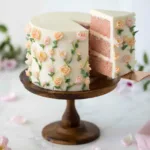
Baby In Bloom Painted Cake
- Total Time: 50 min
- Yield: 10 servings 1x
Description
A stunning, tender vanilla-strawberry cake with artistically painted buttercream frosting, perfect for baby showers and celebrations.
Ingredients
- 1 ⅔ cups all-purpose flour (213 g)
- 1 cup granulated sugar (228 g)
- 1 teaspoon baking powder (3 g)
- ¼ teaspoon baking soda (1 g)
- ¾ cup unsalted butter, room temperature (176 g)
- ¼ cup whole milk, warmed (60 ml)
- ¼ cup strawberry preserves, strained and warmed (46 g)
- ½ cup sour cream (120 ml)
- 3 teaspoons vanilla extract (10 g)
- 3 large egg whites
- Pink food coloring
- 1 lb confectioners sugar (462 g)
- 2 sticks unsalted butter, room temperature (228 g)
- 1 tablespoon strawberry preserve, strained
- 2 tablespoons fresh lemon juice, strained
- Pink, orange, and green gel food coloring
Instructions
- Preheat oven to 350°F. Grease, flour, and line with parchment two 8-inch round cake pans.
- In a medium bowl, whisk together flour, baking powder, and baking soda. Set aside.
- In a stand mixer, beat room-temperature butter and sugar on medium-high for 3-4 minutes until light and fluffy.
- In a small bowl, combine the warm milk and warm, strained strawberry preserves.
- With mixer on low, add egg whites one at a time to the butter mixture, then mix in vanilla.
- Alternately add the dry ingredients and the milk mixture to the batter, beginning and ending with flour. Mix until just combined after each addition.
- Fold in the sour cream and a few drops of pink food coloring until the batter is uniformly pink.
- Divide batter evenly between the prepared pans. Bake for 30-35 minutes, until a toothpick comes out clean.
- Cool cakes in pans for 10 minutes, then invert onto a wire rack to cool completely.
- For the buttercream, beat room-temperature butter in a stand mixer for 4-5 minutes until pale and creamy.
- Gradually add confectioners sugar on low speed, then beat on medium-high for 3-4 minutes until fluffy.
- Add the strained strawberry preserve and lemon juice; beat for one more minute.
- Place one cake layer on a plate, top with buttercream, and add the second layer.
- Apply a thin crumb coat of buttercream over the entire cake. Chill for at least 30 minutes.
- Apply the final, thicker layer of buttercream, smoothing the top and sides with an offset spatula.
- Place small dabs of pink, orange, and green food coloring in separate spots on the frosted cake.
- Using a clean, soft-bristled paintbrush, gently blend and swirl the colors into the frosting to create a watercolor effect.
- Chill the cake briefly to set the design before serving.
Notes
- Ensure all dairy ingredients (butter, milk, sour cream) are at room temperature for a smooth batter and frosting.
- Gel food coloring is best for the painting step as it is more vibrant and won’t thin the buttercream.
- The cake layers must be completely cool before frosting to prevent the buttercream from melting.
- If the buttercream is too soft, chill it for 15-20 minutes and re-whip before using.
- Prep Time: 20 min
- Cook Time: 35 min
- Category: Main Course
- Method: Baked
- Cuisine: American
Nutrition
- Calories: 240 kcal
- Sugar: 30 g
- Sodium: 10 mg
- Fat: 7 g
- Carbohydrates: 20 g
- Protein: 2 g
Ingredients and Substitutions
Gathering your ingredients is the first step to baking success. Here is everything you will need for the cake layers and the painted buttercream. Remember, using room temperature ingredients ensures a smooth, lump-free batter and frosting.
Base Components
- 1 ⅔ cups all-purpose flour (213 g)
- 1 cup granulated sugar (228 g)
- 1 teaspoon baking powder (3 g)
- ¼ teaspoon baking soda (1 g)
- ¾ cup unsalted butter, room temperature (176 g)
- ¼ cup whole milk, warmed (60 ml)
- 3 large egg whites
- ½ cup sour cream (120 ml)
Sauce and Seasonings
- ¼ cup strawberry preserves, strained and warmed (46 g)
- 3 teaspoons vanilla extract (10 g)
- Pink food coloring (gel or liquid)
Buttercream Frosting
- 1 lb confectioners sugar (462 g)
- 2 sticks unsalted butter, room temperature (228 g)
- 1 tablespoon strawberry preserve, strained
- 2 tablespoons fresh lemon juice, strained
- Pink, orange, and green gel food coloring
Now, let us talk about smart substitutions. If you need a dairy-free option, use a plant-based butter and a non-dairy milk like oat or almond. Sour cream can be replaced with an equal amount of plain Greek yogurt for a similar tangy moisture. For a natural pink color in the cake, you can increase the amount of strained strawberry preserves slightly. Gel food coloring gives the most vibrant colors for painting, but liquid coloring works too, just use a bit more. This flexible recipe allows you to adapt it to your dietary needs and what you have on hand.
How to Make Baby In Bloom Painted Cake
Follow these clear, step-by-step instructions to build your beautiful cake from the ground up. The process is broken down into three main parts: making the cake, whipping up the buttercream, and finally, the artistic assembly.
Step 1: Bake the Perfect Cake Layers
Start by preheating your oven to 350 degrees Fahrenheit. Grease and flour two 8-inch round cake pans, then line the bottoms with parchment paper for guaranteed easy release. In a medium bowl, whisk together the all-purpose flour, baking powder, and baking soda. Set this dry mixture aside. In the bowl of a stand mixer fitted with the paddle attachment, beat the room-temperature butter and granulated sugar together on medium-high speed for about 3 to 4 minutes. You want the mixture to become very light, fluffy, and pale in color. Meanwhile, in a separate small bowl or measuring cup, gently combine the warm milk and the warm, strained strawberry preserves. This helps them incorporate smoothly.
Step 2: Combine Wet and Dry Ingredients
With the mixer on low speed, add the egg whites to the creamed butter and sugar one at a time, making sure each is fully incorporated before adding the next. Then, mix in the vanilla extract. Now, you will alternate adding the dry ingredients and the wet milk mixture to the batter. Add about one-third of the flour mixture, mix until just combined, then add half of the milk and preserves mixture. Repeat, ending with the final third of the flour. Finally, fold in the sour cream and a few drops of pink food coloring until you achieve a uniform, soft pink hue. Be careful not to overmix the batter.
Step 3: Bake and Cool
Divide the cake batter evenly between your two prepared pans. Smooth the tops with a spatula. Bake for 30 to 35 minutes, or until a toothpick inserted into the center comes out clean. The cakes should be lightly golden and spring back when gently touched. Allow the cakes to cool in their pans on a wire rack for 10 minutes. Then, carefully run a knife around the edges and invert them onto the rack to cool completely. It is crucial the cakes are completely cold before you frost them, otherwise the buttercream will melt.
Step 4: Prepare the American Buttercream
While the cakes cool, make the frosting. In the clean bowl of your stand mixer fitted with the paddle or whisk attachment, beat the room-temperature butter on medium-high speed for 4 to 5 minutes until it is very pale and creamy. Gradually add the confectioners sugar, about one cup at a time, with the mixer on low speed to avoid a sugar cloud. Once all the sugar is added, increase the speed to medium-high and beat for another 3 to 4 minutes until incredibly fluffy. Add the strained strawberry preserve and lemon juice, and beat for one more minute. The lemon juice adds a lovely brightness that balances the sweetness. Your buttercream should be stiff, smooth, and hold a peak.
Step 5: Crumb Coat and Chill
Place one cooled cake layer on your serving plate or a cardboard cake round. Spread a generous dollop of plain buttercream on top. Place the second cake layer on top. Now, apply a thin layer of buttercream all over the entire cake. This is called a crumb coat. It does not need to be perfect. Its job is to trap any loose crumbs and create a smooth base for the final layer of frosting. Once the cake is thinly coated, place it in the refrigerator for at least 30 minutes to firm up. This chilling step is a game-changer for a clean final look.
Pro Tips for Success
Follow these expert tips to guarantee your painted cake turns out flawless every single time. First, always ensure your butter and other dairy ingredients are truly at room temperature. This is the secret to a smooth batter and frosting that is not lumpy. Second, use gel food coloring for the painting step. Gel colors are more concentrated, so you use less, and they will not thin out your buttercream like liquid colors can. Third, when painting, less is more. Start with a tiny amount of color on a clean brush and build up the intensity slowly. You can always add more color, but you cannot take it away. Finally, have fun and embrace the artistic process. No two painted cakes will look exactly alike, and that is part of their charm. Your unique creation will be perfect.
Flavor Variations
While the strawberry-vanilla combination is classic and delightful, you can easily customize the flavors of this cake. For a lemon-berry twist, add the zest of one lemon to the cake batter and use lemon extract instead of vanilla.
You could also use raspberry or apricot preserves in place of the strawberry. If you love chocolate, replace a quarter cup of the flour with unsweetened cocoa powder for a pretty pink-and-chocolate cake.
For the buttercream, a splash of almond extract or a tablespoon of instant coffee dissolved in the lemon juice can create wonderful new flavor profiles. The painting technique works beautifully with any flavor base, so let your taste buds guide you. This recipe is incredibly versatile and forgiving.
Serving Suggestions
This Baby In Bloom Painted Cake is a celebration all by itself. Slice it with a sharp, thin-bladed knife that you dip in hot water and wipe clean between cuts for perfect slices. Serve it on a beautiful cake stand to show off its artistry. A cake this lovely pairs perfectly with a cup of coffee or tea. For a larger party spread, consider offering lighter accompaniments. A fresh Greek salad with fresh feta makes a savory, refreshing counterpoint to the sweet cake. Similarly, a Mediterranean orzo salad can be a fantastic side dish for your meal before dessert. For another cool, crisp option, a simple cucumber ranch salad would be a wonderful complement.
Storage and Freezing Instructions
Proper storage keeps your cake tasting fresh and looking beautiful. Because the frosting is butter-based, you should store the finished, decorated cake in the refrigerator. Cover it loosely with a cake dome or invert a large bowl over it to protect the painted surface.
It will keep well for up to 4 days. For longer storage, you can freeze the unfrosted cake layers. Wrap each cooled layer tightly in two layers of plastic wrap, then a layer of aluminum foil. Freeze for up to 3 months.
Thaw overnight in the refrigerator before frosting. You can also freeze the finished cake. Place the decorated cake, uncovered, in the freezer for about an hour until the frosting is very firm. Then, wrap it securely in several layers of plastic wrap and foil. Thaw in the refrigerator overnight before serving.
Nutrition Facts per Serving
| Calories | Fat | Carbs | Protein | Fiber | Sugar | Sodium |
|---|---|---|---|---|---|---|
| 240 kcal | 7 g | 20 g | 2 g | 0 g | 30 g | 10 mg |
These values are estimates based on the specific ingredients used and may vary slightly with substitutions. The cake is a rich, celebratory dessert best enjoyed in moderation as part of a balanced diet.
FAQs About Painted Cake
Can I make this cake ahead of time?
Absolutely. You can bake the cake layers up to two days in advance. Wrap them tightly in plastic wrap once completely cool and store at room temperature. You can also make the buttercream a day ahead, store it covered in the refrigerator, and then re-whip it before using to restore its fluffy texture.
What kind of paintbrush should I use for the buttercream?
Use a clean, food-safe paintbrush with soft bristles. A small, flat brush or a round detailing brush works perfectly. Brand-new brushes from an art supply store are fine, just make sure they have not been used for non-food purposes. You can also find brushes specifically made for cake decorating.
My buttercream looks too soft for painting. What should I do?
If your buttercream seems too soft, it is likely because your butter was too warm. Place the entire bowl of buttercream in the refrigerator for 15-20 minutes, then re-whip it. This should firm it up. Conversely, if it is too stiff, beat in a teaspoon of milk or lemon juice at a time until it reaches a spreadable consistency.
Can I use a different type of frosting?
The painting technique works best with a crusting buttercream like American buttercream or a Swiss meringue buttercream. These frostings form a slight outer layer that is ideal for painting on. Whipped cream or cream cheese frostings are too soft and will not hold the painted design as well.
How do I get sharp, clean lines when painting?
The key to clean lines is a chilled cake and a light touch. Make sure your crumb coat is thoroughly chilled so the final layer of frosting goes on smoothly. When painting, use the tip of your brush and gently press and pull the color. Do not press too hard or you will dig into the frosting underneath.
Final Thoughts
Creating this Baby In Bloom Painted Cake is a rewarding experience that combines the joy of baking with the fun of painting. From the tender, pink-tinted cake layers to the final artistic strokes on the buttercream canvas, every step is designed to be approachable and enjoyable.
This cake proves that you do not need to be a professional pastry chef to create a breathtaking, personalized dessert. It is a wonderful project to share with family or to present as a heartfelt gift.
The techniques you learn here can be applied to countless other cakes and themes. So, gather your ingredients, prepare your brushes, and get ready to bake and paint a masterpiece that is as delicious as it is beautiful. Your special occasion deserves nothing less.