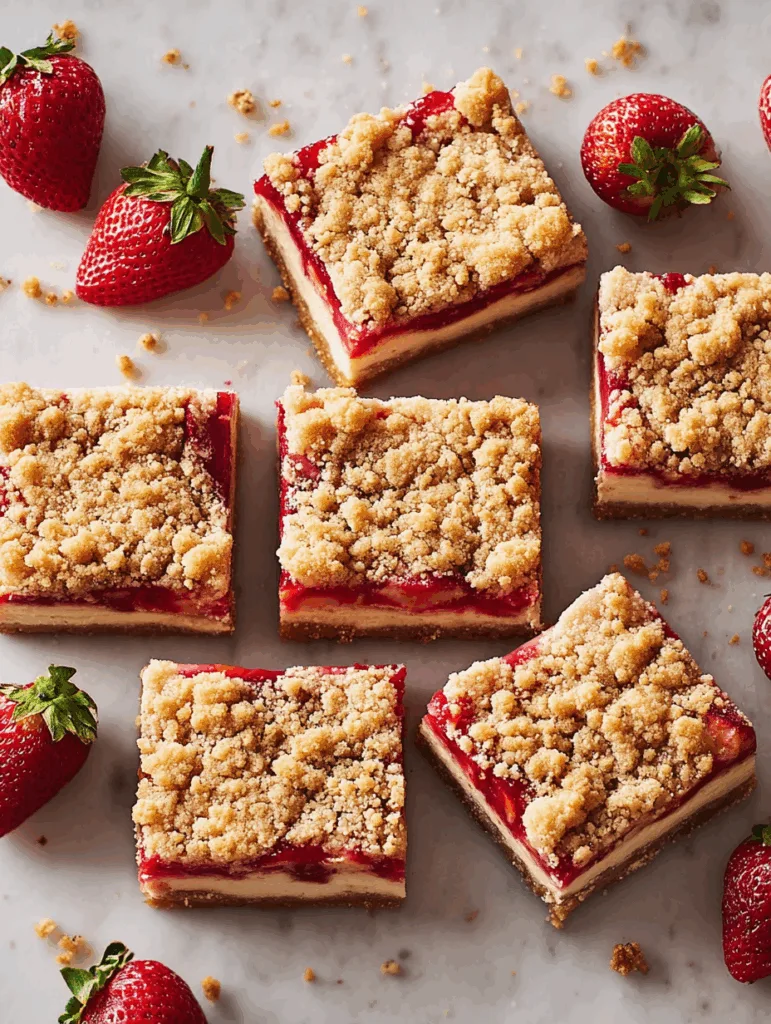
Strawberry cheesecake bars are the kind of treat that disappear fast. With a buttery crust, creamy filling, jammy strawberry topping, and a golden crumble finish, they hit all the right dessert notes in just one bite. Whether you’re hosting brunch or craving a late-night snack, these bars are your new best friend.
These bars combine sweet strawberries and tangy cream cheese in a rich, layered dessert that’s simple to make ahead. In this post, we’ll cover how to prep the crust, filling, and topping with ease, the best tools for even slicing, and how to store leftovers (if any survive).
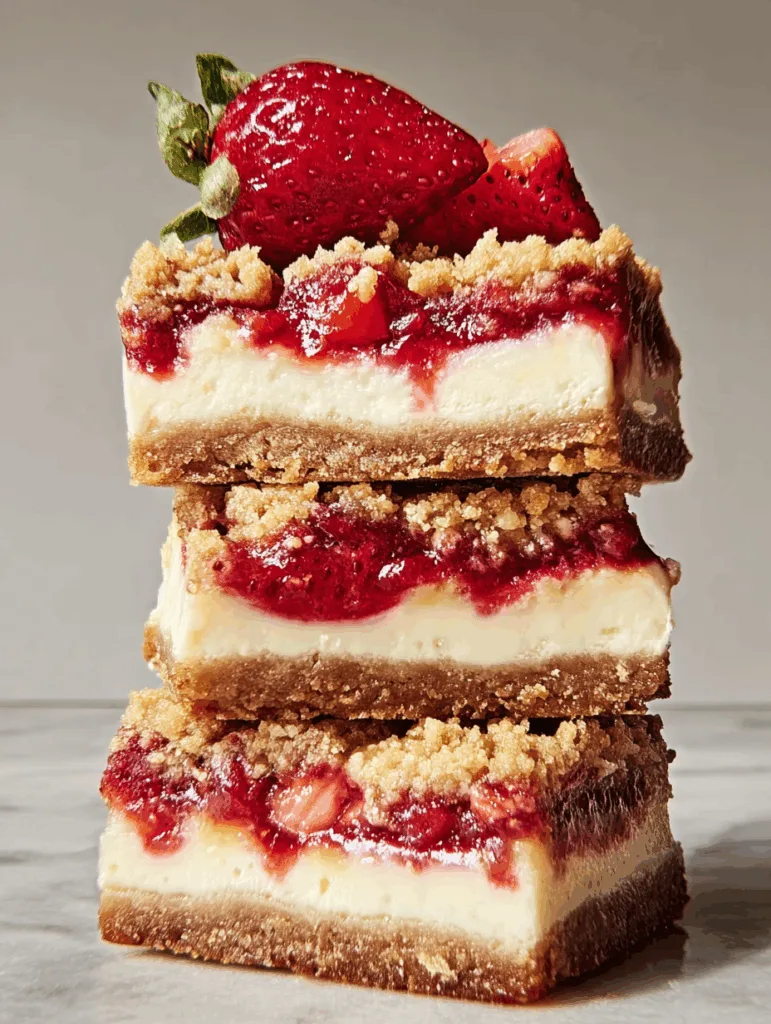
Strawberry Cheesecake Bars Start with Layers of Flavor
Building the Perfect Crust Base
The first bite sets the stage. A good base adds structure and a touch of buttery sweetness to balance the creamy and fruity layers. For this recipe, we use finely ground graham cracker crumbs mixed with melted butter, sugar, and just a pinch of salt. The trick is getting the consistency right the mixture should resemble wet sand and hold when pressed between your fingers.
- Use a measuring cup or the back of a spoon to pack the crust evenly into your lined baking pan.
- Don’t rush the pre-bake. Letting it firm up in the oven ensures a crisp layer that won’t get soggy once topped.
- Cool the crust completely before layering on the filling.
If you’ve made our mini cheesecake cups, you know a solid crust can transform a dessert from basic to bakery-style.
Fresh Strawberry Topping Done Right
What makes these bars standout is that they don’t rely on packaged filling. Instead, the topping is made from real chopped strawberries gently cooked with sugar, fresh lemon juice, and a bit of cornstarch to thicken.
- Simmer until the mixture boils and begins to thicken, releasing the strawberries’ juices.
- Stir and mash gently to get the right jam-like consistency.
- Let it cool slightly before spooning over the cream cheese layer.
This fresh fruit layer adds bright flavor and a juicy texture that complements the creamy base without overpowering it. If you’re into fruity desserts, these bars offer the same satisfaction you’d find in our lemon pie bars.
Recipe
Print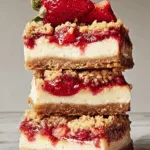
Strawberry Cheesecake Bars
- Total Time: 4 hrs 30 mins
- Yield: 16 bars 1x
- Diet: Vegetarian
Description
These strawberry cheesecake bars feature a crunchy graham cracker crust, creamy vanilla filling, fresh strawberry topping, and buttery crumble. A simple and impressive make-ahead dessert.
Ingredients
- Cooking spray
- 1 1/2 cups finely ground graham cracker crumbs (150 g)
- 6 tbsp unsalted butter, melted (85 g)
- 1/4 cup granulated sugar (50 g)
- 1/4 tsp kosher salt
- 3 cups chopped strawberries (450 g)
- 1/4 cup granulated sugar (50 g)
- 2 tbsp lemon juice (30 ml)
- 1 tbsp cornstarch (8 g)
- 2 blocks cream cheese, room temperature (16 oz / 450 g)
- 2 large eggs
- 1/3 cup granulated sugar (67 g)
- 1 tsp vanilla extract (5 ml)
- 1/4 tsp kosher salt
- 3/4 cup all-purpose flour (90 g)
- 1/4 cup packed dark brown sugar (50 g)
- 1/4 tsp ground cinnamon
- 1/4 tsp kosher salt
- 5 tbsp unsalted butter, melted (70 g)
- Halved strawberries, for topping
Instructions
- Preheat oven to 350°F (175°C). Line a 9″x9″ baking pan with parchment and spray lightly with oil.
- In a bowl, mix graham cracker crumbs, sugar, salt, and melted butter until it resembles wet sand.
- Press mixture evenly into prepared pan and bake for 12 minutes. Let cool on a wire rack.
- In a saucepan, cook chopped strawberries with sugar, lemon juice, and cornstarch over medium heat. Mash gently and simmer until thickened. Let cool.
- Beat cream cheese, eggs, sugar, vanilla, and salt in a large bowl until smooth and creamy.
- In another bowl, whisk flour, brown sugar, cinnamon, and salt. Stir in melted butter until crumbly.
- Pour cream cheese filling over crust. Gently spoon strawberry mixture on top. Crumble topping over everything.
- Bake for 35 minutes or until set. Cool completely, then chill at least 1 hour.
- Use parchment overhang to lift from pan. Slice into squares and top with halved strawberries.
Notes
- Use a warm knife for clean slices
- Bars keep in the fridge for up to 4 days
- Do not freeze for best texture
- Chill fully before slicing to prevent soft centers
- Prep Time: 15 mins
- Cook Time: 35 mins
- Category: Dessert
- Method: Baking
- Cuisine: American
Nutrition
- Serving Size: 1 bar
- Calories: 302
- Sugar: 17
- Sodium: 240
- Fat: 21
- Saturated Fat: 11
- Unsaturated Fat: 9
- Trans Fat: 0
- Carbohydrates: 25
- Fiber: 1
- Protein: 4
- Cholesterol: 75
Creamy Filling That Holds Its Shape
The Key to Smooth, Creamy Texture
The star of these bars is undeniably the rich cream cheese filling. But achieving that perfectly smooth, velvety consistency requires a few smart steps. Room-temperature cream cheese is essential it blends easier and creates a lump-free mixture. If you’ve ever had cracks in cheesecake, chances are the batter wasn’t smooth or overmixed.
When mixing:
- Use a handheld mixer on medium speed to avoid over-beating
- Add the eggs one at a time, mixing just until combined
- Scrape the sides of the bowl to ensure everything incorporates evenly
The addition of vanilla gives the filling that classic cheesecake flavor, while a pinch of salt balances the sweetness. The result? A filling that bakes up soft yet sliceable no messy center, no weird air pockets.
If you’ve enjoyed the creamy consistency in our easy banana pudding squares, this cheesecake layer will be just as rewarding.
How to Layer Without Mixing Things Up
Layering the components right is what gives these bars their signature look. Here’s how to do it cleanly:
- After the crust is cooled, pour the cream cheese filling in gently. Use an offset spatula or the back of a spoon to spread it evenly.
- Spoon the strawberry topping carefully over the cream cheese layer. You don’t need to swirl the contrast looks beautiful on its own.
- Finally, crumble the buttery topping evenly across the surface, making sure to cover the bars well without pressing down.
This gentle assembly technique ensures the clean, distinct layers survive baking and chilling. When you cut into the bars, you’ll get that photo-worthy reveal every time.
Crumb Topping & Chill Time Make All the Difference
Why the Crumb Layer Finishes It All
That final crumble on top isn’t just decorative it adds a buttery crunch that brings balance to every bite. The texture contrast between the smooth filling and golden topping makes these bars irresistible. What’s more, the flavor is deepened with cinnamon and brown sugar, which pairs beautifully with strawberries.
To make it right:
- Whisk the flour, brown sugar, cinnamon, and salt first
- Add melted butter and mix until a crumbly dough forms
- Sprinkle evenly don’t pack it down
As the bars bake, the crumble firms up slightly while still keeping a soft, cookie-like bite. When cooled, it stays golden and crisp without going dry.
If you’ve made our strawberry shortcake muffins before, you’ll love how the crumble brings similar cozy vibes to these bars.
Cooling and Chilling: Don’t Skip This Step
Patience really pays off here. After baking, the bars should cool at room temperature to help everything set properly. Cutting into warm bars will result in a messy filling that hasn’t settled. After cooling:
- Refrigerate for at least an hour, preferably longer if you have time
- Use the parchment overhang to lift the slab out of the pan
- Slice with a sharp knife, wiping clean between cuts for smooth edges
This extra step transforms the bars from soft and wobbly to sliceable and portable. The filling becomes firm but creamy, and the topping stays intact.
Planning ahead? These bars can easily be made a day in advance and stored in the fridge. They’re a great make-ahead option, like our no-bake strawberry icebox cake perfect for parties or prepping before a busy week.
Storing, Serving & Easy Variations to Try
Storage Tips That Keep Bars Fresh
These bars aren’t just pretty they’re practical too. Once cooled and sliced, they hold up well in the fridge for several days, making them perfect for planning ahead.
Here’s how to store them properly:
- Place bars in a single layer in an airtight container
- Store in the refrigerator for up to 4 days
- Avoid stacking unless you separate layers with parchment
- Do not freeze the fresh strawberries and cream layer may separate
Before serving, let the bars sit at room temperature for 10–15 minutes for the best texture. If you’re bringing them to a gathering, keep them chilled during transport to maintain their structure.
Like our cherry crumble dessert bars, these sliceable treats are a crowd-pleaser that travel well and taste even better the next day.
Simple Variations to Keep It Fresh
Once you’ve made the original version, it’s easy to customize this recipe based on what you have or what’s in season. Here are a few easy swaps and twists:
- Berry Swap: Use blueberries, raspberries, or a mix
- Citrus Twist: Add lemon zest to the filling for a citrus kick
- Spiced Crust: Add a pinch of nutmeg or cardamom to the crumb topping
- Chocolate Drizzle: Melt and drizzle white chocolate after cooling
- Mini Bar Option: Make these in muffin tins for personal-sized cheesecake bites
The beauty of this recipe lies in its flexibility. Stick with the original when you’re craving strawberry classics, or adapt with what you love. Just like our fans love the playful spin in our carrot cake cheesecake bars, you can confidently make these your own.
Final Thoughts
Strawberry cheesecake bars deliver everything you love about a full cheesecake but in a more manageable, snackable square. The crust is crisp, the filling creamy, the topping fresh and sweet, and that final crumble? Pure comfort. With a little planning and some fridge time, you’ll have bakery-style dessert bars that slice clean, taste rich, and satisfy every sweet craving.
Whether you’re prepping for a party or just treating your family midweek, these bars tuck perfectly into any occasion. Once you try them, don’t be surprised if they end up in your regular rotation.
Tuck in & enjoy every bite.