Light, golden, and irresistibly fluffy, gluten free beignets are the treat you didn’t know you were missing. These crisp pillows of sweet dough are easy to make at home and impossible to resist.
What Makes Gluten Free Beignets So Special
If you’ve ever had a classic beignet, you know they’re like edible clouds: soft, puffy, and dusted in sweet powdered sugar. But here’s the thing. Gluten free beignets hold their own. They bring that same charm without any gluten, and once you take a bite, you’ll see just how close they come to the original.
How gluten free beignets differ from regular ones
You might be wondering, can a gluten free version really compare? The answer is yes, and here’s why. Traditional beignets rely on gluten for structure and elasticity. But in this version, yeast takes care of the rise, while a good gluten free flour blend gives just enough hold to puff beautifully in hot oil.
Instead of regular dairy, canned coconut milk brings a creamy richness. Paired with melted plant-based butter, the dough turns soft and moist without getting heavy. The result is a light, airy inside and a crisp golden crust that gives the perfect bite.
These aren’t just lookalikes. They hit the right texture, flavor, and feel. With a little powdered sugar on top, it’s everything you love in a beignet without missing anything.
Perfect for family treats or special mornings
Beignets have a way of turning a simple morning into something special. Whether it’s a weekend brunch or a surprise after-dinner treat, gluten free beignets fit right in. They’re fun to fry, quick to serve, and easy to customize with different toppings or fillings.
Kids love them just as much as grown-ups. They’re just the kind of sweet surprise that stands next to kid-friendly treats like marshmallow bars or dipped snacks.
And here’s a tip. You can make the dough ahead of time and fry when you’re ready to serve. They’re best fresh, but leftover beignets can be warmed in the oven for a crisp bite again.
Recipe
Print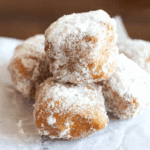
Fluffy Gluten Free Beignets
- Total Time: 1 hour 25 minutes
- Yield: 20 beignets 1x
- Diet: Gluten Free
Description
Light, fluffy, and golden, these gluten free beignets are the perfect fried dessert. Crisp outside, pillowy inside, and dusted with sugar. A sweet bite every home cook can master.
Ingredients
- 2 teaspoons dry active yeast
- 6 tablespoons warm water (110º F) (90 ml)
- 2 tablespoons cane sugar
- 1 ½ cups gluten free flour blend (180 g)
- ⅛ teaspoon salt
- ⅓ cup canned coconut milk (80 ml)
- 1 large egg
- 2 tablespoons melted plant-based butter (30 g)
- 2 cups high-heat oil like canola or coconut (480 ml)
- ½ cup powdered sugar (60 g)
Instructions
- Add the warm water, dry yeast, and cane sugar to a small bowl and let sit for 10 minutes until frothy.
- In a larger bowl, whisk together the flour blend and salt.
- Pour in the yeast mixture, egg, coconut milk, and melted butter. Mix until a soft dough forms.
- Cover the bowl with plastic wrap and let rise in a warm place for 45–60 minutes.
- Roll the dough on wax paper lightly dusted with gluten free flour to ½ inch thick.
- Cut into 1-inch squares using a sharp knife or pizza cutter.
- Heat oil in a deep skillet to 350º F. Add beignets a few at a time. Fry for 1½ minutes per side.
- Remove and place on paper towels to drain excess oil.
- Toss the warm beignets in powdered sugar and serve immediately.
Notes
- If using a flour blend without xanthan gum, add 1 teaspoon to support structure.
- Use full-fat canned coconut milk with no solid lumps for the best texture.
- Keep oil temperature steady at 350º F for even frying.
- Let cut dough rest a few minutes before frying to improve puffing.
- Reheat leftovers in a warm oven to re-crisp.
- Prep Time: 15 minutes
- Cook Time: 10 minutes
- Category: Gluten Free Dessert Recipes
- Method: Fried
- Cuisine: American
Nutrition
- Serving Size: 1 beignet
- Calories: 124
- Sugar: 5g
- Sodium: 29mg
- Fat: 40g
- Saturated Fat: 2g
- Trans Fat: 1g
- Carbohydrates: 11g
- Fiber: 1g
- Protein: 2g
- Cholesterol: 8mg
Tips for Making the Perfect Dough Without Gluten
Getting the right texture in a gluten free dough can feel tricky, but don’t worry — it’s all about balance. With the right flour blend and a few key tricks, your dough will be soft, easy to work with, and perfect for frying.
Choosing the right gluten free flour blend
Not all gluten free flours behave the same way. That’s why the choice of blend makes a big difference in your beignet dough. For this recipe, a blend that includes a binding agent like xanthan gum or guar gum is important. These help replicate the stretchiness that gluten usually provides.
Cup4Cup is one of the best options here. It creates a soft dough that rises well and fries up light and airy. Some blends, like Bob’s Red Mill 1-to-1, may not rise as much because they’re not designed for yeast recipes. If your flour doesn’t include xanthan gum, just add 1 teaspoon per batch to support structure and elasticity.
If you’re experimenting with a different flour blend, pay attention to texture. The dough should be soft but not sticky. Too wet? Add a bit more flour. Too dry? A splash of extra coconut milk usually does the trick. Getting that balance right means your beignets will puff up beautifully when they hit the oil.
You can use this tip across recipes, like when working with creamy desserts such as the mini banana pudding cheesecake. Both benefit from choosing the right flour base and knowing how to handle it.
How to handle and roll gluten free dough easily
Once your dough has risen, it’s time to roll it out. This step can make or break your beignets, especially with a gluten free mix. Because the dough can be a little more delicate, be gentle and avoid overhandling.
Start by placing the dough on a sheet of wax paper lightly dusted with gluten free flour. This helps prevent sticking and makes cleanup faster. Use a floured rolling pin to roll the dough to about half an inch thick. Thinner than that, and the centers won’t stay soft. Thicker than that, and they might not cook through properly.
When cutting the dough into squares, a pizza wheel or sharp knife works best. Aim for uniform 1-inch pieces so they cook evenly. Don’t worry if the edges aren’t perfect, once fried and dusted, every piece will look golden and delicious.
Let the cut dough sit for just a few minutes while you heat your oil. This short rest helps them puff better. And remember, gluten free dough doesn’t behave exactly like regular dough, but with these tips, you’ll get light, fluffy results every time.
Frying Without Fuss – Crispy on the Outside, Cloud-Like Inside
Frying might sound intimidating, but it’s easier than you think when you know what to watch for. With the right oil and temperature, your beignets will puff beautifully, turn golden all around, and stay soft and airy on the inside.
Best oils for frying gluten free beignets
The oil you use matters more than you might expect. Some oils aren’t stable at high temperatures and can break down or burn before the beignets even start to cook. For this recipe, you need a neutral-flavored oil that can handle the heat. Canola oil and refined coconut oil are both great options.
These oils perform best around 350 degrees Fahrenheit. That’s the sweet spot. Too hot and the outside darkens too fast while the inside stays raw. Too cool and your beignets won’t puff properly. Instead, they’ll absorb excess oil and turn greasy instead of crisp.
If you have a thermometer, clip it to the side of your skillet to monitor the temperature throughout frying. If not, drop in a small piece of dough to test. It should immediately sizzle and begin to float after a few seconds.
Make sure your oil is deep enough so the beignets float freely. If they sit close to the bottom, they can burn or develop uneven spots. A Dutch oven or deep cast iron pan works well to maintain consistent heat and space.
Getting the frying right is essential for that perfect bite. It’s the same attention to detail needed in soft-set treats like vegan ricotta cheesecake, where the texture makes all the difference.
How to tell when your beignets are ready
Once the oil is hot and steady, carefully add a few dough squares at a time. Don’t overcrowd the pan. Too many pieces will drop the temperature and cause soggy, heavy results. Give each one space to puff and turn easily.
Each side needs about 90 seconds to cook. You’re looking for a light golden color and a soft rise as the dough expands. Use a slotted spoon or spatula to flip them gently once the first side is golden. The second side usually cooks a little faster, so stay close and watch the color.
Properly cooked beignets will be golden, lightly crisp, and puffy. When they float and develop that gentle crust, it’s time to remove them. Transfer to a paper towel-lined tray to drain any excess oil. This step keeps them from turning soggy after frying.
Now for the final touch. While still warm, toss each beignet in powdered sugar. It clings best to warm surfaces and gives that soft, sweet finish without becoming sticky or overly messy.
You can enjoy them right away, or serve alongside a cool dessert like strawberry sago for a satisfying temperature contrast.
To store, let them cool completely and place in an airtight container. They’ll stay fresh for up to three days. Reheat in a warm oven before serving to bring back the crisp outer shell. But really, they rarely last long enough for leftovers.
Creative Twists and Serving Ideas for Beignets
Once you’ve mastered the classic version, it’s time to have a little fun. Beignets are the kind of treat that invites creativity. Whether you’re adding flavor, swapping coatings, or building a dessert plate, there are plenty of ways to make these gluten free bites even more exciting.
Flavor upgrades: dustings, drizzles, and dips
The classic powdered sugar finish is timeless. But if you’re ready to change things up, you have options. A light sprinkle of cinnamon with the sugar brings a cozy touch. You can also add a little citrus zest to the coating for a refreshing hint of lemon or orange.
If you’re into richer toppings, try a drizzle of chocolate sauce or a dip in vanilla glaze. Even a quick honey drizzle can make a big difference. Serve with small ramekins of jam, melted chocolate, or flavored cream cheese dip so everyone can build their own plate.
Pair your warm beignets with a cup of coffee or a glass of cold milk. They’re also lovely on a brunch table alongside something like no bake cheesecake recipes for a sweet spread everyone will love.
For a finishing touch, you can roll beignets in a sugar mix before serving. Think cocoa and sugar for a mocha vibe or crushed freeze-dried berries for a pop of color and tartness.
Fun variations to try at home
Want to give your beignets a seasonal spin or make them even more festive? There are a few easy ways to remix the base recipe.
Try adding a touch of spice to the dough. A pinch of cinnamon or nutmeg works well in the fall. In spring and summer, serve them with fresh fruit on the side. Think macerated strawberries or a light mango purée. You could even fill them with fruit jam using a piping bag once fried.
Mini beignets are another fun idea. Just cut the dough into smaller squares and fry as usual. These bite-size versions are great for parties or dessert boards. You can set them next to chilled favorites like no bake banana split dessert for a warm and cold combo.
For extra crunch, dust beignets with finely chopped toasted nuts or shredded coconut after frying. Just press the topping in gently so it sticks.
You can even create themed toppings for holidays. Red and green sugar for winter, pastel sprinkles for spring, or pumpkin spice powder for fall. They’re easy to dress up and always a hit at gatherings.
Final Thoughts
Gluten free beignets bring comfort, flavor, and a little bit of celebration to any kitchen. With just a handful of pantry staples and a bit of warm oil, you can create something that feels truly special.
They’re crisp, fluffy, and versatile enough to enjoy plain or dressed up. Whether you’re making them for your family, brunch guests, or just because the craving hits, these beignets deliver joy in every bite.
And if you’re craving more sweet inspiration, try something chilled like the vegan ricotta cheesecake for your next dessert night.
Happy frying, and don’t forget, a dusting of sugar is the only decoration these need.