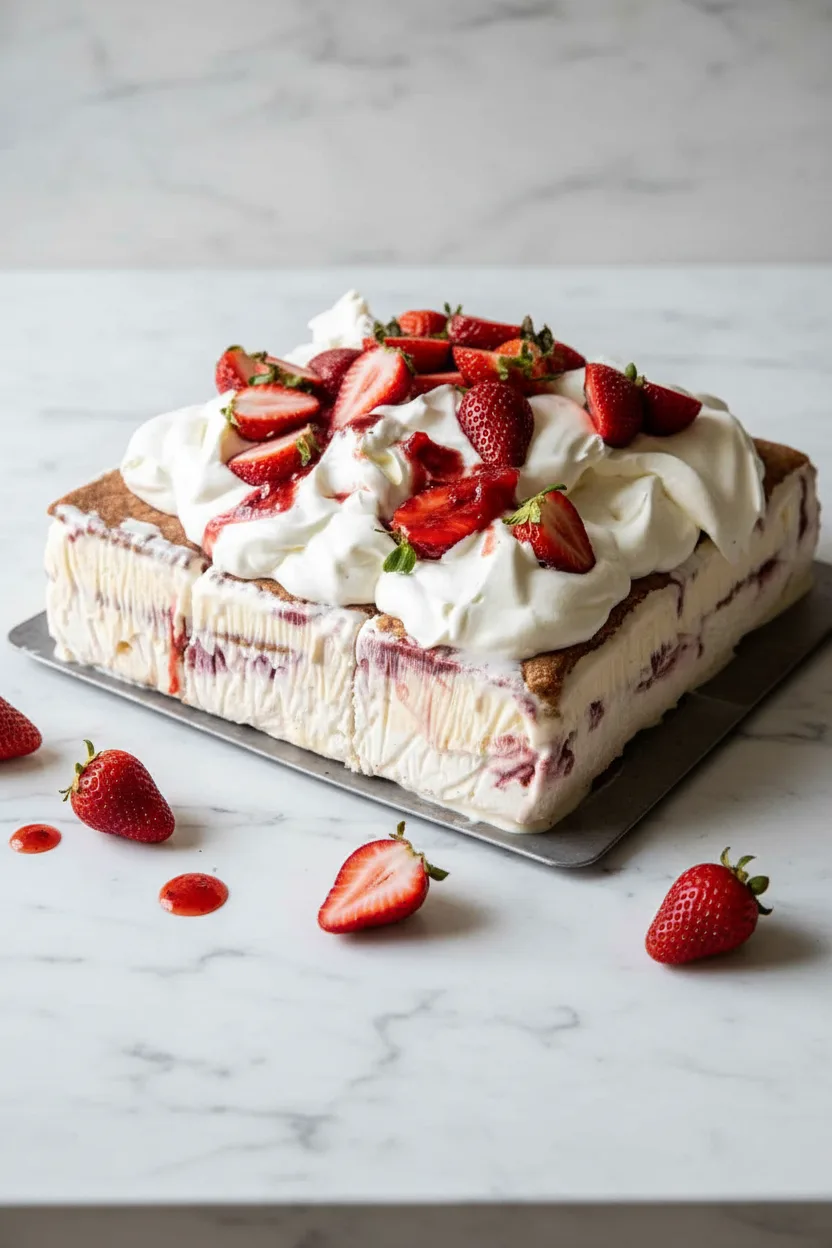
Imagine a dessert that combines the nostalgic crunch of graham crackers with the creamy indulgence of ice cream, all layered with sweet strawberry jam and fresh fruit. This Easy Strawberry Ice Cream Cake Dessert is that dream come true, and it requires absolutely no baking. It’s the perfect make-ahead treat for a warm summer day, a special birthday, or any occasion that calls for something spectacular yet simple.
By assembling layers of simple ingredients and letting the freezer do the work, you create a stunning, shareable dessert that’s both elegant and incredibly fun to eat. Everyone will be asking for the recipe after just one bite of this frozen masterpiece.
Why You’ll Love This Strawberry Ice Cream Cake
You will adore this dessert for its perfect balance of textures and flavors. The creamy vanilla layers contrast beautifully with the crunchy graham cracker base, while the sweet strawberry jam and fresh fruit add a vibrant, fruity punch. Furthermore, this recipe is incredibly forgiving and customizable.
You can use different flavors of ice cream or jam to suit your taste. Best of all, it’s a no-bake wonder, saving you time and keeping your kitchen cool. This cake is a guaranteed crowd-pleaser that looks far more impressive than the effort required to make it.
Recipe
Print
Easy Strawberry Ice Cream Cake Dessert
- Total Time: 4 hr 30 min
- Yield: 9 servings 1x
Description
A stunning no-bake dessert with layers of graham crackers, creamy vanilla, sweet strawberry jam, and fresh fruit.
Ingredients
- 2 cups heavy cream
- 1/2 cup powdered sugar
- 2 teaspoons vanilla extract
- 18–20 sheets cinnamon graham crackers
- 2 –3 pints vanilla ice cream
- 1 jar (12-16 ounce) strawberry jam
- 1 cup sliced fresh strawberries
Instructions
- Line a 9-inch square baking pan with parchment paper.
- Using an electric mixer, whip 1 cup of cream with 1/4 cup powdered sugar and 1 teaspoon vanilla until soft peaks form.
- Layer the graham crackers in the bottom of the prepared pan. Layer with 1/2 of the vanilla ice cream, then spread over 1/2 of the whipped cream. Swirl the cream with 1/2 of the strawberry jam.
- Add another layer of graham crackers, the remaining ice cream, and whipped cream. Swirl with the remaining jam, reserving 2 tablespoons. Layer with crackers. Wrap the cake and freeze 4 hours or until frozen.
- Remove the cake from the freezer. Use the parchment paper to lift the cake out of the pan. Let sit 5 minutes, then slice into 9 pieces.
- Whip the remaining 1 cup of cream with 1/4 cup sugar, and 1 teaspoon vanilla. Spread over the cake. Swirl with reserved jam and sliced strawberries. Serve and enjoy immediately.
Notes
- Let ice cream soften slightly for easier spreading.
- Use a hot knife for clean slices.
- Add final whipped cream and strawberry garnish just before serving.
- Prep Time: 30 min
- Category: Main Course
- Method: Baked
- Cuisine: American
Nutrition
- Calories: 441 kcal
Ingredients and Substitutions
Gathering your ingredients is the first step to dessert success. This recipe uses common items that come together magically.
Base Components
- Graham Crackers: These form the essential crunchy layers. You can use honey or cinnamon varieties. For a different twist, try using vanilla wafers or even thin chocolate cookies.
- Vanilla Ice Cream: The star of the creamy layers. Use a high-quality, creamy vanilla for the best texture. For a dairy-free version, a rich coconut milk or almond milk ice cream works wonderfully.
- Heavy Cream: Whipped into fluffy peaks, this creates a light, mousse-like layer. For a lighter option, you can use a stabilized whipped topping, though the flavor of real cream is superior.
Sauce and Seasonings
- Strawberry Jam: This provides the sweet, swirled fruit flavor. Feel free to substitute with raspberry, apricot, or blueberry jam. Using a seedless jam gives a smoother swirl.
- Fresh Strawberries: Sliced strawberries add a fresh, bright note and beautiful garnish. Other berries like raspberries or blueberries would be equally delicious.
- Powdered Sugar and Vanilla Extract: These sweeten and flavor the whipped cream. You can adjust the sugar to your liking. Pure vanilla extract gives the best flavor.
If you love no-bake, fruity desserts, you might also enjoy the vibrant layers of a Rainbow Flower Baby in Bloom Cake, which offers a similar playful assembly.
How to Make Strawberry Ice Cream Cake
Making this ice cream cake is a straightforward process of layering and freezing. Let’s walk through each simple step.
Step 1: Prepare the Pan and Whipped Cream
First, line a 9-inch square baking pan with parchment paper, leaving some overhang on the sides. This will act as a sling to easily lift the frozen cake out later. Then, in a large bowl, use an electric mixer to whip one cup of heavy cream with a quarter cup of powdered sugar and one teaspoon of vanilla extract. Whip until soft peaks form, which means the cream holds its shape but the tip curls over when you lift the beaters. Set this aside.
Step 2: Build the First Layers
Now, begin assembling. Place a single layer of graham crackers in the bottom of your prepared pan, breaking them to fit as needed. Next, scoop out about half of your vanilla ice cream. Working quickly, spread it in an even layer over the crackers.
It’s okay if it’s a bit soft. Then, spread half of your freshly whipped cream over the ice cream layer. Take half of the strawberry jam and dollop it over the whipped cream. Use a knife or skewer to gently swirl the jam into the cream, creating a marbled effect.
Step 3: Repeat and Freeze
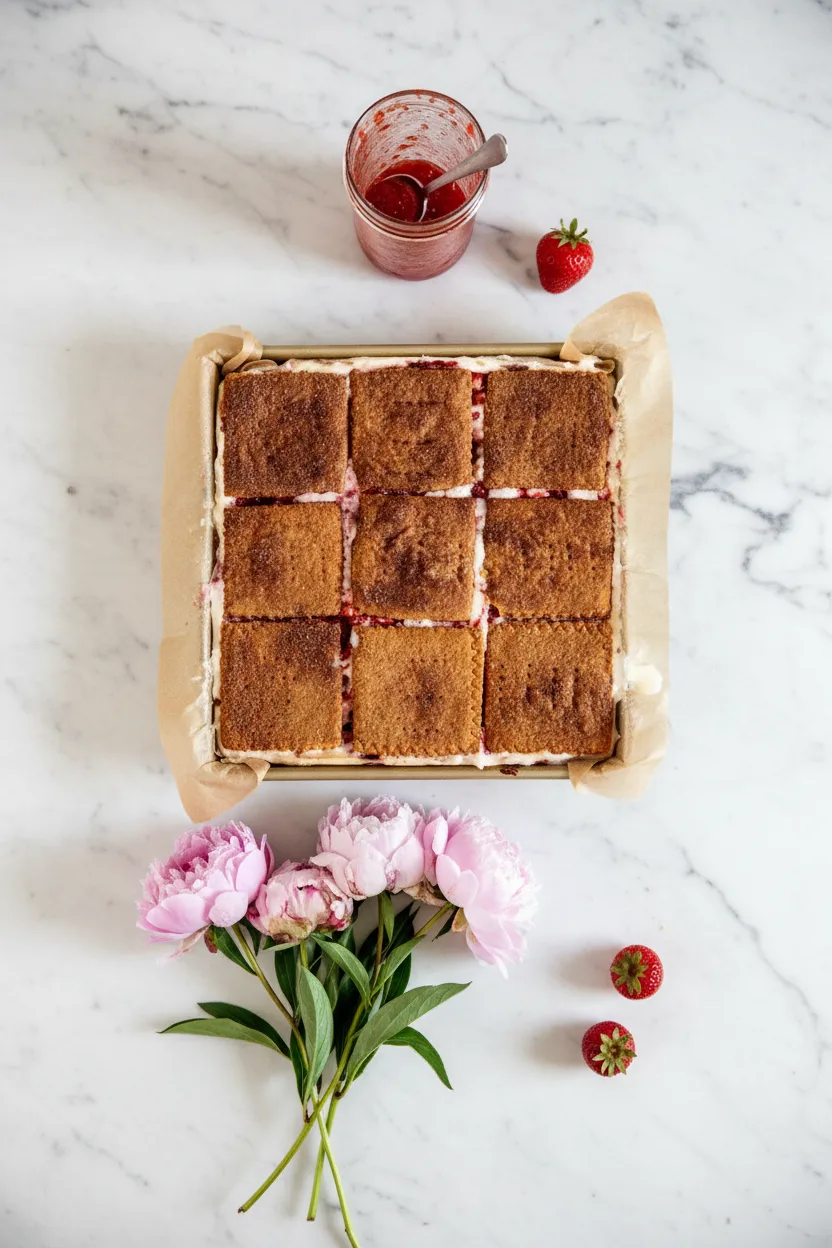
Add another layer of graham crackers on top of the swirled cream. Then, spread the remaining vanilla ice cream, followed by the rest of the whipped cream. Swirl the remaining jam (reserving about two tablespoons for later) into this top layer of cream. Finish with a final layer of graham crackers.
Gently press down to compact the layers slightly. Carefully wrap the entire pan tightly with plastic wrap and place it in the freezer. Freeze for at least four hours, or until the cake is completely firm and set.
Step 4: Garnish and Serve
When ready to serve, remove the cake from the freezer. Use the parchment paper overhang to lift the entire cake block out of the pan and onto a cutting board. Let it sit at room temperature for about five minutes to slightly soften for easier slicing. Meanwhile, whip the second cup of heavy cream with the remaining quarter cup of powdered sugar and teaspoon of vanilla.
Spread this fresh whipped cream over the top of the cake. Dollop and swirl the reserved two tablespoons of jam into this topping. Finally, decorate with the sliced fresh strawberries. Slice into nine squares and serve immediately. For another stunning no-bake cake idea, explore the delicate design of a Baby in Bloom Painted Cake.
Pro Tips for Success
Follow these expert tips to ensure your ice cream cake turns out perfect every single time. First, work efficiently when spreading the ice cream. Letting it soften on the counter for five to ten minutes makes it easier to spread without tearing the layers underneath. However, do not let it melt.
Second, when swirling the jam, use a light hand. A few figure-eight motions with a knife are enough to create a beautiful marbled look without completely mixing the jam into the cream. Third, for the cleanest slices, dip a sharp knife in hot water and wipe it dry between each cut.
This will give you neat, professional-looking pieces. Finally, ensure your whipped cream is cold. Chill your bowl and beaters in the freezer for ten minutes before whipping for the best volume and stability.
Flavor Variations
The basic formula of this dessert is a canvas for your creativity. Try a chocolate lover’s version by using chocolate ice cream and swirling with chocolate sauce instead of jam. You could also use crushed chocolate sandwich cookies for the base layers. For a tropical twist, use coconut ice cream and swirl with passion fruit curd or mango puree, topping with toasted coconut flakes.
A cookies and cream variation is fantastic too. Simply use cookies and cream ice cream and mix crushed chocolate sandwich cookies into the whipped cream layers. The possibilities are truly endless, allowing you to tailor the dessert to any season or preference.
Serving Suggestions
This ice cream cake is delightful on its own, but a few simple additions can elevate it into a restaurant-worthy presentation. Serve each slice with an extra dollop of whipped cream and a few more fresh strawberry slices on the side. A drizzle of caramel or chocolate sauce adds a touch of decadence.
For a contrasting texture, sprinkle some chopped nuts like toasted almonds or pecans over the top. If you’re serving a crowd, consider pairing it with a lighter option, like the refreshing citrus notes found in a Naked Lemon Blueberry Baby in Bloom Cake. This creates a wonderful dessert spread with options for everyone.
Storage and Freezing Instructions
This cake stores beautifully, making it the ultimate make-ahead dessert. After the initial assembly and freeze, you can keep the fully wrapped cake in the freezer for up to two weeks.
Do not add the final whipped cream and strawberry garnish until just before you plan to serve it. If you have leftovers, cover the cut sides with plastic wrap and return the remaining cake to the freezer.
It will keep for about five days, though the graham crackers may soften slightly over time. For best texture and flavor, consume leftovers within a week. You cannot refreeze the cake once it has fully thawed, so only take out what you plan to serve.
FAQs About Strawberry Ice Cream Cake
Here are answers to the most common questions about making this delightful dessert.
Can I make this cake ahead of time?
Absolutely. This is the perfect make-ahead dessert. You can assemble the entire cake, freeze it, and store it for up to two weeks before serving. Simply add the final whipped cream and fresh strawberry garnish right before you are ready to present it.
Can I use a different type of ice cream?
Yes, you can. Feel free to experiment with your favorite flavors. Strawberry, chocolate, or coffee ice cream would all be delicious. Just ensure it’s a quality, creamy ice cream for the best layered texture.
My ice cream is too hard to spread. What should I do?
Let the ice cream container sit at room temperature for five to ten minutes to soften slightly. You should be able to scoop and spread it easily, but it should not be soupy or melted. Working in sections can also help.
How do I prevent the graham crackers from getting soggy?
The key is to work quickly during assembly and get the cake into the freezer promptly. The frozen environment halts the moisture transfer. Using full-fat ice cream and well-whipped cream also creates a barrier that helps protect the cracker layers.
Can I make this in a different pan?
A 9-inch springform pan works wonderfully for a round cake presentation. A 9×13-inch pan will yield a larger, thinner cake, so you may need to adjust the number of graham cracker layers slightly. The parchment paper sling is still recommended for easy removal.
Final Thoughts
This Easy Strawberry Ice Cream Cake Dessert proves that the most impressive treats are often the simplest to create. With no baking required and a short list of familiar ingredients, you can produce a show-stopping dessert that delights guests of all ages. The process of layering is fun, and the reward of a cool, creamy, and crunchy slice is unmatched.
Whether for a birthday, a holiday, or just a regular Tuesday that needs a sweet lift, this cake is the answer. So gather your ingredients, clear some freezer space, and get ready to make a dessert that will become a new favorite in your recipe collection. Enjoy every delicious, frosty bite.