A quick and delightful bite into buttery, crumbly joy. Danish butter cookies are the ultimate go-to for holiday trays, afternoon tea, or last-minute sweet cravings. This easy, homemade version brings that iconic melt-in-your-mouth texture with a twist: no unnecessary ingredients, just pure, family-friendly goodness.
What Makes Danish Butter Cookies So Irresistible?
There’s something magical about biting into a Danish butter cookie. The delicate crunch, the soft buttery center, and that familiar shape everyone loves. Whether you’re prepping for a holiday platter or craving a cozy treat with coffee, these cookies check all the boxes.
The Signature Buttery Crumble
These cookies are famous for their texture. Thanks to a generous amount of butter, they’re rich but never overwhelming. The trick lies in how the butter and sugar are creamed together. It needs to be light and fluffy before anything else is added. That’s what gives each cookie its tender crumb and golden edges.
Simple Pantry Ingredients, Elegant Results
You don’t need anything fancy. Just real butter, granulated sugar, flour, one egg, and a splash of vanilla extract. That’s all it takes to get the same iconic taste you find in those festive tins. No preservatives. No fuss. Just the kind of comfort that comes from baking something from scratch. These cookies offer the same satisfying ease and elegance you’ll find in our no-bake cheesecake recipes.
Recipe
Print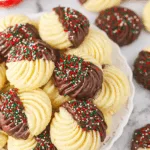
Danish Butter Cookies
- Total Time: 25 minutes
- Yield: 30 cookies 1x
Description
A buttery classic made from simple ingredients, Danish Butter Cookies are crisp on the edges, tender in the center, and perfect for any holiday tray or afternoon tea moment. Dip in chocolate and decorate as you like.
Ingredients
- 1 cup (224 g) unsalted butter, room temperature
- 2/3 cup (138 g) granulated sugar
- 1 large egg
- 1 teaspoon vanilla extract
- 2 1/4 cups (293 g) all-purpose flour
- 1/2 teaspoon salt
- 1–3 teaspoons milk
- 6–8 ounces melting chocolate (cocoa butter-based)
- Sprinkles (optional, ingredient-checked)
Instructions
- Preheat oven to 350°F (180°C). Line baking sheets with parchment or silicone mats.
- Cream the butter and sugar on medium speed for 3 to 4 minutes until pale and fluffy.
- Add the egg and beat until fully combined.
- Mix in vanilla extract.
- Add flour and salt. Stir until just combined, then finish mixing with a spatula if needed.
- Add milk one teaspoon at a time until the dough is soft enough to pipe.
- Pipe dough using an open star tip (like Ateco 825) onto the prepared sheet.
- Bake for 8 to 10 minutes or until edges begin to turn golden.
- Let cookies rest for 2 to 3 minutes on the tray, then transfer to a wire rack to cool.
- Melt the chocolate and dip half of each cookie. Shake off excess and add sprinkles if using.
Notes
- Measure flour carefully to avoid dense dough. Use a food scale if possible.
- Cookies are more flavorful after resting overnight in an airtight container.
- Store at room temperature for 5 to 7 days or freeze for up to 3 months.
- Decorate after freezing for a fresher look when serving.
- Prep Time: 15 minutes
- Cook Time: 10 minutes
- Category: Dessert
- Method: Oven
- Cuisine: Danish
Nutrition
- Serving Size: 1 cookie
- Calories: 147
- Sugar: 8.7 g
- Sodium: 48.7 mg
- Fat: 8.7 g
- Carbohydrates: 15.9 g
- Protein: 1.7 g
- Cholesterol: 24 mg
How to Perfect the Dough and Piping Technique
Getting the dough right is the secret behind Danish butter cookies that hold their shape and deliver that crisp, tender bite. If your cookies tend to spread too much or lose their design in the oven, these tips will help you fix that fast.
Mastering the Creaming Method
Begin with butter that is soft, not greasy. When you beat it with sugar, take your time. This step is not just about combining ingredients. It is about building structure. Beat for at least three minutes until the mixture becomes pale and fluffy. That air gives your cookies a light texture and clean edge after baking.
Once the butter and sugar are ready, add the egg. Mix just until it blends in. Next, pour in the vanilla. That little step adds warmth and depth to the flavor.
Now add the flour and salt. Mix slowly and stop as soon as the dough comes together. Do not keep mixing once the dry ingredients disappear. Overmixing will make the cookies dense and chewy, not delicate and crisp.
Piping Tips That Make a Difference
Piping shapes these cookies into elegant swirls and shells. But soft dough loses its shape and spreads. Here is how to avoid that problem:
- If the dough feels too soft, chill it for 10 minutes before piping.
- If the dough feels too thick, add a teaspoon of milk and test it again.
- Use an open star tip such as Ateco 825. Closed tips press the dough too tightly and blur the lines.
Test a small batch first. Pipe a swirl onto the tray and wait a few seconds. If it holds its shape, the dough is ready. Bake right away so the shape sets while cold.
These shaping steps are simple and fun. If you are looking for more decorative treats, check out our favorite kid-friendly treats for easy, colorful ideas.
Customizing for Every Occasion
Once you master the base dough, Danish butter cookies become the perfect canvas for creativity. A few extra touches turn them into festive holiday stars, elegant gifts, or colorful treats for kids. Whether you decorate with chocolate, change up the flavors, or add a seasonal twist, the possibilities stay delicious.
Dips, Drizzles and Decorations
The most popular way to dress these cookies up is by dipping them in chocolate. Use a smooth, cocoa butter-based melting chocolate for the best finish. Once the cookies cool, dip one side, let the extra drip off, and place them on parchment paper until the chocolate sets.
If you’re adding sprinkles, do it while the chocolate is still wet. Try rainbow sprinkles for birthdays, gold for holidays, or pastel colors for spring gatherings. You can also drizzle melted chocolate on top for a more refined look.
Pair them with other chocolate-coated ideas like these chocolate covered rice krispie treats for a cookie platter that everyone will talk about.
Flavor Variations to Try
A small change in flavor can make a big impact. Try adding fresh orange zest to your dough for a bright, citrusy lift. You can also add a little cinnamon for a warm, spiced twist that pairs well with cocoa dips.
For something a little different, switch the vanilla with almond extract. The result is a bold flavor that still feels familiar and comforting. You can also blend almond and vanilla together for a bakery-style cookie that works for any season.
Every variation begins with the same easy dough. From there, you can adapt and personalize the cookies to suit your guests, the season, or your own sweet cravings.
Storage, Gifting and Freezing Tips
Once you’ve baked a batch of Danish butter cookies, you’ll want to keep them fresh and gift-ready. These cookies store well, travel easily, and even taste better the next day. Whether you’re making them ahead for a holiday tray or prepping gifts for neighbors, these tips will help you get it just right.
Storing for Freshness
After the cookies have cooled and the chocolate has set, transfer them to an airtight container. Use layers of parchment paper between rows to prevent sticking or smudging. Store them at room temperature, away from direct heat or sunlight.
They stay fresh for about 5 to 7 days. In fact, letting them sit overnight enhances the buttery flavor and softens the texture just enough to make them even more enjoyable. If you’re planning a dessert table, consider baking them one day in advance.
For more sweet treats that hold up well without refrigeration, try these no bake caramel pretzel crack bars. They also store beautifully and pair perfectly with butter cookies on a gift tray.
Freezing for a Future Treat
Danish butter cookies are excellent for freezing. You can freeze them plain or decorated. If you freeze them after adding chocolate and sprinkles, let everything set completely before placing them in a freezer-safe container.
Wrap each layer with parchment and seal tightly. Label with the date, and you’re good for up to three months. When ready to enjoy, just thaw them in the fridge for a few hours or overnight. You can also wait to dip and decorate until after thawing for a fresher finish.
This makes them a great make-ahead treat for parties or gift boxes. Bake now, enjoy later, and always have something ready when guests drop by.
Final Thoughts
Butter cookies are a small joy that brings big smiles. With just a few simple ingredients and easy steps, you get a melt-in-the-mouth treat that’s perfect for every season. Whether dipped in chocolate, sprinkled for fun, or stacked in a pretty tin, these Danish butter cookies never disappoint.
So gather your ingredients, preheat that oven, and get ready to fill your kitchen with buttery, sweet magic. Then tuck in, and enjoy every bite.
FAQ
Can I freeze Danish butter cookie dough?
Yes, you can. Shape the dough into a log or flatten it into a disc, wrap it tightly, and freeze for up to two months. When ready to use, thaw it in the fridge until soft enough to pipe. This lets you bake fresh cookies anytime with very little prep.
Why are my butter cookies spreading too much?
There are a few common reasons. The butter may have been too warm, or the dough might have needed chilling. Also, avoid adding too much milk. Always test a small amount first, and make sure you use parchment or silicone mats, not greased pans.
How do I keep Danish cookies crisp?
Store them in a tightly sealed container at room temperature. Adding a slice of bread or a sugar cube inside the container helps absorb extra moisture. Do not refrigerate them, as that tends to soften the crisp edges.
Can I make these without a piping bag?
Yes, you can. While piping gives them their signature look, you can use a cookie press or even roll the dough into small balls and flatten them gently with a fork. The taste stays just as delicious.