DreamCloud Cheesecake Bars are as dreamy as their name suggests. Light, creamy, and swirled with pastel color for a magical bite every time. With a smooth filling and golden crust, they’re the perfect crowd-pleaser.
What Makes DreamCloud Cheesecake Bars So Special
Pastel Cheesecake Bars You’ll Want on Repeat
There’s something irresistibly fun about a dessert that’s both playful and elegant. DreamCloud Cheesecake Bars bring color and comfort in every slice. With a velvety cheesecake filling layered over a golden graham cracker crust, these bars balance texture and taste in the most satisfying way. What really makes them stand out is the swirl of pastel colors that look like something out of a daydream.
These bars are ideal for celebrations but simple enough for an everyday treat. They’re soft, not too sweet, and melt-in-your-mouth creamy with just the right crunch underneath. The combination of cream cheese and a light marshmallow base creates a filling that’s both fluffy and rich. Add a hint of vanilla and a touch of sour cream, and you’ve got that signature cheesecake flavor with a little extra charm.
If you enjoy colorful recipes like these Butterfinger Caramel Cheesecake Bars, you’ll love the dreamy twist these bars bring to the table. Same comfort, a little more whimsy.
Color, Creaminess, and Crave-Worthy Texture
The pastel swirl isn’t just pretty. It invites you to slow down and enjoy every bite. And the crust? Toasted graham crackers, just the right touch of sweetness, and a bit of butter make the base incredibly satisfying. Each forkful gives you a mix of silky cheesecake and just enough crunch. If you’re looking to impress at your next gathering, these bars bring both the look and the flavor.
Recipe
Print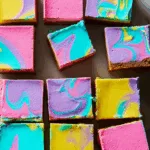
DreamCloud Cheesecake Bars
- Total Time: 1 hr 5 mins
- Yield: 20 bars 1x
- Diet: Vegetarian
Description
Dreamy, pastel-swirl cheesecake bars with a golden graham cracker crust and a light, fluffy filling made for easy slicing and crowd-pleasing.
Ingredients
- Cooking spray
- 16 graham crackers (from about 2 sleeves)
- 1/2 cup unsalted butter, melted (113 g)
- 2 Tbsp. granulated sugar (25 g)
- 1 tsp. kosher salt (5 g)
- 3 packages cream cheese, softened (24 oz. / 680 g)
- 1 jar marshmallow creme (7.5 oz. / 213 g)
- 1/2 cup sour cream (120 ml)
- 1/4 cup granulated sugar (50 g)
- 1 tsp. vanilla extract (5 ml)
- 1/2 tsp. kosher salt (2.5 g)
- 3 large eggs
- Blue, purple, yellow, and pink food coloring
Instructions
- Preheat oven to 350°F (175°C). Line a 13×9 baking dish with parchment and lightly grease with cooking spray.
- Pulse graham crackers in a food processor until fine crumbs form. Add butter, sugar, and salt. Pulse until combined.
- Press mixture firmly into the prepared baking dish. Bake for 10–12 minutes until golden brown. Reduce oven to 325°F (163°C).
- In a large mixing bowl, beat cream cheese until smooth. Add marshmallow creme, sour cream, sugar, vanilla, and salt. Mix until smooth. Scrape down sides.
- Add eggs one at a time and beat until incorporated.
- Divide the batter evenly into four bowls. Add 2–3 drops of a different food coloring to each bowl (blue, purple, yellow, pink).
- Pour each color over the crust in straight lines. Use a fork or spoon to gently swirl crosswise and lengthwise for a marbled effect.
- Bake for 25 minutes, until set but slightly jiggly in the center.
- Cool for 10 minutes at room temperature. Chill for at least 1 hour before slicing into bars.
- Use parchment to lift the set cheesecake from the dish. Slice into 20 bars.
Notes
- Use gel food coloring for more vibrant pastel tones without thinning the batter.
- Make sure cream cheese is fully softened to avoid lumps.
- For clean slices, run a sharp knife under warm water between cuts.
- Prep Time: 35 mins
- Cook Time: 30 mins
- Category: Dessert
- Method: Baked
- Cuisine: American
Nutrition
- Serving Size: 1 bar
- Calories: 287
- Sugar: 14 g
- Sodium: 187 mg
- Fat: 20 g
- Saturated Fat: 11 g
- Unsaturated Fat: 8 g
- Trans Fat: 0 g
- Carbohydrates: 23 g
- Fiber: 0.4 g
- Protein: 4.2 g
- Cholesterol: 78 mg
How to Make DreamCloud Cheesecake Bars at Home
Making the Perfect Graham Cracker Crust
A good cheesecake bar starts from the bottom up, and the graham cracker crust is key to holding everything together. You’ll want it firm, golden, and just sweet enough to complement the creamy filling. Start by pulsing graham crackers into fine crumbs using a food processor. If you don’t have one, a rolling pin and zip-top bag work just as well. The finer the crumbs, the smoother the crust will pack.
Once the crumbs are ready, stir in melted butter, sugar, and salt. It should feel like wet sand and hold together when pressed between your fingers. Press the mixture firmly into a parchment-lined baking dish. Use the bottom of a measuring cup to make it smooth and even, especially in the corners. Bake it until golden, which brings out a warm, toasty flavor that perfectly contrasts the soft filling.
Let it cool slightly before adding the filling. This short bake time creates a sturdy base without overbaking it. If you’ve tried our No-Bake Pistachio Cheesecake Bars, you’ll notice how a simple crust can transform the entire dessert experience.
Creating the Swirl of Dreamy Pastel Colors
Now comes the fun part. Once your cream cheese mixture is ready, divide it equally among four bowls. Add a few drops of blue, purple, yellow, and pink food coloring. You’re aiming for soft pastel shades, so start with a small amount and adjust if needed. Gel colors work best because they’re vibrant and don’t thin the batter.
Pour the colored fillings over the crust in long, horizontal lines. It doesn’t have to be perfect. The magic happens when you take a fork or the back of a spoon and gently swirl the colors together. Start with crosswise swirls, then repeat lengthwise. Go slowly and stop once you see a marbled effect. Avoid overmixing or the colors will blend into one tone.
Bake the bars until the center is just set and the edges look dry. A slight jiggle in the middle is perfect. Once cooled and chilled, the result is a creamy slice of rainbow you’ll want to show off on every dessert table.
Serving, Storing, and Customizing DreamCloud Cheesecake Bars
Slice, Chill, Serve: Getting That Clean Cut
Once your bars have chilled for at least an hour, it’s time to slice. This step can make or break the presentation, so a little patience goes a long way. Use the parchment overhang to lift the entire cheesecake block out of the pan and place it on a cutting board. For the cleanest cuts, grab a sharp knife and run it under warm water. Wipe it clean between each slice.
Aim for even squares or rectangles, depending on the occasion. If you’re serving these for a party, bite-sized squares make great finger food. For a plated dessert, go with larger slices and serve with a drizzle of white chocolate or a light dusting of powdered sugar.
These bars hold their shape well once chilled and are easy to stack or layer in containers. They don’t need a fork, but they’ll melt in your mouth like they do.
Flavor Swaps, Toppings, and Holiday Themes
One of the best things about this cheesecake bar recipe is how easy it is to adapt. Want to add a twist? Mix a little citrus zest into the batter for extra brightness, or swap the vanilla for almond extract. You can also change up the colors for seasonal events. Think red and green for winter holidays, orange and black for fall, or pastels for baby showers and spring brunches.
Add toppings after baking and chilling to avoid mess or melting. Here are a few crowd-pleasing ideas:
- Dollops of whipped topping with pastel sprinkles
- Thin slices of fresh strawberries or raspberries
- White chocolate drizzle in zig-zag patterns
If you’re into seasonal sweets, you’ll love the Mini Egg Cheesecake Recipe. It’s another colorful take on creamy cheesecake with built-in celebration vibes.
These bars also store beautifully. Keep them in an airtight container in the fridge for up to four days. If you’re making them ahead, freeze them for up to one month. Just wrap each bar individually in parchment and store in a freezer-safe container.
FAQs and Troubleshooting DreamCloud Cheesecake Bars
Why Did My Cheesecake Crack or Sink?
A cracked cheesecake bar is still delicious, but let’s fix it for next time. Cracking usually happens when the batter is overmixed, or the bars are overbaked. Try to mix the cream cheese until it’s just smooth before adding eggs, and once they go in, blend until combined without whipping too much air into the batter. Too much air can rise and fall in the oven, leading to cracks.
Also, don’t skip the jiggle test. Pull the bars from the oven when the center is just barely set. They’ll continue to firm up as they cool. Letting them rest for 10 minutes before transferring to the fridge helps them settle evenly and reduces the chance of sinking in the middle.
Using room temperature ingredients is another secret to success. Cold cream cheese and eggs can create lumps or uneven textures. If you’ve had trouble with cracks before, try placing a pan of hot water on the rack below your cheesecake during baking. It adds moisture and keeps the texture smooth.
Can I Make These Ahead or Freeze Them?
Absolutely. DreamCloud Cheesecake Bars are one of those make-ahead desserts that actually get better with chill time. Once baked, let them cool to room temperature before chilling for at least an hour. For best texture and clean slicing, chill overnight.
If you’re preparing for a party or event, you can freeze them for up to a month. Slice them first, wrap each bar in parchment or wax paper, then store in a sealed container. When you’re ready to serve, thaw in the fridge overnight or at room temperature for about 30 minutes.
Need a lighter option with a similar dreamy vibe? Try the Vegan Ricotta Cheesecake. It’s surprisingly creamy and perfect for anyone looking for dairy-light alternatives.
You can even turn this recipe into mini bites or layered jars for portable party servings. The key is keeping that swirl visible and the filling silky.
Final Thoughts
DreamCloud Cheesecake Bars are more than just pretty treats. They’re the kind of dessert that feels joyful from start to finish. With a buttery crust, dreamy swirl, and silky texture, each bar is a small celebration. They’re easy to make, easier to customize, and guaranteed to leave a sweet impression. For more colorful and creative cheesecake ideas, check out our full cheesecake recipe collection.