Apple crisp is one of those timeless desserts that never gets old. With soft, spiced apples and a crunchy oat topping, this easy recipe delivers cozy flavor in every bite. It’s a no-fuss, feel-good treat perfect for busy bakers who want something sweet without spending hours in the kitchen.

Table of Contents
Why This Apple Crisp Belongs in Your Recipe Box
If you’re craving a dessert that’s simple, comforting, and always a crowd-pleaser, this apple crisp is the one to make. It’s quick to prep, bakes beautifully, and tastes just like those cozy treats from childhood.
Here’s why it’s a go-to:
- No mixers or fancy tools needed, just a bowl, a spoon, and an oven
- Easy ingredients you already have in your pantry
- Golden topping with old fashioned oats for that perfect crunch
- Naturally sweet apples like Golden Delicious make every bite soft and juicy
- It pairs perfectly with a scoop of vanilla ice cream or whipped topping
Recipe
Print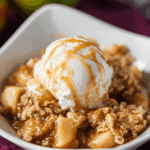
Apple Crisp
- Total Time: 1 hour
- Yield: 6 1x
- Diet: Vegetarian
Description
This classic apple crisp is sweet, spiced, and topped with a buttery oat crumble. It’s the perfect no-fuss dessert that’s ready in just an hour.
Ingredients
Spiced Apples:
- 6 golden delicious apples, peeled and chopped (about 6–7 cups)
- 2 Tbsp [25g] granulated sugar
- 3/4 tsp ground cinnamon
- 1 1/2 tsp [7ml] lemon juice
Crisp Topping:
- 1 cup [200g] light brown sugar
- 3/4 cup [60g] old fashioned oats
- 3/4 cup [95g] all-purpose flour
- 1 tsp ground cinnamon
- Pinch of kosher salt
- 1/2 cup [115g] cold unsalted butter, diced into small cubes
Instructions
- Preheat oven to 350°F. Grease an 8×8 baking dish with non-stick spray or butter.
- In a mixing bowl, combine apples, sugar, cinnamon, and lemon juice. Transfer to prepared baking dish.
- In another bowl, combine brown sugar, oats, flour, cinnamon, and salt. Add diced cold butter.
- Use a pastry cutter or your hands to blend until mixture becomes crumbly.
- Sprinkle topping over apples and gently pat down.
- Bake for 40–50 minutes, until topping is golden and filling is bubbly.
- Serve warm with ice cream or whipped topping.
Notes
- To avoid excess juice, add 1 Tbsp [8g] flour to the apple mixture if your apples are very juicy.
- Let the crisp cool fully before storing. Reheat in oven for best texture.
- Prep Time: 15 minutes
- Cook Time: 45 minutes
- Category: Desserts
- Method: Baking
- Cuisine: American
Nutrition
- Serving Size: 1 bowl
- Calories: 301
- Sugar: 34g
- Sodium: 78mg
- Fat: 11g
- Saturated Fat: 7g
- Unsaturated Fat: 3g
- Trans Fat: 0g
- Carbohydrates: 50g
- Fiber: 4g
- Protein: 2g
- Cholesterol: 25mg
How to Make the Best Old Fashioned Apple Crisp
This part is where the magic happens. With just a little mixing and layering, your kitchen will soon smell like warm cinnamon apples and buttery oat topping. The steps are easy to follow and don’t take much time.
Step-by-Step to Sweet, Spiced Perfection
Start by preheating your oven to 350°F. Lightly butter an 8×8 baking dish or spray with non-stick spray.
For the filling:
- Peel and chop 6 Golden Delicious apples
- Toss them with 2 tablespoons of sugar, ¾ teaspoon cinnamon, and 1½ teaspoons lemon juice
- Spread evenly in the prepared baking dish
For the topping:
- In a separate bowl, mix:
- 1 cup light brown sugar
- ¾ cup old fashioned oats
- ¾ cup all-purpose flour
- 1 teaspoon ground cinnamon
- Pinch of kosher salt
- Add ½ cup cold butter, diced small
- Use a pastry cutter or your hands to blend until the mix becomes crumbly
Spread the topping evenly over the apples. Lightly pat it down so it stays in place while baking.
Bake for 40–50 minutes until the top is golden and the filling is bubbly around the edges.
If you enjoy classic bakes like this, check out the pineapple heaven cake for another warm and fruity option.
Tips for the Crisp That’s Always Just Right
- Cut apples evenly so they cook at the same rate
- Don’t skip the lemon juice, it brightens the flavor and keeps apples from turning dull
- Want the topping extra crisp? Broil it for the last 2 minutes, but keep an eye on it
This dessert is fantastic warm, but it reheats well too. Bake it the night before, let it cool, then cover and chill. Reheat the next day at 350°F for about 30 minutes.
Need a cool treat to balance the warmth? Try it with a side of no-bake Twix cheesecake for a decadent dessert duo.

Fun Twists on Traditional Apple Crisp
Once you’ve nailed the basic apple crisp, it’s easy to make small changes that bring big flavor. You don’t need to get fancy, just switch up a few ingredients or toppings to keep things interesting without losing that old fashioned charm.
Topping Upgrades for Extra Crunch or Creaminess
That classic oat crumble is perfect as is, but if you want to add more texture or richness, here are a few simple ideas:
- Chopped nuts like walnuts or pecans for a toasty crunch
- A drizzle of homemade caramel sauce right after baking
- Vanilla bean ice cream or whipped topping for a smooth contrast
You can even make individual portions and top each one differently. It’s a great way to please a crowd or just try something new for yourself.
If you enjoy small-batch desserts with variety, the no-bake pistachio cheesecake bars offer the same flexibility with layers and toppings.
Flavor Twists You’ll Want to Try
Apple crisp is super adaptable. Depending on the season or what’s in your kitchen, try adding:
- Fresh berries like raspberries or blueberries mixed in with the apples
- A dash of nutmeg or ginger for a deeper spice profile
- Maple syrup or coconut sugar in place of brown sugar for a different sweetness
These small additions change the overall flavor without taking away the nostalgic comfort you expect from an easy apple crisp. If fruity mashups are your thing, matcha tea tiramisu is another creative option that blends flavors beautifully.
No matter how you switch things up, the heart of this dessert stays the same, warm apples, cozy spice, and a crispy, buttery topping.
Serving and Storing Apple Crisp the Easy Way
One of the best things about this apple crisp recipe is how well it keeps. Whether you’re prepping ahead for guests or saving leftovers for later, it’s super low-maintenance and still tastes great the next day.
How to Store and Reheat Without Losing Texture
After the crisp cools completely, cover it tightly and store in the refrigerator.
- Refrigerate: Up to 3 days
- Reheat: Let it sit at room temperature for 15–20 minutes, then warm it in the oven at 350°F for about 30 minutes
Avoid the microwave if you want to keep the topping crisp. A quick trip back to the oven keeps that crunchy oat layer just right.
For desserts that also store beautifully, the no-bake cannoli delight is a winner for make-ahead planning.
The Best Ways to Serve Apple Crisp
This dessert is delicious straight from the oven, but it’s even better when paired with something cool and creamy.
Try it with:
- A scoop of vanilla bean ice cream
- Dollop of whipped cream
- Chilled custard or sweet yogurt if you’re going for a lighter touch
Want something different on the table too? The smooth, creamy dolly parton no bake dessert makes a perfect contrast to apple crisp’s warm, crumbly texture.
It’s comfort food at its finest, whether you serve it fresh out of the oven or save it for a sweet treat tomorrow.
Final Thoughts
This old fashioned apple crisp recipe is all about comfort, simplicity, and flavor. It’s easy enough for weeknights and special enough for gatherings. With minimal effort and everyday ingredients, you get a warm dessert that hits the sweet spot every time.
Whether you’re a seasoned home baker or just getting started, this easy apple crisp is a treat worth repeating. And when you’re ready for more cozy bakes, explore recipes like our no-bake caramel cheesecake shooters for your next dessert craving.
Tuck in and enjoy every bite.