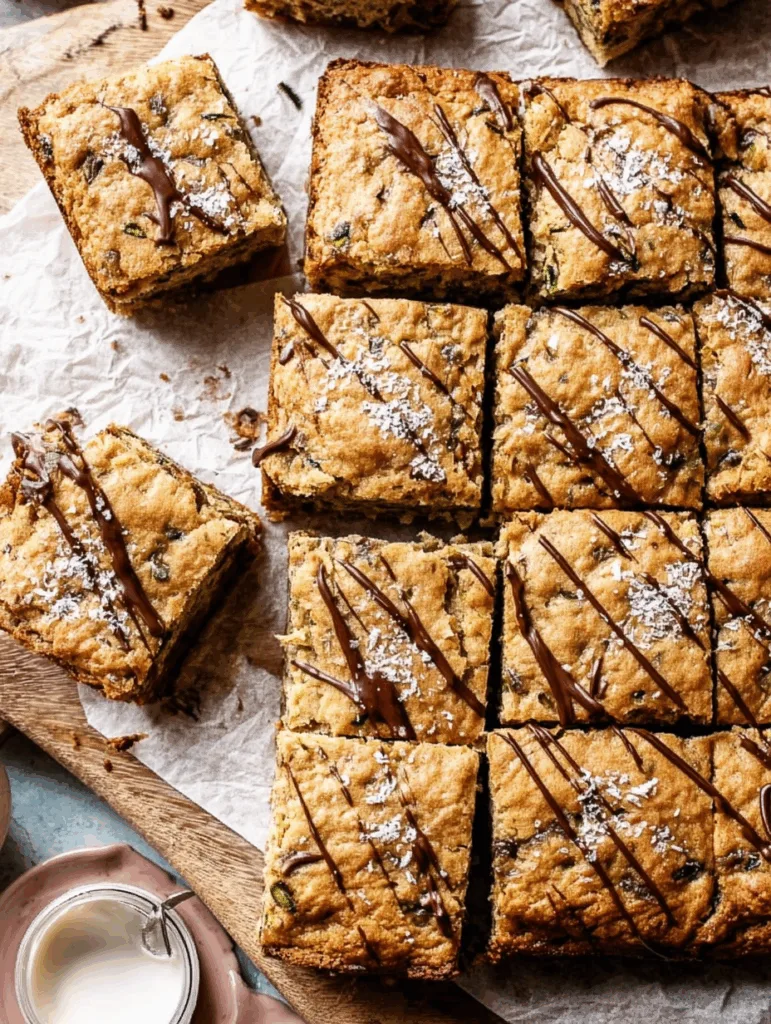
When ripe bananas meet shredded zucchini, something special happens, especially when it’s baked into soft, lightly sweetened bars. These zucchini banana bread bars are the kind of treat you’ll want to have around all week. They’re moist, tender, and packed with good-for-you ingredients, all without any grains or dairy. Whether you need a mid-afternoon bite or a better dessert option, this recipe keeps it simple, and keeps your kitchen smelling incredible.
Now let’s dive into what makes these bars so loved, how to make them just right, and why they might become your new favorite baked treat.
Why You’ll Love These Zucchini Banana Bread Bars
There’s something about the combination of banana and zucchini that just works. When you bake them into soft, naturally sweet bars with clean, grain-free ingredients, you get a treat that feels indulgent without the guilt. These zucchini banana bread bars strike the perfect balance between comfort and simplicity.
Secret Behind the Texture
What gives these bars their soft, tender bite without using traditional flour or dairy? It’s all in the combination:
- Ripe bananas bring natural sweetness and moisture
- Shredded zucchini keeps the texture moist but not soggy
- Coconut flour adds lightness and structure
- Cashew butter helps bind everything together and adds richness
Each bite is soft, flavorful, and satisfying without feeling too heavy or dense.
Naturally Sweet Without Refined Sugar
If you’re looking for a way to curb sweet cravings without processed sugar, these bars are a great option.
- Overripe bananas add most of the sweetness
- A small amount of pure maple syrup balances the flavor
- Dark chocolate chips add just the right touch of indulgence
These are sweet enough to please your taste buds, but not so sweet that you’ll crash later. If you’re into baked treats with real-food ingredients, these Sweet Potato Protein Brownies are another delicious recipe to keep in rotation.
Ready to bake? Let’s walk through the full recipe next.
Recipe
Print
Zucchini Banana Bread Bars (Gluten-Free & Paleo)
- Total Time: 40 minutes
- Yield: 16 bars 1x
- Diet: Gluten Free
Description
Grain-free and gluten-free zucchini banana bread bars made with coconut flour, nut butter, and sweetened naturally with banana and maple syrup. A wholesome snack or dessert for any time of day.
Ingredients
- 1 cup shredded zucchini (130 g)
- 1 cup mashed extra ripe banana (240 g)
- 3/4 cup cashew butter (180 g)
- 2 tablespoons pure maple syrup (30 ml)
- 2 large eggs
- 1 teaspoon vanilla extract (5 ml)
- 1/2 cup coconut flour (56 g)
- 1/2 teaspoon baking soda (2 g)
- 1/2 teaspoon cinnamon (1.3 g)
- 1/4 teaspoon salt (1.5 g)
- 1/2 cup dark chocolate chips, dairy-free if needed (90 g)
- For topping:
- 2 tablespoons dark chocolate chips, dairy-free if needed (30 g)
- 1/2 teaspoon coconut oil (2.5 ml)
Instructions
- Preheat oven to 350°F (175°C). Line a 9×9 inch (23×23 cm) pan with parchment paper and lightly grease the sides.
- Shred zucchini and squeeze out excess moisture using a clean cloth or paper towel.
- In a large bowl, mix shredded zucchini, mashed banana, cashew butter, maple syrup, eggs, and vanilla until smooth.
- Add coconut flour, baking soda, cinnamon, and salt. Stir until well combined.
- Fold in 1/2 cup chocolate chips.
- Pour batter into prepared pan and spread evenly.
- Bake for 30 to 40 minutes or until a toothpick inserted in the center comes out clean. Cool on a wire rack.
- To make drizzle, melt chocolate chips with coconut oil in a microwave-safe bowl in 30-second intervals, stirring each time.
- Drizzle melted chocolate over cooled bars. Let chocolate set before slicing.
- Cut into 12 or 16 bars and serve.
Notes
- Use very ripe bananas for best flavor and sweetness.
- Make sure zucchini is well-drained to prevent soggy bars.
- You can swap cashew butter with almond or sunflower seed butter.
- Bars can be stored at room temperature for 1 day, or refrigerated for up to 5 days.
- Freeze individually wrapped bars for up to 3 months.
- Prep Time: 10 minutes
- Cook Time: 30 minutes
- Category: Dessert
- Method: Bake
- Cuisine: American
Nutrition
- Serving Size: 1 bar
- Calories: 154
- Sugar: 7.7
- Sodium: 75
- Fat: 9.2
- Saturated Fat: 2.8
- Trans Fat: 0
- Carbohydrates: 16.6
- Fiber: 4
- Protein: 4
How to Bake Perfect Paleo Banana Zucchini Bars
These bars come together fast, but there are a few small tricks that make a big difference in the texture and flavor. Let’s walk through the simple steps to make sure you get perfect results every time.
Get the Ingredients Right
Start by picking the best ingredients. That’s key to getting these bars just right:
- Choose bananas that are heavily speckled with brown spots. The darker they are, the sweeter your bars will be.
- Shred the zucchini using a medium grater, then press it well using a clean towel to remove excess moisture. Too much liquid can make the bars gummy or undercooked in the center.
- Cashew butter gives these bars a rich, buttery base. If you don’t have it on hand, almond or sunflower seed butter works nicely too.
- Use a fine coconut flour that absorbs liquid evenly. This flour behaves differently than most and gives the bars structure without grains.
When you’re baking with simple ingredients like these, a little attention upfront really pays off.
Step-by-Step Mixing and Baking Tips
With your ingredients prepped, it’s time to mix and bake. Follow these steps for the best texture:
- Combine all wet ingredients first. Mix until the texture is smooth and consistent.
- Add in the dry ingredients gently. Stir just until everything is incorporated. Overmixing can cause the coconut flour to thicken too much.
- Fold in the chocolate chips last to keep them from melting into the batter.
- Line your baking pan and grease the sides lightly to prevent sticking.
- Bake until the edges are golden and a toothpick comes out clean. It should take about 35 minutes.
Let the bars cool fully before slicing. This helps them set and hold together beautifully. For another easy treat that doesn’t require oven time, check out the creamy layers in this No Bake Cannoli Delight Recipe. It’s a chilled dessert you can prep while the bars are baking.
How to Customize Your Zucchini Banana Bars
One of the best things about these bars is how easy they are to make your own. Whether you need a version for allergies or want to add a little crunch, this recipe adjusts beautifully to your kitchen and taste.
Nut-Free or Chocolate-Free Options
Not every pantry has cashew butter, and not everyone loves chocolate in their bars. Luckily, these are easy swaps:
- Use sunflower seed butter or tahini instead of nut butter for a completely nut-free version that still gives a rich, smooth base.
- Omit the chocolate chips altogether or replace them with chopped dried fruit like dates or figs for natural sweetness and chew.
- Add crushed freeze-dried fruit or a sprinkle of cinnamon sugar on top before baking for extra flair without the chocolate.
The base is flavorful enough to hold up without extra sweeteners. It’s flexible, forgiving, and fits a variety of dietary needs.
Make It Kid-Approved
Want to get your kids excited about a healthier treat? This recipe is a great one to make together, and it’s perfect for lunchboxes or snack time.
- Cut the bars into mini squares or rectangles for small hands or portion control.
- Let kids help with mixing and drizzling melted chocolate for an interactive kitchen activity.
- Freeze the bars individually so you can quickly grab one for school lunches or after-school snacks.
This recipe holds up well in texture and flavor, even after a few days in the fridge or freezer. If you’re planning snacks that please both kids and adults, these fun Blueberry Hand Pies are another sweet recipe you’ll want to try.
Storage, Serving and Chocolate Drizzle Tips
These zucchini banana bread bars store incredibly well, making them ideal for meal prep, snacking on the go, or enjoying slowly throughout the week. And that chocolate drizzle? It takes them to the next level.
How to Store and Freeze
Once baked, you’ll want to let the bars cool completely before storing. That helps keep their texture perfect and prevents moisture from collecting.
- Store them at room temperature in an airtight container for one day.
- For longer storage, place them in the fridge. They stay fresh and firm for up to five days.
- Want to freeze them? Just wrap each bar individually or place parchment between them. They’ll keep in the freezer for up to three months.
To enjoy from frozen, simply let them thaw at room temperature. The texture stays soft, and the flavor holds up beautifully.
The Perfect Chocolate Drizzle That Sets Right
Melted chocolate makes everything better, but the key is to get a smooth drizzle that sets quickly and doesn’t make a mess.
- Use a small microwave-safe bowl to melt the chocolate chips with just a little bit of coconut oil. This creates a glossy finish that’s easy to drizzle.
- Heat in short intervals, stirring after every 30 seconds to avoid burning the chocolate.
- Once melted, drizzle using a spoon, piping bag, or even a fork for a rustic finish.
- Chill the bars in the fridge after drizzling to let the topping set. This also helps when slicing cleanly.
This extra touch only takes a minute, but it really elevates the final presentation. If no-bake desserts with texture and richness are your style, you’ll enjoy this nostalgic No Bake Banana Split Dessert that’s just as fun and flavorful.