These Sweet Celebration Bars are the kind of dessert that brings instant joy to the table. Soft and chewy on the inside, finished with a fluffy swirl of vanilla frosting on top, each bite is sweet, colorful, and unforgettable. Whether you’re baking for a party or just craving a feel-good treat, these bars deliver.
The Joy of Sweet Celebration Bars
What Makes These Bars So Addictive
If you love desserts that taste as good as they look, Sweet Celebration Bars are about to be your new favorite. The base is thick, buttery, and soft, similar to your favorite sugar cookie, but with an even better texture thanks to a perfect bake and chewy finish. On top, there’s a creamy vanilla frosting that spreads like silk and melts in your mouth.
These bars are vibrant, rich, and fun to make. They’re the kind of treat that brings smiles before the first bite even happens. Great for birthdays, family get-togethers, or just a little reward after a long week. If you’re into colorful, no-fuss sweets, this one checks every box.
Craving another quick dessert with bold flavor? You’ll love the Cake Mix Toffee Bars Recipe for something just as easy and rewarding.
Key Ingredients That Make the Magic
It all starts with softened butter, which creates a creamy base when whipped with sugar. The addition of a whole egg and an extra yolk gives the bars a rich texture and helps them stay moist. A mix of flour, baking powder, and cornstarch builds structure while keeping things soft.
Rainbow sprinkles add charm and color to the dough. They hold their shape during baking, adding crunch and pops of sweetness in every bite. In the frosting, vanilla and a dairy-free creamy alternative come together to create a light, fluffy topping that’s easy to spread and customize with your favorite colors.
Recipe
Print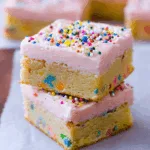
Sweet Celebration Bars
- Total Time: 1 hour, 30 minutes
- Yield: 16 bars 1x
- Diet: Vegetarian
Description
These soft-baked sugar cookie bars are topped with creamy vanilla frosting and colorful sprinkles, making them perfect for any celebration.
Ingredients
- 1/2 cup (8 Tbsp; 113g) unsalted butter, softened to room temperature
- 3/4 cup (150g) granulated sugar
- 1 large egg + 1 egg yolk
- 2 teaspoons pure vanilla extract
- 1 and 1/2 cups (188g) all-purpose flour (spooned & leveled)
- 1/4 teaspoon salt
- 1 teaspoon baking powder
- 1/2 teaspoon baking soda
- 1 and 1/2 teaspoons cornstarch
- 1/2 cup (80g) rainbow sprinkles
- 3/4 cup (12 Tbsp; 170g) unsalted butter, softened
- 2 and 1/4 cups (270g) confectioners’ sugar
- 3 tablespoons (45ml) dairy-free heavy-style cream alternative
- 1 teaspoon vanilla extract
- Salt, to taste
- Optional: natural food coloring and sprinkles
Instructions
- Preheat oven to 350°F (177°C). Line an 8 or 9-inch square pan with foil leaving overhang on the sides.
- Cream butter until smooth. Add sugar and beat until light and fluffy. Beat in egg, yolk, and vanilla.
- In a separate bowl, whisk flour, salt, baking powder, baking soda, and cornstarch.
- Gradually add dry ingredients to wet mixture on low speed. Fold in sprinkles.
- Press dough evenly into pan. Bake for 25–26 minutes. Cool completely in pan.
- For frosting, beat butter until creamy. Add sugar, cream, vanilla, and mix on high for 3 minutes. Adjust consistency with cream or sugar if needed.
- Spread frosting over cooled bars. Top with more sprinkles. Cut with sharp knife.
Notes
- Use jimmies-style sprinkles to prevent color bleed.
- Let bars cool fully before frosting to avoid melting.
- Chill before cutting for neater squares.
- Can be made ahead and frozen (unfrosted) up to 3 months.
- Prep Time: 25 minutes
- Cook Time: 25 minutes
- Category: Dessert
- Method: Baking
- Cuisine: American
Nutrition
- Serving Size: 1 bar
- Calories: 260
- Sugar: 23g
- Sodium: 85mg
- Fat: 13g
- Saturated Fat: 8g
- Unsaturated Fat: 4g
- Trans Fat: 0g
- Carbohydrates: 33g
- Fiber: 0.5g
- Protein: 2g
- Cholesterol: 45mg
Baking Tips for Perfect Cookie Bars Every Time
Mixing and Folding Like a Pro
The way you mix your dough can make or break these bars. Start by creaming the butter and sugar until light and fluffy. This step builds the base for that soft texture. Make sure your butter is fully softened at room temperature. Cold butter won’t blend smoothly, and melted butter can ruin the structure.
Once the egg and vanilla are in, take your time combining the dry ingredients. Don’t rush the flour mix. Whisking the flour, baking soda, baking powder, and cornstarch before adding keeps things even. When adding to the wet mix, go slow and steady on low speed. It might feel thick, but that’s exactly what you want.
As for the sprinkles, fold them in gently. Mixing too aggressively can break them or spread their color unevenly. Use classic rainbow jimmies, they keep their shape and color best. This little detail keeps your cookie bars looking fun, not messy.
Just like the No-Bake Boston Cream Pie Bars, the texture here depends on getting the base mixture just right.
Baking Time and Cooling Matters
Once your dough is evenly spread in the pan, it’s time to bake. Set your oven to 350°F and make sure it’s fully preheated before sliding the tray in. That first blast of heat helps the bars rise and set evenly. Bake them for 25 to 26 minutes, just until the edges look slightly golden.
It’s tempting to let them go a bit longer, but overbaking will make them dry. The top should be pale, and the middle might look a little soft when you pull them out. That’s what you want. They’ll finish setting as they cool.
After baking, let the bars rest in the pan on a wire rack. Don’t try to frost too early. The bars must be completely cool before you even think about adding that dreamy vanilla layer. If they’re even a little warm, the frosting will melt and slide, and you’ll lose that thick, luscious finish.
Once fully cooled, lift them out using the foil edges and get ready to frost. Cutting them neatly is easiest when they’ve had time to chill a bit in the fridge. Use a sharp knife, and wipe it clean between cuts for perfect squares.
Frosting and Decorating – The Celebration Moment
Smooth, Fluffy Vanilla Frosting Tips
Now comes the part everyone waits for frosting. The vanilla topping isn’t just decorative; it’s the creamy layer that brings the whole bar to life. To get it right, start with butter that’s softened but not melted. Beat it on medium speed until it’s light and creamy. This step creates the base texture for a smooth spread.
Slowly add the confectioners’ sugar while mixing on low. This prevents clumps and keeps the texture even. Once combined, turn the mixer to high and add your cream alternative and vanilla extract. Beat for a full three minutes. The longer you mix, the fluffier it gets.
Adjusting the consistency is easy. If it’s too stiff, add a splash more of your cream substitute. If it feels too soft, add more sugar a tablespoon at a time. A pinch of salt helps balance the sweetness. Once your frosting is smooth and holds shape, you’re ready to spread it.
Just like in the Butterfinger Caramel Cheesecake Bars, the frosting here should feel silky but stable. You want clean edges and thick swirls, not drips.
Sprinkles That Actually Work
When it comes to decorating, the type of sprinkles you choose matters. Not all sprinkles are created equal. For this recipe, use the classic jimmies, those thin, rod-shaped sprinkles that come in rainbow or pastel blends. They hold up in the dough and don’t bleed color when baked.
Avoid using the small ball-shaped ones, often called nonpareils, especially in the dough. They tend to melt or bleed into the batter, turning your bars a muddy shade of green or purple. That’s not the kind of celebration you want.
For topping, go wild with color combinations. Pink frosting with gold sprinkles for birthdays, or red and green for holiday gatherings. You can even divide the frosting and create a duo-tone effect.
Decorating doesn’t need to be complicated. A generous layer of frosting and a handful of sprinkles create a polished, party-ready finish. If you’re looking for even more creative and colorful no-bake desserts, the No-Bake Caramel Pretzel Crack Bars are another must-try.
Make-Ahead, Storage & Serving Ideas
Best Way to Store for Freshness
One of the best parts about Sweet Celebration Bars is how easy they are to make ahead. If you’re prepping for a party or just like having treats on hand, you’ll appreciate how well these store.
Once baked and cooled, you can keep the bars unfrosted in an airtight container at room temperature for up to two days. If you’ve already frosted them, they’ll stay fresh for about the same amount of time, though the frosting holds up better in cooler environments. For best results, store frosted bars in the fridge, especially if your kitchen gets warm. They’ll last for up to five days this way.
Want to make them even further in advance? Freeze the unfrosted bars. Wrap them tightly in plastic and place in a freezer-safe container or bag. They’ll keep for up to three months. When you’re ready to serve, thaw them overnight in the refrigerator, then bring them to room temperature and frost as usual.
Keeping your frosting separate until you’re ready to serve can help it stay light and fluffy. That way, your bars look and taste freshly made.
How to Serve for Parties and Kids
Sweet Celebration Bars are perfect for slicing into neat, even squares. If you’re making them for a kids’ event or school party, consider cutting them into smaller, bite-sized pieces. They’re easy to pick up and mess-free, which is always a win for little hands and busy parents.
You can also personalize the bars with themed colors or initials using frosting piping or shaped sprinkles. For holidays, go with seasonal colors, orange and black for fall parties, red and pink for Valentine’s, or pastels for spring.
These bars fit just as well on a dessert platter as they do in a lunchbox. They’re sturdy, travel well, and taste just as good chilled as they do at room temperature.
Looking for more no-bake or party-ready ideas? Don’t miss the No-Bake Caramel Pretzel Crack Bars Recipe for a salty-sweet contrast your guests will love.