These peanut butter Rice Krispie bars bring together crunchy cereal, gooey marshmallows, and a creamy chocolate topping. They’re quick, fun, and made with pantry staples for the perfect shareable no-bake dessert.
Why Peanut Butter Rice Krispie Bars Are Always a Hit
The Sweet Nostalgia of Every Crunch
Peanut butter Rice Krispie bars are one of those desserts that instantly transport you to after-school snacking and weekend baking memories. They’re chewy, crunchy, and perfectly sweet without being over-the-top. Whether you’re making them for a potluck or a casual treat night at home, their crowd-pleasing nature is undeniable.
- Ready in just 15 minutes – no baking involved
- Holds well in lunchboxes and stays chewy for days
- Great for kids’ parties, picnics, and holiday platters
Simple Pantry Staples That Always Impress
You don’t need specialty ingredients to make these. With just a few classics – crispy rice cereal, peanut butter, chocolate chips, and soft marshmallows – you get a layered texture that tastes like more effort than it is. If you’re already into no-bake snacks like these No Bake Lunch Lady Peanut Butter Bars, this one will earn a spot in your recipe box.
Recipe
Print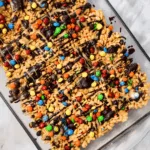
Peanut Butter Rice Krispie Bars
- Total Time: 15 minutes
- Yield: 16 squares 1x
- Diet: Vegetarian
Description
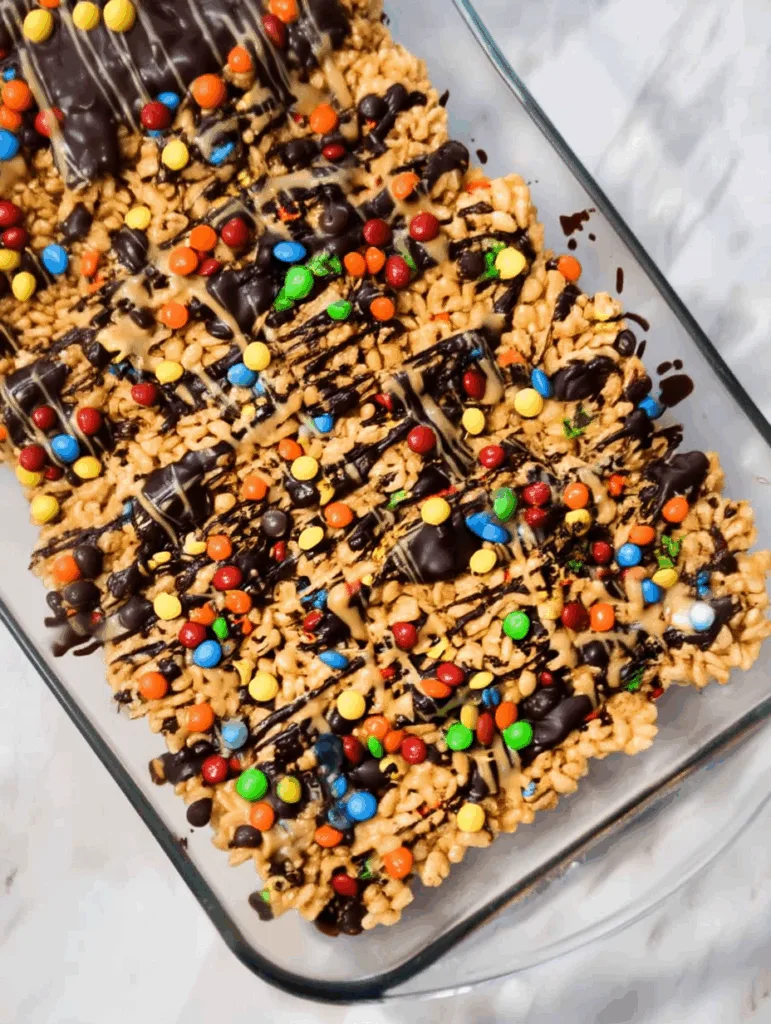
Sweet and chewy peanut butter Rice Krispie treats with a chocolate drizzle and colorful candy crunch on top – ready in minutes with no oven needed
Ingredients
- ¼ cup butter (56 g)
- 1 cup peanut butter, smooth (250 g)
- 4 cups mini marshmallows (192 g)
- 6 cups crispy rice cereal (150 g)
- 1 cup mini candy-coated chocolates (160 g)
- ¼ cup semi-sweet chocolate chips (45 g)
- 1½ tablespoon butter (21 g)
- 2 tablespoon peanut butter (32 g)
- ½ tablespoon butter (7 g)
- ⅓ cup mini candy-coated chocolates (53 g)
Instructions
- Melt the butter and peanut butter together in a large saucepan over medium heat
- Add the marshmallows and stir until fully melted
- Remove from heat and stir in the crispy rice cereal until fully coated
- Fold in the mini candy-coated chocolates quickly before the mixture cools too much
- Press the mixture gently into a greased 9×13 inch pan using a rubber spatula
- Melt chocolate chips with 1½ tbsp butter in the microwave for 45 seconds, stir until smooth, then drizzle over the bars
- Melt 2 tbsp peanut butter with ½ tbsp butter in the microwave for 20 seconds, stir, and drizzle as well
- Sprinkle the remaining candy-coated chocolates evenly on top
- Refrigerate for 30 minutes before slicing and serving
Notes
- Use smooth peanut butter for best texture and melting
- Press lightly to avoid crushing the cereal and to keep bars chewy
- Oil your spatula or fingers slightly to prevent sticking
- Store in an airtight container in the fridge up to 5 days
- Prep Time: 15 minutes
- Cook Time: 0 minutes
- Category: Dessert
- Method: No Bake
- Cuisine: American
Nutrition
- Serving Size: 1 square
- Calories: 322
- Sugar: 22g
- Sodium: 196mg
- Fat: 18g
- Saturated Fat: 7g
- Unsaturated Fat: 9g
- Trans Fat: 0g
- Carbohydrates: 37g
- Fiber: 2g
- Protein: 6g
- Cholesterol: 14mg
Secrets to Soft and Chewy Peanut Butter Krispie Bars
Choosing the Right Cereal and Marshmallows
What makes these peanut butter Rice Krispie bars unforgettable is that perfect chewy texture. It all starts with using the right kind of crispy rice cereal. Some brands crumble too easily, while others stay too firm. Go for a cereal that maintains its crunch after mixing but still absorbs the warm peanut butter-marshmallow blend well. One great tip is to use a fresh box – stale cereal leads to dense bars. Also, don’t overlook the marshmallows. Soft, fluffy marshmallows melt down to a smoother texture than older, stiff ones. This one tiny detail makes a huge difference.
If you’re following gluten-free eating habits, consider a cereal specifically labeled as such. There’s a full breakdown on that in this Gluten-Free Rice Krispies article, which walks you through the best brands that don’t sacrifice texture.
Here’s how to avoid the most common cereal bar problems:
- Use fresh marshmallows – they melt faster and more evenly
- Lightly grease your spatula or spoon so the mix doesn’t stick
- Gently fold cereal into the mixture to avoid crushing it
- Line your pan with parchment paper for easy lift-out slicing
The Peanut Butter Melt & Mix Method
Peanut butter brings both flavor and structure to these bars, so melting it the right way matters. Start by heating the butter and peanut butter together on medium heat. This lets them emulsify smoothly before the marshmallows go in. When marshmallows are added too soon, they can clump or cook unevenly. Let the peanut butter base reach a creamy consistency, then add the marshmallows and stir constantly until they disappear into the mix.
If you love experimenting, you can swap in almond butter or a sunflower seed spread to shake things up, but always stick to smooth versions. Chunky spreads may seem fun, but they disrupt the evenness of the mixture and make slicing difficult.
Another neat trick? Avoid overcooking the mixture. Once the marshmallows melt, remove the pan immediately from heat. Letting it boil or bubble can stiffen the texture and dry the bars out. That balance of gooey and chewy is what keeps people reaching for seconds.
Want a fun twist? After combining everything, try mixing in other crispy textures like puffed quinoa or unsweetened coconut flakes. Just don’t go overboard, too many add-ins can cause crumbling. If you’re into mix-and-match bar ideas, the Fruity Pebbles Rice Krispie Treats on the site might inspire your next batch.
Toppings, Mix-Ins & Serving Tricks for Peanut Butter Rice Krispie Bars
The Best Toppings for Flavor and Texture
Once you’ve pressed that golden peanut butter cereal mix into the pan, the fun really begins, it’s topping time. A classic drizzle of chocolate adds richness and visual appeal, but it also helps bind the top layer and enhances every bite. For this recipe, we melt semi-sweet chocolate chips with a touch of butter to create a glossy, smooth topping that sets beautifully.
Layered on top of that is a peanut butter drizzle, slightly warmed to stay pourable. This creates a sweet-and-salty contrast that pairs perfectly with the crispy base. Finally, colorful mini candy-coated chocolates make these bars both cheerful and satisfying with that little pop of crunch. For those who like extra texture, you could sprinkle in crushed pretzels or puffed millet right before topping.
If you’re a chocolate lover looking to go bolder, you’ll love these Chocolate Covered Rice Krispie Treats that take drizzling to the next level with a full coat of creamy chocolate.
Great topping ideas to rotate in:
- White chocolate drizzle with dried cranberries
- Chopped roasted nuts for crunch
- Shredded coconut or cocoa nibs
- A swirl of softened cookie butter
Fun Ways to Serve & Store Your Bars
These bars are all about convenience. Slice them into perfect squares once chilled, and you’ve got dessert on standby for the week. They’re firm enough to pack into lunchboxes, yet soft enough to enjoy straight from the fridge. Want clean cuts? Run your knife under hot water between slices. That little hack makes your bars look bakery-ready.
Here are some other creative serving ideas:
- Layer them in parchment in a treat box for gifting
- Cut into mini bites for party trays
- Stack them with wax paper between for a bake sale
You can also freeze these bars for up to 3 months. Just wrap individual pieces in parchment or plastic wrap and store in a sealed container. To serve later, let them thaw at room temperature for about 20 minutes.
If you’re the type to prepare a few sweets ahead for the month, these bars are perfect for batch-making. You can even pair them alongside other easy prep treats like these No Bake Lunch Lady Peanut Butter Bars to create a dessert box for gatherings.
Whether you’re serving them on a casual weekend or at a festive event, these peanut butter Rice Krispie bars bring smiles with every slice.
Make-Ahead Tips, Flavor Twists & Common Mistakes to Avoid
Easy Make-Ahead Prep for Busy Weeks
These bars are an absolute win for anyone who likes to prep ahead. They hold up well for several days, don’t need reheating, and taste just as amazing straight from the fridge. Once fully cooled and sliced, store them in an airtight container, either layered between wax paper or in individual snack bags.
Planning a party? Make a full batch the night before and keep them chilled until serving. If you want to freeze them, that’s easy too, wrap each piece in parchment and seal in a freezer-safe bag or container. Just pull out what you need and let it come to room temp for 20 minutes. They’ll taste fresh and chewy every time.
One fun idea: use themed mini candy chocolates to match holidays or birthdays. You can swap out colors for Halloween, Valentine’s Day, or baby showers to give these bars a festive twist without any extra effort.
Flavor Variations & Common Pitfalls to Avoid
Peanut butter Rice Krispie bars are the kind of recipe that invites play. You can personalize the flavor while still keeping that crave-worthy texture. Want to brighten things up? Try adding citrus zest to the melted peanut butter mixture. Craving more depth? A pinch of cinnamon or a swirl of nut-free chocolate spread can level up the entire tray.
Here are a few simple swaps to keep things exciting:
- Use crunchy rice cereal with cocoa for a chocolatey base
- Swap half the peanut butter for creamy almond butter
- Add freeze-dried fruit like strawberries for a tangy crunch
- Mix in crushed graham crackers for a s’mores-inspired vibe
But beware, there are a few mistakes you’ll want to dodge:
- Overheating the marshmallow mixture makes the bars stiff
- Pressing too hard into the pan causes dry, dense squares
- Adding mix-ins too early (before it cools slightly) leads to melting and color bleed
- Using old marshmallows or stale cereal ruins the melt and crunch
If you’re curious about what else you can do with crispy cereal treats, the fun spin on Fruity Pebbles Rice Krispie Treats will give you even more inspiration.
Take your time, get creative with toppings, and let your freezer do the hard work for future snacking.
Final Thoughts
Peanut Butter Rice Krispie Bars are proof that simple, no-bake recipes can still feel special. With the right melt method, a chewy base, and an irresistible drizzle, these bars check every dessert box. Plus, they’re flexible, fun to make with kids, and perfect for prepping ahead.
Whether you’re gifting a tray, serving them at a birthday party, or saving them for snack time, every square brings joy in every bite. So tuck in, enjoy, and keep experimenting, because these bars are just the beginning of your no-bake dessert adventures.