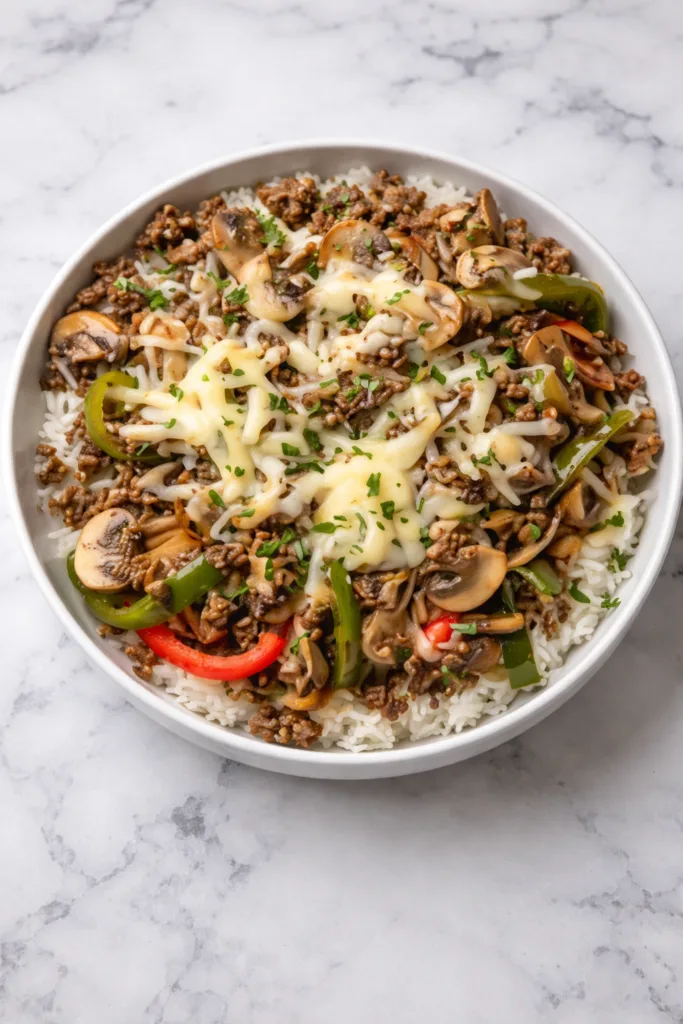
Busy weeknights call for delicious meals that fuel your body and satisfy your taste buds. This Ground Beef Philly Cheesesteak Meal Prep delivers all the classic flavors you love in a convenient make-ahead format.
Imagine juicy beef, caramelized vegetables, and melted cheese served over fluffy rice – ready to grab from your fridge whenever hunger strikes. Whether you’re meal prepping for work lunches or family dinners, this recipe turns your kitchen into a sandwich shop without the long lines or greasy takeout bags.
Why You’ll Love This Recipe
Ground Beef Philly Cheesesteak Meal Prep stands out because it combines simplicity with bold flavors. You get that iconic Philly cheesesteak taste using affordable ingredients that cook quickly in one pan.
The recipe works perfectly for lunchboxes since it reheats beautifully without drying out. Plus, you can customize it endlessly based on what you have in your fridge – swap vegetables, adjust seasonings, or try different cheeses!
Unlike complicated meal plans, this dish comes together in just 35 minutes from start to finish. The savory Worcestershire alternative adds depth to the beef while the melted cheese creates that irresistible gooey texture Philly cheesesteaks are famous for. Serve it over basmati rice for a complete meal that keeps you full for hours. If you enjoy easy protein-packed dinners, you’ll appreciate how this dish simplifies your weekly routine.
Recipe
Print
Ground Beef Philly Cheesesteak Meal Prep
- Total Time: 35 min
- Yield: 8 servings 1x
Description
Juicy ground beef with caramelized veggies and melted cheese over rice for easy meal prep lunches.
Ingredients
- 3 lbs lean ground beef (1.36 kg)
- 2 medium green bell peppers, diced
- 2 small onions, sliced
- 4 cups sliced mushrooms
- 4 tsp seasoned soy sauce
- ½ cup beef broth
- 2 cups shredded Colby Jack or provolone cheese
- 4 cups cooked basmati rice
Instructions
- Cook the rice: If not pre-cooked, prepare rice according to package directions. Set aside.
- Sauté veggies: In a large skillet over medium heat, sauté onions, peppers, and mushrooms for 5-7 minutes until soft and slightly caramelized. Remove and set aside.
- Brown the beef: In the same skillet, cook ground beef until browned. Drain excess fat.
- Add flavor: Stir in seasoned soy sauce and beef broth. Simmer for 2-3 minutes. Add veggies back in and mix well.
- Melt the cheese: Sprinkle cheese evenly over the mixture. Cover and cook on low until melted.
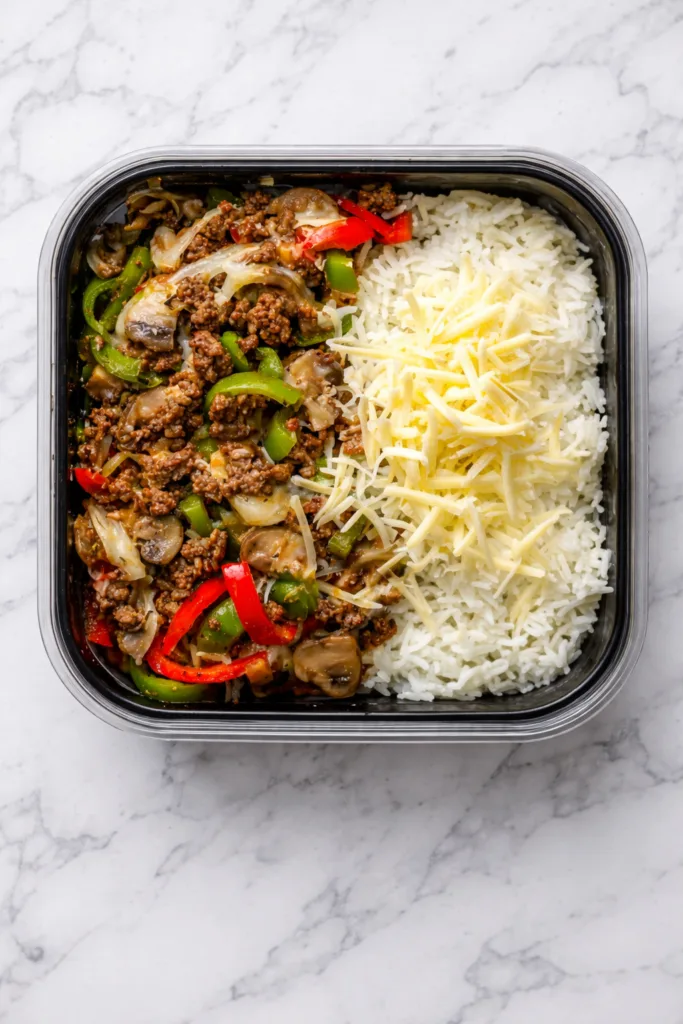
- Assemble meal prep: Divide rice and cheesesteak mix into 8 containers. Store in the fridge for up to 4 days.
Notes
- Undercook vegetables slightly to maintain texture during reheating.
- Freeze portions up to 3 months – leave off cheese and add fresh when reheating.
- For dairy-free version, use plant-based cheese alternatives.
- Prep Time: 15 min
- Cook Time: 20 min
- Category: Main Course
- Method: Stovetop
- Cuisine: American
Nutrition
- Calories: 480/serving
- Sugar: 3g/serving
- Sodium: 450mg/serving
- Fat: 28g/serving
- Carbohydrates: 24g/serving
- Fiber: 2g/serving
- Protein: 32g/serving
Ingredients and Substitutions
Base Components
The beauty of this recipe lies in its adaptable ingredient list. Here’s what creates those signature flavors:
- Lean ground beef: 3 lbs (1.36 kg) provides high-quality protein. Swap with ground turkey or chicken for a lighter option.
- Vegetables: 2 green bell peppers, 2 small onions, and 4 cups sliced mushrooms create texture and sweetness.
- Seasonings: 4 tsp seasoned soy sauce instead of Worcestershire, plus ½ cup beef broth for richness.
Cheese Options
Traditional provolone or Colby Jack melts beautifully, but feel free to experiment with mozzarella or American cheese. For a dairy-free version, use plant-based shreds that melt well.
How to Make Ground Beef Philly Cheesesteak Meal Prep
Follow these simple steps to create satisfying meals ready for your whole week. You’ll need a large skillet and meal prep containers.
Step 1: Prepare the Rice
Cook basmati rice according to package directions if not using pre-cooked. Fluff with a fork and set aside to cool slightly. Tip: Rinsing rice before cooking removes excess starch for fluffier results.
Step 2: Sauté the Vegetables
Heat your skillet over medium heat. Add diced peppers, sliced onions, and mushrooms. Cook 5-7 minutes until softened and slightly caramelized. Transfer to a plate.
Step 3: Brown the Beef
Using the same skillet, cook ground beef until no pink remains. Break it into crumbles as it cooks. Drain excess fat using a colander or spoon.
Step 4: Build Flavor
Return the drained beef to the skillet. Stir in seasoned soy sauce and beef broth. Let simmer 2-3 minutes until liquid reduces slightly. Add cooked veggies back in and mix thoroughly.
Step 5: Add Cheese
Sprinkle shredded cheese evenly over the beef mixture. Cover the skillet with a lid and cook on low heat 1-2 minutes until cheese melts completely.
Step 6: Assemble Containers
Divide cooked rice among 8 meal prep containers. Top each with cheesesteak mixture. Seal containers and refrigerate up to 4 days. Reheat in microwave 1-2 minutes when ready to eat.
Pro Tips for Success
- Drain beef thoroughly: Excess fat makes the dish greasy. Place cooked beef in a colander and press with a paper towel.
- Slice veggies thin: Uniform cuts ensure even cooking and better texture. Aim for ¼-inch slices.
- Undercook vegetables slightly: They’ll soften more when reheated, preserving color and crunch.
- Freeze extras: For longer storage, freeze portions up to 3 months in airtight bags.
Flavor Variations
This versatile recipe welcomes creativity. Try these popular twists:
- Italian Style: Add oregano, basil, and swap cheese for mozzarella with marinara sauce.
- Spicy Southwest: Mix in chili powder, cumin, and top with avocado slices or salsa.
- Low-Carb Version: Replace rice with cauliflower rice or serve mixture in lettuce wraps.
- Extra Cheesy: Stir cream cheese into the beef mixture before adding shredded cheese.
If you like quick flavor-packed meals, check out our 15-minute Asian-inspired bowl for another time-saving idea.
Serving Suggestions
Enjoy this cheesesteak prep as-is or customize with tasty add-ons:
- Drizzle with sriracha mayo or garlic aioli for extra zing
- Top with pickled jalapeños or banana peppers
- Serve with a side salad or steamed broccoli
- Pack garlic bread or whole-grain crackers for crunch
Storage and Freezing Instructions
Refrigeration
Store assembled meals in airtight containers in the refrigerator 3-4 days. For best results, reheat covered in microwave until steaming hot (165°F internal temperature). Add a splash of water if rice seems dry.
Freezing
Freeze portions up to 3 months using freezer-safe containers. Thaw overnight in refrigerator before reheating. Avoid freezing with cheese – add fresh cheese during reheating instead.
Nutrition Facts per Serving
| Calories | Fat | Carbs | Protein | Fiber | Sugar | Sodium |
|---|---|---|---|---|---|---|
| 480 | 28g | 24g | 32g | 2g | 3g | 450mg |
FAQs About Ground Beef Philly Cheesesteak Meal Prep
How do I prevent soggy vegetables in meal prep?
Undercook veggies slightly and drain beef thoroughly before mixing. Pack ingredients separately if possible, combining just before eating.
Can I make this recipe in a slow cooker?
Absolutely! Try our slow cooker techniques adapted for this dish. Brown beef first then cook on low 4-6 hours with veggies and seasonings, adding cheese during last 30 minutes.
What’s the best way to reheat these meals?
Microwave portions covered with damp paper towel 1-2 minutes. Stir halfway through. For crispy cheese, broil in oven 1-2 minutes after microwaving.
Can I use different types of rice?
Yes! Brown rice, quinoa, or couscous work well. Adjust cooking times accordingly.
How can I boost the protein content further?
Add black beans, diced tofu, or extra lean ground beef. You could even mix in prepared lentils.
Final Thoughts
Ground Beef Philly Cheesesteak Meal Prep transforms classic sandwich flavors into lunchbox-ready perfection. With minimal effort, you get eight satisfying meals featuring tender beef, sweet peppers, and melty cheese over fluffy rice.
Budget-friendly and family-approved, this recipe solves your weekday meal dilemmas while delivering restaurant-quality taste. Prep it once and enjoy delicious homemade lunches all week long!