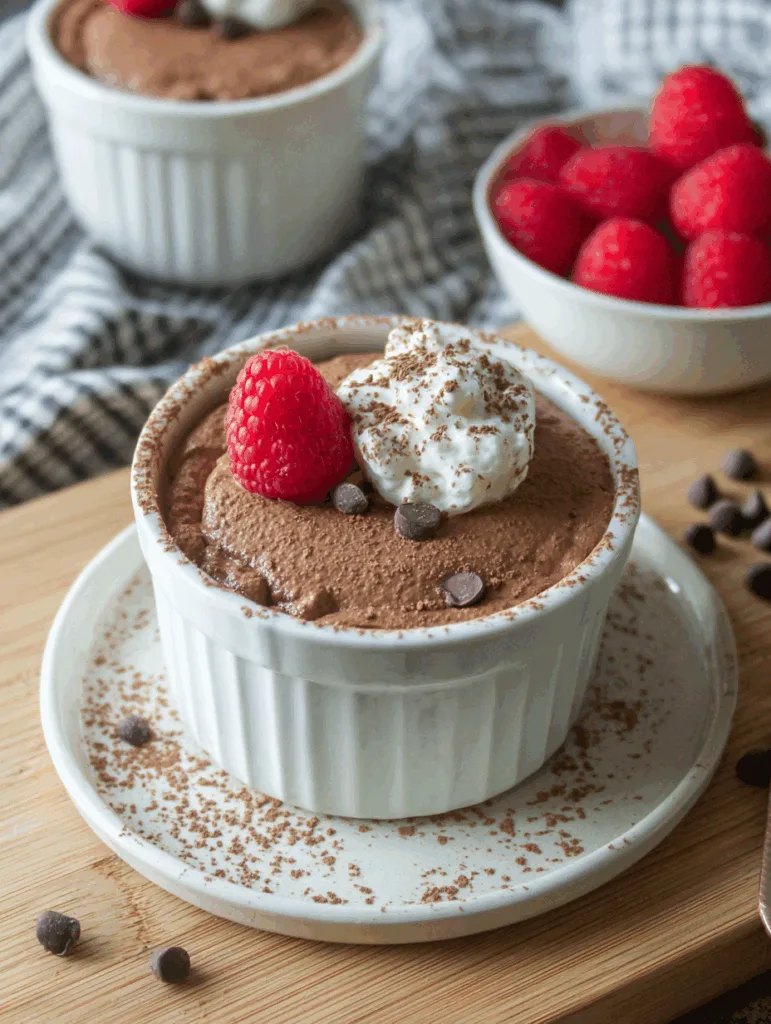
Chocolate mousse doesn’t need to be complicated or loaded with sugar. This 3-ingredient cottage cheese chocolate mousse is a creamy, dreamy dessert that’s surprisingly healthy and packed with protein. In just 5 minutes, you’ll have a sweet treat that satisfies without the fuss.
Why Cottage Cheese Is the Secret Star of This Mousse
Cottage Cheese Makes Dessert Better
Cottage cheese in dessert might sound unexpected, but it’s a game-changer. It adds a smooth, creamy texture with a hint of tang that balances the richness of chocolate perfectly. Once blended, it completely transforms into a luscious base that rivals any traditional mousse.
There’s no need to shop for fancy ingredients. This is a recipe you can make with what’s already in your fridge. Cottage cheese blends beautifully into sweet treats and proves itself beyond just breakfast bowls or savory meals.
Protein-Packed and Family-Friendly
This dessert delivers more than just flavor. It provides a solid protein punch with over 13 grams per serving depending on the cottage cheese you choose. It’s satisfying enough for an afternoon pick-me-up or a post-dinner treat that won’t leave you hungry.
It’s also ideal for picky eaters. Once mixed with chocolate and cocoa powder, there’s no cottage cheese taste or texture left behind. Just pure, chocolatey goodness that’s smooth enough to fool even the most skeptical family member.
Recipe
Print
Cottage Cheese Chocolate Mousse
- Total Time: 5 minutes
- Yield: 4 servings 1x
- Diet: Vegetarian
Description
A creamy, high-protein chocolate mousse made with just 3 ingredients. Perfect for a quick dessert that’s both satisfying and sweet-tooth approved.
Ingredients
- 1 cup 2% cottage cheese (240 g)
- 2/3 cup chocolate chips, milk or dark (120 g)
- 1 tbsp unsweetened cocoa powder (8 g)
- 1 tsp maple syrup or honey, optional (5 ml)
- 1/2 tsp vanilla extract, optional (2.5 ml)
Instructions
- Melt the chocolate chips in a microwave-safe dish in 30-second intervals, stirring in between, until smooth
- Add cottage cheese, melted chocolate, and cocoa powder to a food processor or high-speed blender
- Blend on high for 20 to 30 seconds until creamy
- Scrape down the sides and blend again for extra smoothness
- Spoon into bowls or jars and serve immediately or chill for a thicker texture
Notes
- Use dark chocolate chips for a less sweet version
- Try fat-free or 4% cottage cheese to adjust creaminess
- Avoid white chocolate as it does not melt well
- Add maple syrup or honey if you prefer a sweeter mousse
- Best served chilled after 30 minutes in the fridge
- Top with whipped cream, chocolate shavings, or fresh berries
- Prep Time: 5 minutes
- Cook Time: 0 minutes
- Category: Dessert
- Method: Blended
- Cuisine: American
Nutrition
- Serving Size: 1 cup
- Calories: 220
- Sugar: 14 g
- Sodium: 210 mg
- Fat: 11 g
- Saturated Fat: 6 g
- Unsaturated Fat: 4 g
- Trans Fat: 0 g
- Carbohydrates: 18 g
- Fiber: 2 g
- Protein: 13 g
- Cholesterol: 15 mg
Creating the Creamiest Cottage Cheese Chocolate Mousse
The 3 Essential Ingredients You’ll Need
This dessert proves that sometimes, the simplest combinations are the most satisfying. Here’s what makes it work so well:
- Cottage cheese: Use 2% for the perfect balance of creaminess and lightness. If you want it even richer, try a 4% version. Fat-free works too but won’t be as silky.
- Chocolate chips: Choose milk, semi-sweet, or dark chocolate chips. All melt beautifully and pair perfectly with cottage cheese. For a deeper cocoa flavor and lower sugar, dark chocolate is a great pick.
- Cocoa powder: Just one tablespoon adds an extra boost of chocolate flavor. Make sure it’s unsweetened for the best result.
Optional extras like a touch of maple syrup or a splash of vanilla extract can sweeten or deepen the flavor depending on your mood, but they aren’t necessary for the mousse to be delicious.
Tips for Smooth Blending
Texture makes or breaks a mousse. The good news is, it’s easy to get it right with the help of your blender or food processor. Here’s how:
- Melt the chocolate chips fully in a microwave-safe bowl using 30-second intervals. Stir each time to avoid burning.
- Add everything to the blender while the chocolate is still warm. This helps it blend more easily with the cottage cheese.
- Scrape down the sides of your blender or food processor after your first blend, then blend again until it’s silky smooth. The goal is a mousse that’s thick, airy, and completely lump-free.
- Chill for 30 minutes after blending. While it’s optional, this step really helps the texture set and gives the mousse a firmer bite.
Flavor Boosts and Topping Ideas
Add Sweetness Naturally
The mousse is already sweet from the chocolate chips, but if you’re craving something a little richer, it’s easy to take it up a notch with natural flavor boosters.
- Maple syrup or honey: A teaspoon is all you need for a touch of extra sweetness. Blend it right in with the other ingredients.
- Vanilla extract: Just a splash adds depth without overpowering the chocolate. Don’t overdo it or the mousse may turn runny.
- Cocoa powder tweak: If you prefer an intense chocolate flavor, feel free to increase the cocoa powder slightly.
These additions let you tailor the mousse to your taste without compromising the creamy texture. Since the base is neutral, it welcomes all kinds of creative flavor upgrades. Want to go bold? Add a pinch of instant coffee to intensify the chocolate notes or a little cinnamon for warmth.
Topping & Serving Inspiration
What really brings this mousse to life is how you serve it. Dress it up or keep it simple, it’s up to you.
- Whipped topping: A dollop of whipped cream adds that classic mousse feel.
- Chocolate shavings or chips: Sprinkle some on top for crunch and visual appeal.
- Fresh fruit: Add strawberries, raspberries, banana slices, or even pomegranate seeds for color and a refreshing contrast.
- Nutty texture: Try crushed pistachios or sunflower seeds for a satisfying finish.
- Layer it: Use jars or glasses and alternate with fruit or granola for a mousse parfait look.
Planning to serve guests? Spoon the mousse into glass cups and top with fresh berries and mint leaves for an elegant presentation that looks like it came straight from a café.
Make It Your Own – Variations and Storage
Customize to Fit Your Preferences
This mousse might be simple, but that doesn’t mean it has to be the same every time. With just a few tweaks, you can enjoy it in fresh and flavorful ways.
- Dark chocolate twist: Swap milk chocolate chips for dark chocolate if you prefer a more intense, less sweet flavor.
- Extra creamy version: Go with 4% cottage cheese for an even richer texture. It blends ultra-smooth and makes the mousse feel more indulgent.
- Fruit mix-ins: Blend in a handful of raspberries or a few slices of banana for a fruity chocolate mousse.
- Smoothie bowl style: Chill the mousse, then top it with sliced fruit, a spoonful of nut butter, and some oats for a breakfast-style bowl.
- Crunchy layers: Layer it with crushed crackers or cereal for a mousse trifle your kids will love.
Each version feels like a brand new dessert but keeps the prep just as quick and simple. That’s the beauty of starting with a reliable, creamy base – the rest is up to your cravings and creativity.
How to Store and Enjoy Later
The best part about this recipe? It keeps well, making it ideal for prepping ahead.
- Refrigerate it: Store in airtight containers or small glass jars for up to 3 days. It gets even creamier after resting in the fridge.
- Serve it cold: The texture sets up nicely after chilling, so give it at least 30 minutes before serving.
- Avoid freezing: While it might be tempting, freezing alters the texture and creates an icy, gritty feel.
This makes it a great make-ahead dessert for lunchboxes, parties, or whenever you want something sweet and satisfying at the end of a long day.