If you’re craving something sweet and snappy to make, these chocolate covered rice krispie treats are just what your day needs. With a base of crunchy cereal and gooey marshmallows topped in melted chocolate, it’s a no-bake wonder ready in minutes. Let’s make snack time something worth talking about.

Table of Contents
The Irresistible Charm of Chocolate Covered Rice Krispie Treats
Why These Treats Win Every Time
Chocolate covered rice krispie treats take a classic snack and make it even better. They’re crunchy, chewy, and topped with a smooth layer of chocolate. The best part? No oven. Just six pantry staples, a few minutes on the stove, and you’re done. Perfect for busy days.
These treats work for any occasion. Want them casual? Leave them plain. Want them party-ready? Add sprinkles or a sea salt finish. They’re always a hit. For another quick idea, try these Fruity Pebbles Rice Krispie Treats or go rich with Scotcheroo Truffles.
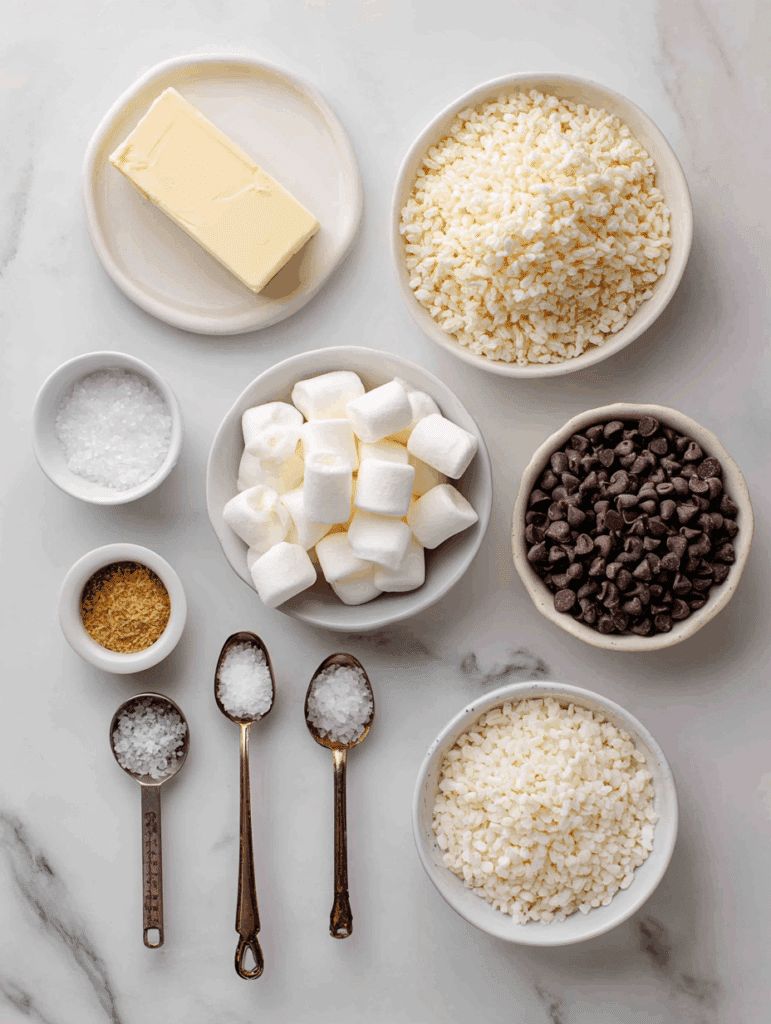
The 6 Ingredients You’ll Need
This recipe keeps it simple. Just gather:
- Butter (regular or dairy-free)
- Mini marshmallows (set 1 cup aside)
- Vanilla extract
- Rice Krispies cereal
- Chocolate chips or chopped chocolate
- Optional: sea salt or sprinkles for topping
You can use white, milk, or dark chocolate. All work well. For a nutty twist, check out the Lunch Lady Peanut Butter Bars. They’re just as easy.
Re cipe
Print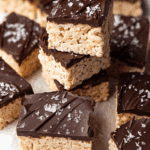
Chocolate Covered Rice Krispie Treats
- Total Time: 28 minutes
- Yield: 12 treats 1x
- Diet: Vegetarian
Description
These chocolate covered rice krispie treats are a quick, fun no-bake dessert topped with melted chocolate and a sprinkle of sea salt or sprinkles. Perfect for busy days or sweet moments.
Ingredients
- 6 tablespoons [3 oz / 85 g] butter (regular or dairy-free)
- 7 cups [14 oz / 400 g] mini marshmallows, separated
- 1 teaspoon [0.17 fl oz / 5 ml] vanilla extract
- 5 cups [4.4 oz / 125 g] rice krispies cereal
- 1 cup [6 oz / 170 g] chocolate chips or chopped chocolate (dark, white, or milk)
- 1½ tablespoons [0.75 oz / 21 g] butter (for chocolate)
- Optional: sea salt or sprinkles
Instructions
- Line an 8×8 or 9×9 pan with parchment paper.
- Melt butter in a large pot over medium heat.
- Add 6 cups of marshmallows and stir until melted. Mix in vanilla.
- Add rice krispie cereal and remaining cup of marshmallows. Stir quickly.
- Press mixture into pan using greased spatula or hands.
- Melt chocolate with butter in 20-second microwave intervals, stirring each time.
- Spread chocolate over the top, sprinkle with salt or sprinkles, and let set before slicing.
Notes
- Use a neutral oil instead of butter in chocolate if preferred.
- Chop large marshmallows if using them instead of minis.
- Store in airtight container up to 3 days.
- To speed up chocolate setting, place pan in the fridge.
- Prep Time: 8 minutes
- Rest Time: 20 minutes
- Cook Time: 0 minutes
- Category: Dessert
- Method: No-Bake
- Cuisine: American
Nutrition
- Serving Size: 1 treat
- Calories: 275
- Sugar: 27g
- Sodium: 98mg
- Fat: 9g
- Saturated Fat: 5g
- Unsaturated Fat: 3g
- Trans Fat: 0.02g
- Carbohydrates: 46g
- Fiber: 2g
- Protein: 3g
- Cholesterol: 2mg
Easy Steps to Make Chocolate Covered Rice Krispie Treats
Step-by-Step Process That Anyone Can Follow
Making these chocolate covered rice krispie treats is surprisingly simple. First, line an 8×8 or 9×9 inch pan with parchment paper. This makes removal and cleanup much easier.
In a large pot, melt the butter over medium heat. Once melted, add in 6 cups of mini marshmallows and stir until smooth and gooey. Mix in the vanilla extract. Now pour in the crispy rice cereal and the remaining 1 cup of marshmallows. Stir quickly while the mixture is still hot.
Press the mixture into the pan using a greased spatula or clean hands. Don’t pack it down too tightly. A gentle press is all you need to keep them soft and chewy.
Next, melt the chocolate with butter in the microwave using short bursts of 20 seconds. Stir after each time until it’s glossy and fully melted. Spread the chocolate over the top and finish with sea salt or sprinkles if you like.
You’ll have a tray of glossy, layered treats that rival any bakery-style square. These are just as easy as the No Bake Pistachio Cheesecake Bars and pair well with a cup of tea or coffee.
Helpful Tips for Texture and Chocolate Coating
| Tip | Why It Matters |
|---|---|
| Use fresh marshmallows | Old marshmallows melt poorly and can ruin the texture |
| Avoid high heat | Medium heat prevents scorching the butter and sugar |
| Press gently into the pan | Keeps the treats soft and airy instead of dense |
| Chill to set chocolate faster | Pop in the fridge if you’re short on time |
Want more chocolate on top? Adjust the topping based on your pan size or preference. Here’s a quick guide:
| Chocolate Layer | Chocolate Chips | Butter |
|---|---|---|
| Standard | 1 cup | 1½ tablespoons |
| Extra Thick | 1½ cups | 2 tablespoons |
Fun Variations and Creative Add-ins
Twist Your Chocolate Covered Rice Krispies Treats with Flavor Upgrades
One of the best things about chocolate covered rice krispie treats is how flexible they are. The base recipe is simple, which gives you room to have fun with flavors and textures. You can easily mix in mini chocolate candies, chopped nuts, or even dried fruits to change things up.
For a colorful twist, try using fruit-flavored marshmallows or swirl in a bit of berry jam before pressing the mix into the pan. Crushed pretzels add a salty crunch that pairs perfectly with the chocolate coating. These ideas make your chocolate covered rice krispie treats even more exciting.
A great example of playing with cereal-based variations is the Fruity Pebbles Rice Krispie Treats. They’re just as easy and fun to make.
Topping Ideas to Dress Them Up
Once the chocolate layer is smooth, it’s time to get creative. Toppings not only add flavor but make your chocolate covered rice krispie treats look party-ready. Here are some favorite add-ons:
- Rainbow sprinkles for a festive finish
- Flaky sea salt for a sweet-salty combo
- Toasted coconut flakes for texture
- Crushed pistachios or almonds for crunch
- A drizzle of white chocolate for contrast
These toppings stick best while the chocolate is still warm. You can even layer chocolates. Pour white chocolate first, let it cool, then top with dark or milk chocolate. It gives your chocolate covered rice krispie treats that double-layer effect. If you enjoy rich chocolate desserts, check out our Carnivore Chocolate Mousse for more inspiration.
There’s no wrong way to enjoy these treats. Whether you keep them simple or load them with goodies, chocolate covered rice krispie treats always deliver big flavor with little effort.
Storage Tips, Make-Ahead Ideas, and FAQs
How to Store Chocolate Covered Rice Krispie Treats the Right Way
Once your chocolate covered rice krispies treats are cooled and cut, storing them properly keeps them fresh and chewy. Place them in an airtight container and keep them at room temperature for up to 3 days. Don’t refrigerate unless you need to set the chocolate quickly. Cold air can make them hard.
Stacking the bars? Place a piece of parchment or wax paper between layers to keep the chocolate coating from sticking.
If you’re planning ahead, you can make chocolate covered rice krispie treats one or two days in advance. Store them in a tightly sealed container and keep them in a cool, dry place.
Need something similar that travels well too? Try our No Bake Caramel Cheesecake Shooters. They’re also easy to prep ahead.
Make-Ahead Tips and Smart Swaps
If you’re making a large batch, you can double the recipe and use a 9×13 inch pan. Just remember to scale the chocolate topping too. For a thicker chocolate finish, use 1½ cups of chocolate chips and 2 tablespoons of butter.
Here’s a quick reference:
| Pan Size | Chocolate Chips | Butter |
|---|---|---|
| 8×8 or 9×9 inch | 1 cup | 1½ tablespoons |
| 9×13 inch (double batch) | 1½ to 2 cups | 2 tablespoons |
Sweet, Simple, and Always a Hit
Chocolate covered rice krispies treats bring everything you love about no-bake desserts into one quick recipe. The crispy texture, gooey marshmallows, and rich chocolate layer make them the kind of treat that disappears fast. Whether you keep them classic or go wild with toppings, they’re easy to make and hard to resist.
Planning a dessert tray? These pair beautifully with No Bake Cheesecake Bars or our crowd-pleasing Old-Fashioned Rhubarb Cake.
For more no-fuss sweets that the whole family will love, follow me on Pinterest and never miss a treat.
FAQs About Chocolate Covered Rice Krispie Treats
How to make chocolate covered rice krispie cakes?
You can press the mixture into cupcake liners instead of a pan. Once set, pour melted chocolate on top and chill briefly. Perfect for bite-sized servings.
Are chocolate Rice Krispies treats discontinued?
Store-bought versions may come and go, but this homemade version is easy to make anytime with simple ingredients you control.
How to make rice crispy treats with chocolate?
Start with the classic marshmallow and cereal base. Then melt chocolate with butter and spread it over the top. Let it cool fully before slicing.
What can I wrap rice krispie treats in?
Wrap each treat in parchment paper or plastic wrap. For gifting, use clear treat bags with a twist tie. This keeps them fresh and portable.