If you’re looking for a dessert that’s bold, colorful, and surprisingly easy to pull off, this spooky swirl chocolate bark is just the treat. In just 30 minutes, you can create a festive masterpiece that’s as fun to break apart as it is to eat.
Why Spooky Chocolate Bark is the Perfect Treat
There’s something magical about swirled chocolate in bold colors. This spooky swirl chocolate bark brings together smooth, melt-in-your-mouth white chocolate and a playful splash of purple, orange, and green. It’s the kind of dessert that catches the eye and gets people talking and you don’t need to be a seasoned baker to nail it.
A treat that’s more fun than fright
One of the best things about this chocolate bark is how quick and simple it is. There’s no baking, no special equipment, and no long prep time. It’s a perfect project for a party or even a weekend activity with kids. You just melt, swirl, chill, and snap.
This treat also plays well with others. Pair it with your favorite easy no-bake desserts like gluten-free rice krispies to build an allergy-friendly treat table everyone can enjoy. And since you’re in full control of the colors and toppings, every batch feels new and festive.
Ingredients you probably already have
What makes spooky swirl chocolate bark so convenient is how pantry-friendly it is. The key ingredients, white chocolate, natural food coloring, and candy toppings are simple to find and often already on hand as nears.
You’ll want high-quality white chocolate to get that smooth base, plus a special candy coating ingredient (like Flo-Coat) that keeps the colors from seizing when mixed with gel-based food coloring. The finishing touch? A sprinkle of party-themed nonpareils and colored sugar that gives it a festive crunch.
Whether you’re prepping last-minute party snacks or looking for a creative way to get the kids involved in the kitchen, this bark makes it fun and approachable. And unlike other seasonal recipes, there’s no stress about getting it “perfect.” The swirls are meant to be wild and whimsical.
Recipe
Print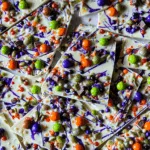
Spooky Swirl Chocolate Bark
- Total Time: 30 mins
- Yield: 4–6 1x
- Diet: Vegetarian
Description
This Spooky Swirl Chocolate Bark is a vibrant, no-bake treat made with creamy white chocolate and swirls of festive color.
Ingredients
- 2 cups white chocolate, chopped (340 g)
- 15 drops Flo-Coat Candy Coating
- 1 drop purple food coloring
- 1 drop green food coloring
- 1 drop orange food coloring
- 2 Tbsp. large colored nonpareils (30 g)
- 1 Tbsp. colored sprinkles (15 g)
Instructions
- Place chocolate in a heat-proof bowl over a pan of simmering water and stir until completely melted.
- Divide 3 tablespoons melted white chocolate into three separate bowls. Add five drops Flo-Coat and one drop of food coloring to each bowl; stir to combine.
- Pour remaining white chocolate onto a parchment-lined baking sheet. Using an offset spatula, spread chocolate until it’s 1/8″- to 1/4″-thick. Drizzle colored chocolate on top and drag a toothpick to create swirls. Dust top with nonpareils and sprinkles.
- Transfer to the refrigerator to set, 20 minutes. Break into pieces to serve.
Notes
- Use gel-based food coloring for vibrant hues.
- Make sure chocolate is completely smooth before swirling.
- Keep refrigerated until serving if your kitchen is warm.
- Prep Time: 10 mins
- Cook Time: 0 mins
- Category: Dessert
- Method: No-Bake
- Cuisine: American
Nutrition
- Serving Size: Varies
- Calories: 2025
- Sugar: 231 g
- Sodium: 325 mg
- Fat: 116 g
- Saturated Fat: 70 g
- Trans Fat: 0 g
- Carbohydrates: 232 g
- Fiber: 1 g
- Protein: 21 g
- Cholesterol: 76 mg
Step-by-Step Guide to Making Spooky Swirl Chocolate Bark
Making spooky swirl chocolate bark is just as exciting as eating it. From melting silky white chocolate to creating those mesmerizing colorful swirls, this process is beginner-friendly and full of creativity. You’ll love how quickly it all comes together and how impressive the final result looks.
Melting and coloring chocolate the right way
Start by melting the white chocolate gently over simmering water. This method called a double boiler prevents the chocolate from overheating or clumping. Stir constantly with a silicone spatula for a smooth, even melt.
Once melted, separate a few tablespoons into three small bowls. This is where the fun begins. To each bowl, add five drops of Flo-Coat, which keeps your food coloring from seizing the chocolate. Then add a single drop of purple, green, or orange food coloring to each bowl. Stir until the color is fully incorporated.
It’s important to use gel-based food coloring here, as liquid dyes can affect the consistency of your chocolate. You’ll get bolder color without thinning the mixture. If you’re working with kids, let them each swirl their own color, it turns the recipe into a mini art project.
You can find a similar playful spin on themed treats in Blueberry Hand Pies by Mark Beahm, where color and form go hand in hand.
Creating the perfect swirl pattern
Now that your base and colors are ready, pour the remaining white chocolate onto a parchment-lined baking sheet. Use an offset spatula to spread it into an even rectangle about 1/8″ to 1/4″ thick. You don’t need to be precise, this bark is meant to look wild and festive.
Next, drizzle the colored chocolates randomly over the surface. You can do lines, dots, or zigzags, there are no rules here. Then grab a toothpick and gently drag it through the chocolate in different directions to create a swirling effect. Don’t overwork it or the colors will muddy; a few passes are enough to get that eerie, hypnotic design.
Finally, sprinkle your nonpareils and themed sprinkles on top before the chocolate starts to set. This adds crunch and an extra dose of visual flair.
Once decorated, place the sheet in the fridge for about 20 minutes to harden. When fully set, break the bark into large shards or smaller snackable pieces. Each one will look slightly different, and that’s part of the charm.
This step-by-step method ensures that even first-time candy makers can feel confident in the kitchen. It’s a quick win with big visual payoff, making it ideal for parties, gifting, or simply celebrating the spooky season.
How to Store and Serve Your Chocolate Bark
Once your spooky swirl chocolate bark is ready, you’ll want to keep those colors sharp and the texture just right. The good news? It stores beautifully and serves up in all kinds of fun, festive ways. Whether you’re saving it for later or prepping ahead for a party, a few quick tips can make all the difference.
Keep it crisp, not sticky
The key to storing chocolate bark is keeping it cool, dry, and airtight. After the bark sets in the fridge, transfer it to a container lined with parchment paper. If stacking, place parchment between layers to prevent sticking or smudging.
Store the container in the fridge for up to one week, or in the freezer for up to a month. If you’re making this ahead, freezing is a fantastic option, just thaw in the fridge for an hour before serving to avoid condensation.
Avoid leaving the bark out in a warm kitchen or near sunlight, as white chocolate melts quickly and can lose its sheen. It’s best served slightly chilled, especially if you’re adding it to a dessert table.
When prepping a larger spread, pair it with something creamy and cool, like this no-bake cannoli delight. The texture contrast between crunchy bark and soft cream filling is unbeatable.
Creative serving ideas
This chocolate bark isn’t just a dessert, it’s a conversation piece. Break it into jagged shards and arrange them on a platter, or tuck pieces into clear treat bags for party favors.
For family movie nights or classroom celebrations, consider layering the bark into jars with popcorn, pretzels, and gummy candies to create colorful spooky snack mixes. Or add a few pieces to a larger dessert board surrounded by cookies, marshmallows, and fruit slices.
Want to impress the kids? Let them decorate their own mini bark slabs with extra toppings like crushed cereal or edible glitter. Just prep small rectangles of bark in advance and set out a decorating station.
If you’re making this as a gift, wrap the shards in parchment and seal with festive washi tape or ribbon. It’s a thoughtful homemade treat that travels well and keeps its crunch.
From spooky snack boards to grab-and-go favors, there’s no wrong way to serve this bark. It’s playful, versatile, and always a hit, especially when paired with other easy no-bake recipes.
Fun Variations and Custom Add-Ins for Your Bark
One of the joys of making chocolate bark is how flexible it is. You start with a smooth base and let your imagination take over. Whether you’re switching up the colors or tossing in extra toppings, there’s always room to personalize each batch of spooky swirl chocolate bark.
Kid-approved bark twists
When you’re making bark for little ones, think colorful and interactive. Use candy eyes to create a monster look, or press in tiny marshmallows for a fun ghostly touch. Crushed cereal like cornflakes or puffed rice adds crunch and keeps things light, plus it’s a great way to use pantry staples.
You can also swirl in a second chocolate, like a naturally flavored dark or colored cocoa melt, for contrast. Pour it side-by-side with the white chocolate and swirl the two together for a marbled effect that’s rich and exciting.
Just like in these no-bake Boston cream pie bars, it’s the layering of textures and flavors that really makes a no-bake dessert stand out. Think of bark as your blank canvas, you get to build on it however you like.
Mini candy-coated pieces, pretzel bits, or crispy fruit snacks all make fun, kid-friendly add-ins that keep the bark playful and exciting to munch.
Make it your own with natural flavors and toppings
Looking for something a little more grown-up or elegant? Try customizing your bark with a mix of flavors and textures that go beyond the standard palette.
Crushed freeze-dried strawberries or raspberries add a pop of color and tartness. Toasted coconut flakes bring warmth and crunch. You can even sprinkle in a pinch of cinnamon or citrus zest for a subtle flavor kick that balances out the sweetness of the white chocolate.
Another fun idea: layer your bark with flavor by adding a thin spread of fruit jam beneath the white chocolate base. Let it chill briefly before swirling the top layer, this creates pockets of juicy surprise in every bite.
Want a touch of elegance for a party platter? Drizzle cooled bark with a contrasting chocolate once set, and immediately dust with edible shimmer or gold sugar. It gives your treat a finished, bakery-style look with very little extra effort.
If you enjoyed how customizable this bark is, you’ll likely also love playing around with no-bake caramel pretzel crack bars, where sweet and salty meet in every bite.
Whether you’re leaning whimsical or refined, the real fun of chocolate bark is making it feel like your own. It’s a dessert that invites creativity, and that means every batch is a new creation.