Searching for a dessert that satisfies your sweet tooth without derailing your fitness goals? Look no further than this creamy, dreamy Ultimate Protein Cheesecake. This recipe is a game-changer, offering the rich, indulgent texture of classic cheesecake with a powerful protein boost, making it perfect for post-workout recovery, a healthy snack, or a guilt-free treat.
Whether you’re following a high-protein diet, managing calories, or simply love delicious food, this baked dessert delivers incredible flavor and nutrition in every slice.
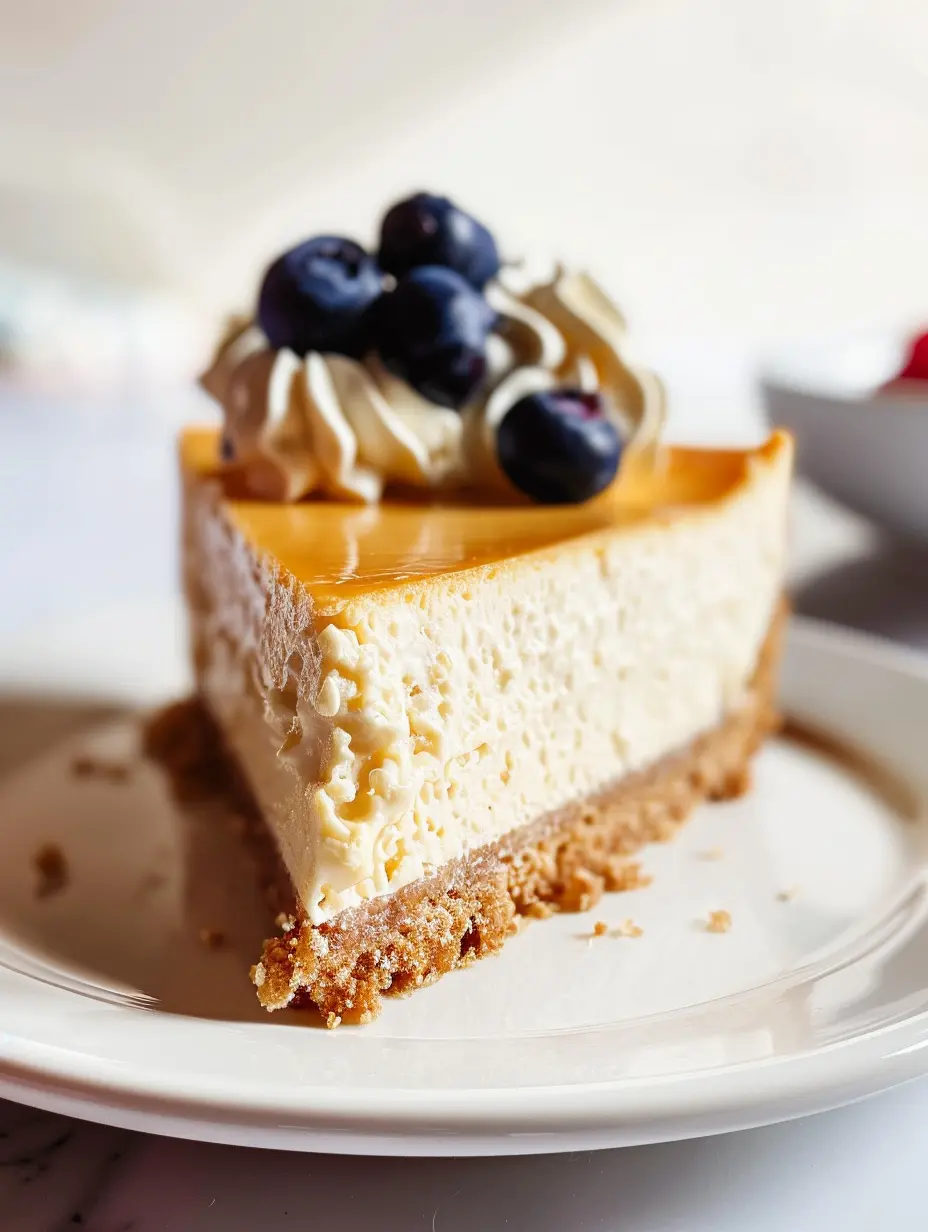
This version is wonderfully versatile. It features a simple almond crust but can easily be made crustless. We’ve crafted it to be naturally low in sugar and carbohydrates, aligning with various dietary preferences. The secret lies in the perfect blend of high-quality cream cheese, protein-rich Greek yogurt, and a carefully measured sweetener. The result is a dessert so satisfying, you won’t believe it’s packed with nearly 20 grams of protein per serving.
For more meal-prep inspiration that balances flavor and fitness, check out our Pepper Steak Meal Prep and Steak Rice Bowl Meal Prep guides.
Why You’ll Love This High-Protein Cheesecake
This isn’t just another protein dessert; it’s a meticulously crafted recipe designed for maximum enjoyment and nutritional benefit. The texture is the star—incredibly smooth and creamy, without the chalkiness sometimes associated with protein powders.
It sets perfectly with a slight jiggle, then firms up in the fridge to a classic, dense cheesecake consistency. The flavor is a beautiful balance of sweet vanilla with a subtle tang from the Greek yogurt and a hint of lemon.
Beyond taste, this cheesecake is a powerhouse of nutrition. Each substantial slice provides a significant amount of protein to support muscle repair and satiety, healthy fats for energy, and fiber for digestive health.
It’s an excellent example of how you can enjoy decadent desserts while staying committed to your health and wellness journey. It pairs wonderfully with a cup of coffee or fresh berries for an extra touch of luxury.
Key Benefits of This Recipe
Muscle-Friendly Macronutrients: With 19 grams of protein and only 7 grams of net carbs per serving, this cheesecake is ideal for those focusing on muscle gain or weight management. The protein comes from multiple sources—whey or plant-based powder, Greek yogurt, and eggs—providing a complete amino acid profile.
Satiety and Satisfaction: The combination of protein, fat, and fiber helps keep you full longer, preventing unnecessary snacking. It’s a dessert that truly satisfies, not just teases your sweet tooth.
Customizable and Forgiving: You can easily adapt this recipe. Use vanilla or unflavored protein powder, adjust the sweetener to your preference, or omit the crust for a even simpler, lower-carb version. The method is straightforward, whether you use a blender, food processor, or just a bowl and whisk.
Gathering Your Ingredients
Quality ingredients are the foundation of any great recipe. For this protein cheesecake, using the right components ensures the perfect texture and flavor. We’ve carefully selected each item to create a harmonious and health-conscious dessert.
The Cheesecake Filling
- Cream Cheese (16 oz, softened): Use full-fat for the creamiest texture. Let it sit at room temperature for at least an hour for easy blending.
- Greek Yogurt (1 1/2 cups): Plain, full-fat Greek yogurt adds protein, tang, and moisture. For a dairy-free option, a thick, plain coconut yogurt can be used.
- Protein Powder (3 scoops): Choose a high-quality unflavored or vanilla whey, casein, or plant-based blend. The quality of your powder greatly affects the final taste and texture.
- Large Eggs (3): They act as a binder and provide structure. Ensure they are at room temperature to blend smoothly into the batter.
- Keto Sweetener (1/3 cup): We recommend a granulated erythritol blend or monk fruit sweetener that measures like sugar. This keeps the dessert low in sugar and carbohydrates.
- Vanilla Extract (1 tbsp): Pure vanilla extract or the seeds from half a vanilla bean provide essential warm, aromatic flavor.
- Lemon Juice (1 tbsp, optional): A small amount brightens the other flavors and cuts through the richness, making the cheesecake taste even creamier.
The Simple Almond Crust
-
- Almond Flour (1 1/2 cups): This creates a nutty, flavorful, and gluten-free crust that complements the filling perfectly. It also adds healthy fats and fiber.
- Butter (4 tbsp, melted): Use unsalted butter to bind the almond flour. For a dairy-free crust, melted coconut oil is an excellent substitute.
Remember, for any recipe, it’s important to use ingredients that align with your dietary principles. We always ensure our recipes use wholesome, permissible ingredients for a wide audience. If you enjoy bar-style desserts, you might also like our easy Apple Crisp Bars for another healthy treat option.
Step-by-Step Baking Instructions
Follow these detailed steps for a flawless protein cheesecake. The process is simple but requires patience, especially during cooling, to achieve the perfect texture.
Step 1: Prepare the Oven and Crust
Preheat your oven to 300°F (150°C). If making the crust, combine the almond flour and melted butter in a bowl until it resembles wet sand. Line the bottom of an 8 or 9-inch springform pan with parchment paper. Press the crust mixture firmly into the bottom (and slightly up the sides if desired).
Bake the crust alone for about 10 minutes, until fragrant and lightly golden. Remove and let it cool completely on a wire rack before adding the filling. This step prevents a soggy bottom.
Step 2: Create the Creamy Filling
In a food processor or high-speed blender, add the softened cream cheese, Greek yogurt, protein powder, sweetener, eggs, vanilla extract, and lemon juice. Blend on medium speed just until the mixture is completely smooth and uniform. Critical Tip: Do not over-blend. Mixing for too long incorporates excess air, which can lead to cracks during baking.
If mixing by hand, ensure your cream cheese is very soft. Whisk it with the yogurt, protein powder, and sweetener first until lump-free. Then, whisk in the eggs one at a time, followed by the vanilla and lemon juice.
Step 3: Assemble and Bake
Pour the smooth batter over the cooled crust. If making a crustless version, simply pour the batter into your parchment-lined and greased springform pan. Gently tap the pan on the counter a few times to release any large air bubbles.
Place the pan in the preheated oven and bake for 45 to 50 minutes. The cheesecake is done when the edges are set and the center has a slight, gentle jiggle—like set gelatin. It should not be liquid.
Step 4: The Crucial Cooling Process
This step is non-negotiable for a crack-free top. Once baked, turn off the oven. Crack the oven door open with a wooden spoon and let the cheesecake cool slowly inside for 30 minutes. This gradual temperature change prevents sudden contraction and cracking.
After 30 minutes, remove the cheesecake from the oven and let it cool completely to room temperature on the counter.
Step 5: Chill and Serve
Once at room temperature, cover the cheesecake (still in the pan) with plastic wrap or foil and refrigerate for at least 4 hours, preferably overnight. This chilling time allows the cheesecake to fully set, developing its signature dense, creamy texture.
When ready to serve, run a thin, sharp knife under hot water, wipe it dry, and carefully run it around the inner edge of the pan to loosen. Release the springform clasp, remove the sides, slice, and enjoy!
Nutritional Profile and Customizations
Understanding the nutrition of this dessert empowers you to fit it seamlessly into your diet. Below is the detailed breakdown per serving, based on the recipe making 12 slices.
| Nutrient | Amount per Serving |
|---|---|
| Calories | 180 kcal |
| Protein | 19 g |
| Total Fat | 9 g |
| Carbohydrates | 7 g |
| Dietary Fiber | 2 g |
| Sugars | 4 g |
Expert Tips for the Best Results
-
-
- Room Temperature is Key: Ensure your cream cheese, eggs, and Greek yogurt are not cold. This allows for a smooth, lump-free batter without over-mixing.
- Choose Your Protein Wisely: For the best texture, casein protein powder creates an extra creamy and thick filling. Whey protein isolate also works well. Avoid protein powders with added gums or thickeners, as they can create a gummy texture.
- Prevent Sticking: Lining the pan bottom with parchment paper and greasing the sides is essential for easy removal, especially for the crustless version.
- Flavor Variations: Add 1/4 cup of unsweetened cocoa powder for a chocolate version, or swirl in some sugar-free fruit preserves before baking. Top with fresh berries, a dollop of whipped cream, or a drizzle of nut butter before serving.
- Storage: Store covered in the refrigerator for up to 5 days. You can also freeze individual slices wrapped tightly in plastic for up to 2 months. Thaw in the refrigerator overnight.
-
This Ultimate Protein Cheesecake proves that healthy eating doesn’t mean sacrificing flavor or enjoyment. It’s a testament to how smart ingredient choices and careful technique can create a dessert that nourishes your body and delights your senses. Bake it, share it, and savor every creamy, protein-packed bite.
Recipe
Print
Protein Cheesecake
- Total Time: 55 min
- Yield: 12 servings 1x
- Diet: Gluten-Free, High-Protein, Low-Carb
Description
A creamy, indulgent baked cheesecake packed with 19g of protein per slice. This high-protein, low-sugar dessert is perfect for fitness enthusiasts and anyone craving a healthy, satisfying treat.
Ingredients
16 ounces cream cheese (softened to room temperature)
1 1/2 cup Greek yogurt (or drained and blended cottage cheese)
3 scoops protein powder (unflavored or vanilla)
3 large eggs
1/3 cup keto sweetener
1 tablespoon vanilla extract (or scraped half vanilla bean)
1 tablespoon lemon juice (optional)
1 1/2 cup almond flour
4 tablespoons butter (melted)
Instructions
- Preheat oven to 300°F (150°C). Mix almond flour and melted butter for crust, press into a lined pan, and bake for 10 mins. Cool.
- In a blender/food processor, combine cream cheese, yogurt, protein powder, eggs, sweetener, vanilla, and lemon juice. Blend just until smooth.
- Pour batter over cooled crust (or into a lined pan for crustless). Tap to release bubbles.
- Bake for 45-50 mins until edges are set and center jiggles slightly.
- Turn off oven, crack door, and let cheesecake cool inside for 30 mins. Then cool completely on counter.
- Refrigerate for at least 4 hours (preferably overnight) before slicing and serving.
Notes
- Ensure all ingredients are at room temperature for a smooth batter.
- Do not over-blend the filling to avoid air bubbles and cracks.
- The cheesecake must chill for several hours to set properly.
- For a dairy-free version, use coconut cream cheese, coconut yogurt, and coconut oil.
- Store in the fridge for up to 5 days or freeze slices for up to 2 months.
- Prep Time: 10 min
- Cook Time: 50 min
- Category: Main Course
- Method: Baked
- Cuisine: American
Nutrition
- Serving Size: 1 slice
- Calories: 180 kcal
- Sugar: 4 g
- Fat: 9 g
- Carbohydrates: 7 g
- Fiber: 2 g
- Protein: 19 g