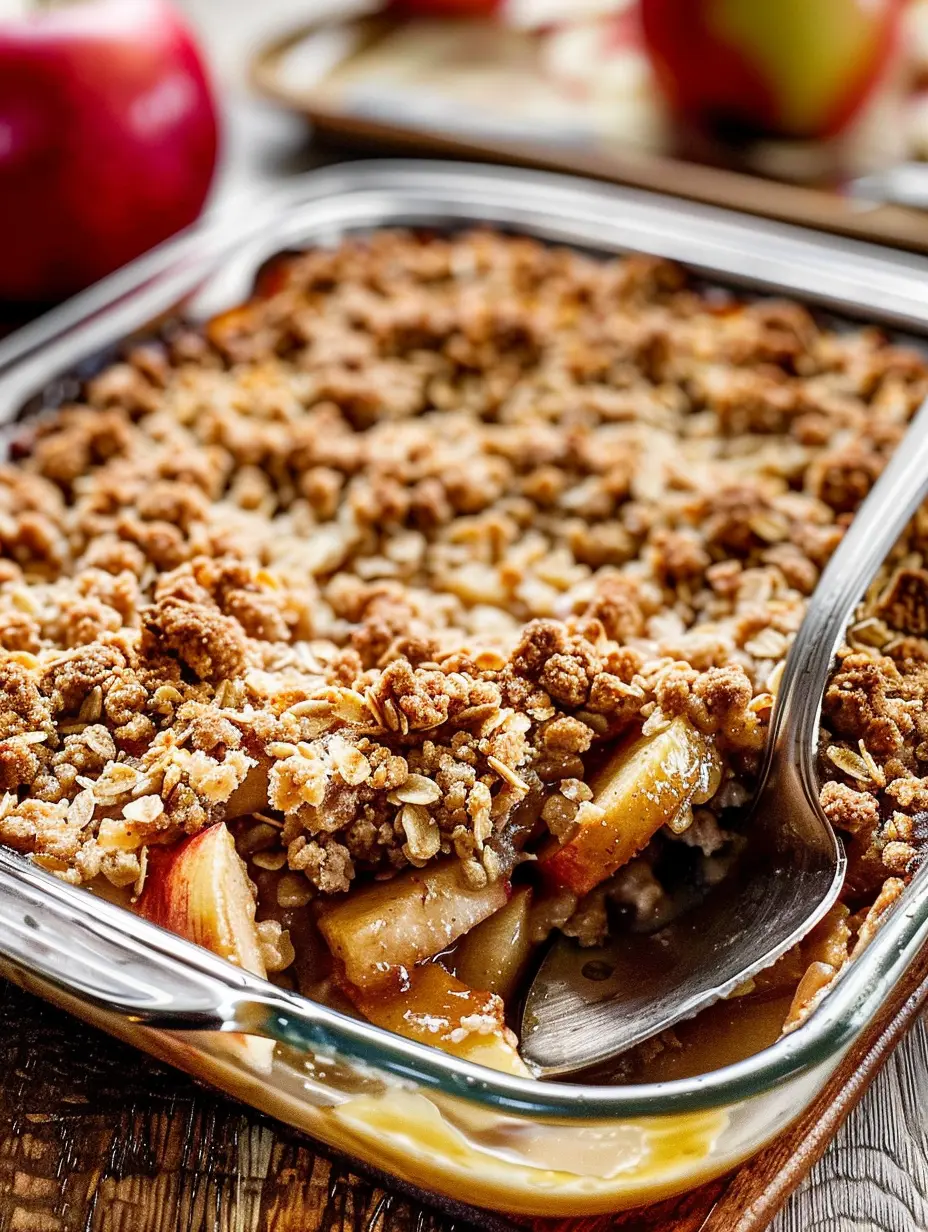
Few desserts evoke the warmth and comfort of home quite like a Traditional Apple Crisp. This classic fruit dessert, a staple of American baking, masterfully combines tender, spiced apples with a golden, buttery, oat-topped crumble. It is the epitome of simple, rustic baking that fills your kitchen with an irresistible aroma.
Easier than pie but just as satisfying, our foolproof recipe delivers that perfect harmony of sweet fruit and crunchy topping every single time. Let’s dive into creating this beloved warm apple treat that is perfect for any occasion.
Why You’ll Love This Classic Dessert
This homemade crisp recipe stands out for its simplicity and incredible flavor. Unlike more finicky desserts, apple crisp is forgiving. The filling celebrates the natural sweetness of the apples, enhanced with brown sugar and warm spices like cinnamon and nutmeg. The topping is a glorious, crumbly mixture of oats, flour, butter, and more brown sugar that bakes into a delightful crunchy contrast.
It’s an easy apple baking project with minimal prep time and maximum reward. Whether served plain, à la mode with vanilla bean ice cream, or with a drizzle of sweet maple syrup, it’s always a crowd-pleaser.
Essential Ingredients for a Perfect Crisp
Gathering high-quality, simple ingredients is the first step to success. Here’s what you’ll need for this simple dessert idea. For the apple filling, you’ll need about 8 medium baking apples (like Granny Smith, Honeycrisp, or Braeburn), peeled and cut into chunks. These are combined with brown sugar, all-purpose flour, pure vanilla extract, ground cinnamon, ground nutmeg, and a pinch of salt.
The crisp topping requires all-purpose flour, brown sugar, ground cinnamon, cold unsalted butter (crucial for a flaky crumb), and old-fashioned rolled oats. The optional serving suggestions include vanilla bean ice cream, which pairs beautifully. Remember, we always use premium vanilla extract for the best flavor profile.
Choosing the Right Apples
The best apples for crisp are those that hold their shape and offer a balance of sweet and tart flavor. Granny Smith apples are a popular choice for their tartness and firm texture, which prevents the filling from becoming mushy.
For a sweeter profile, try Honeycrisp or Fuji. A mix of varieties can create a more complex flavor. The key is to avoid apples that break down completely, like McIntosh, for the filling.
Step-by-Step Baking Instructions
Preheat your oven to 350°F (177°C). Lightly grease a 9×13-inch baking dish or a similar 3.5 to 4-quart baking pan. First, prepare the filling. In a large bowl, combine the peeled and chunked apples with the brown sugar, flour, vanilla extract, cinnamon, nutmeg, and salt. Toss everything until the apples are evenly coated. Spread this mixture evenly into the prepared baking pan. Next, make the iconic crisp topping.
In a medium bowl, whisk together the flour, brown sugar, and cinnamon. Using a pastry cutter, two forks, or your fingertips, cut the cold, cubed butter into the dry mixture. Work until the mixture resembles coarse crumbs and the butter is evenly distributed. Stir in the old-fashioned oats. Sprinkle this crumbly topping evenly over the apple filling, covering it completely.
Bake on the center rack for 45 to 50 minutes. The crisp is done when the topping is a deep golden brown and you can see the fruit juices bubbling vigorously around the edges of the pan. The wonderful smell will tell you it’s ready! Remove the pan from the oven and place it on a wire rack.
Allow it to cool for at least 5 to 10 minutes before serving. This resting time lets the juicy filling thicken slightly. Serve it warm, at room temperature, or even cold. It’s delicious on its own, but truly transcendent when served warm with a scoop of vanilla bean ice cream.
Pro Tips for the Best Results
For the flakiest, most authentic crisp topping, ensure your butter is very cold. This prevents it from melting prematurely and helps create those desirable pebbly crumbs. Do not overmix the topping; a crumbly texture is what you want. If you prefer a nuttier flavor, you can toast the oats in a dry skillet for a few minutes before adding them to the topping mixture.
For the filling, make sure your apple chunks are relatively uniform in size for even cooking. If your apples are very sweet, you can reduce the brown sugar in the filling by a tablespoon or two. Conversely, for tart apples, use the full amount.
Serving Suggestions and Storage
This Traditional Apple Crisp is incredibly versatile. For a decadent treat, serve it warm with a generous scoop of vanilla bean ice cream. The contrast of hot and cold is divine. A drizzle of maple syrup, honey, or a dollop of lightly sweetened whipped cream are also fantastic accompaniments. Looking for more cozy dessert inspiration? Try our creamy Cheesecake Fluff for a no-bake option. To store leftovers, cover the baking dish tightly with plastic wrap or transfer portions to an airtight container. It will keep in the refrigerator for up to 5 days. Reheat single servings in the microwave for 30-60 seconds or the entire dish, covered with foil, in a 300°F oven until warmed through.
Nutritional Information
While this is an indulgent dessert, understanding its nutritional profile can help with portioning. A serving of apple crisp provides energy from carbohydrates, primarily from the apples, oats, and sugars, along with some dietary fiber. The butter contributes fat. For a complete and balanced meal, pair your dessert with a savory dish like our hearty Corn Chowder. And if you’re looking for a protein-packed start to your day that still feels like a treat, our Protein Yogurt Bowl is a perfect choice.
| Nutrition Facts | Per Serving (Approx.) |
|---|---|
| Calories | 350 |
| Total Fat | 12g |
| Saturated Fat | 7g |
| Cholesterol | 30mg |
| Sodium | 85mg |
| Total Carbohydrates | 60g |
| Dietary Fiber | 4g |
| Total Sugars | 42g |
| Protein | 3g |
Frequently Asked Questions
Can I Make This Apple Crisp Ahead of Time?
Absolutely! You can assemble the crisp up to a day in advance. Prepare the filling and topping separately, storing them covered in the refrigerator. Combine them in the baking dish just before you’re ready to bake. You may need to add a few extra minutes to the baking time if the dish goes into the oven cold.
Can I Freeze Apple Crisp?
Yes, both baked and unbaked crisps freeze well. For unbaked, assemble in a freezer-safe dish, wrap tightly, and freeze for up to 3 months. Bake from frozen, adding 15-20 minutes to the baking time. Baked crisp can be frozen after cooling completely. Thaw in the refrigerator overnight and reheat in the oven.
What’s the Difference Between Crisp, Crumble, and Cobbler?
While all are fruit desserts with toppings, the terms differ. A crisp, like this recipe, has a topping that includes oats (and sometimes nuts), giving it a ‘crisp’ texture. A crumble topping is similar but typically does not contain oats. A cobbler has a biscuit or dumpling-like dough dropped on top, which bakes into a cobblestone pattern.
In conclusion, this Traditional Apple Crisp is more than just a recipe; it’s a timeless tradition. Its simple ingredient list, straightforward method, and spectacular results make it the perfect easy apple baking project for bakers of all levels. The combination of soft, spiced apples and a crunchy, sweet oat topping is simply unbeatable.
So, preheat your oven, grab those apples, and get ready to create a homemade dessert that will have everyone asking for seconds. Enjoy the process and the delicious results.
Recipe
Print
Traditional Apple Crisp
- Total Time: 1 hr 5 min
- Yield: 8 servings 1x
Description
A classic American baked dessert with tender spiced apples and a crunchy oat-brown sugar topping.
Ingredients
8 medium apples, peeled and cut into 1-inch chunks (about 10 cups)
1/2 cup (100g) packed light or dark brown sugar
1/4 cup (31g) all-purpose flour
1 teaspoon pure vanilla extract
1 teaspoon ground cinnamon
1/2 teaspoon ground nutmeg
1/4 teaspoon salt
3/4 cup (94g) all-purpose flour
3/4 cup (150g) packed light or dark brown sugar
1 teaspoon ground cinnamon
1/2 cup (113g) cold unsalted butter, cubed
1 cup (85g) old-fashioned rolled oats
Instructions
- Preheat oven to 350°F (177°C). Grease a 9×13-inch baking pan.
- For the filling: In a large bowl, mix apple chunks with 1/2 cup brown sugar, 1/4 cup flour, vanilla, 1 tsp cinnamon, nutmeg, and salt. Spread into pan.
- For the topping: In a medium bowl, whisk 3/4 cup flour, 3/4 cup brown sugar, and 1 tsp cinnamon. Cut in cold butter until crumbly. Stir in oats.
- Sprinkle topping evenly over filling.
- Bake for 45-50 minutes until topping is golden and filling is bubbling.
- Cool for 5-10 minutes before serving. Serve warm with ice cream if desired.
Notes
- Use firm, tart apples like Granny Smith for best texture.
- Keep butter very cold for a flaky crumb topping.
- Store leftovers covered in the fridge for up to 5 days.
- Prep Time: 15 min
- Cook Time: 50 min
- Category: Main Course
- Method: Baked
- Cuisine: American
Nutrition
- Calories: 350
- Sugar: 42g
- Sodium: 85mg
- Fat: 12g
- Saturated Fat: 7g
- Trans Fat: 0g
- Carbohydrates: 60g
- Fiber: 4g
- Protein: 3g
- Cholesterol: 30mg