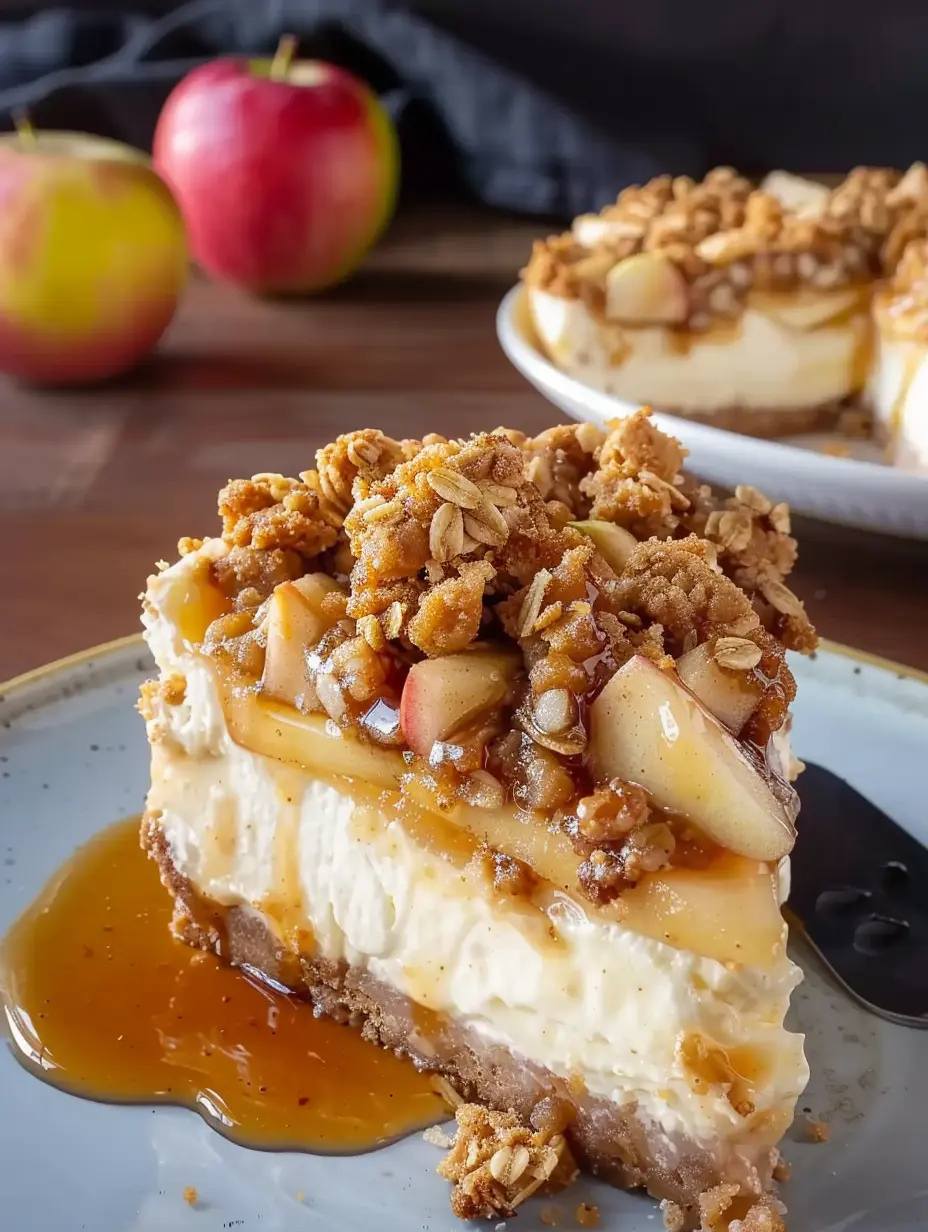
This Apple Crisp Cheesecake recipe is the ultimate celebration dessert. It masterfully layers the tangy, creamy richness of a classic cheesecake with the sweet, spiced comfort of apple crisp. The result is a spectacularly indulgent treat that’s perfect for holidays, special gatherings, or any day you crave a show-stopping finale.
Our version ensures every ingredient is perfectly chosen for maximum flavor while being family-friendly.
Why You’ll Love This Baked Apple Dessert
This recipe isn’t just another cheesecake; it’s a culinary experience. The genius lies in its three distinct layers, each complementing the next. A buttery graham cracker crust provides a solid, sweet foundation. A velvety-smooth cream cheese filling, enriched with Greek yogurt for a delightful tang, sits atop.
Then, we add a generous layer of cinnamon-sugar apples before crowning it all with a buttery oat crumble topping. When baked, the textures and flavors meld into pure bliss. It’s a guaranteed crowd-pleaser that looks as impressive as it tastes.
The Perfect Fusion of Textures
What sets this dessert apart is the symphony of textures. The cheesecake is dense, rich, and creamy. The apple layer softens and becomes tender, releasing its juices into the cake. Finally, the crisp topping bakes to a golden, crunchy perfection, offering a delightful contrast to the creaminess beneath. This combination is what makes every bite unforgettable.
Key Ingredients for Success
Using high-quality ingredients is the first step to a flawless dessert. Let’s break down the essentials for our American classic.
For the Creamy Cheesecake Filling
The foundation of any great cheesecake is the filling. We use full-fat cream cheese, softened to room temperature, to ensure a lump-free, silky texture. Plain Greek yogurt is our secret for added moisture and a subtle tang that balances the sweetness; sour cream works beautifully too.
Pure vanilla extract and fresh eggs are non-negotiable for that classic, rich flavor profile.
For the Spiced Apple & Crisp Layers
Choose firm, sweet-tart apples like Honeycrisp, Granny Smith, or Fuji for the best flavor and texture. They hold their shape during baking. The crisp topping is a simple mix of rolled oats, flour, brown sugar, cinnamon, and melted butter. It creates that signature crunchy, crumbly texture that defines a perfect crisp.
Step-by-Step Baking Guide
Follow these detailed instructions for a perfectly baked cheesecake every time. Patience is key!
Preparing the Crust & Filling
Start by preheating your oven to 325°F. Combine graham cracker crumbs with a tablespoon of sugar, then drizzle with melted butter. Press this mixture firmly into the bottom and slightly up the sides of a 9-inch springform pan. Pre-bake for 10-12 minutes until dry. Let it cool completely. Reduce the oven temperature to 275°F.
In a large bowl, use an electric mixer to whip the softened cream cheese until fluffy. Add the Greek yogurt and mix to combine. Gently mix in the sugar, vanilla, and eggs one at a time, just until the batter is smooth. Over-mixing incorporates too much air, which can cause cracking.
Assembling and Baking to Perfection
Pour the cheesecake batter over the cooled crust. Toss the thinly sliced apples with sugar and cinnamon, then spoon them evenly over the batter. In a separate bowl, mix the flour, oats, brown sugar, and cinnamon for the crisp topping. Drizzle with melted butter and stir until clumps form. Sprinkle this topping evenly over the apples.
Place the springform pan on a baking sheet (as it will be very full) and bake at 275°F for 1.5 to 2 hours. The cheesecake is done when an instant-read thermometer inserted into the center reads 150°F. This low-and-slow method is crucial for a creamy texture without cracks.
The Crucial Cooling Process
Once baked, turn off the oven, prop the door open slightly, and let the cheesecake rest inside for one hour. This gradual temperature change prevents sudden contraction and sinking. After an hour, remove it from the oven and run a thin knife around the edge to release it from the pan.
Let it cool completely at room temperature for 3-4 hours, then refrigerate overnight, or for at least 8 hours. This chilling step is non-negotiable; it allows the cheesecake to set fully, making it firm enough to slice cleanly.
Expert Tips for a Flawless Dessert
Room temperature ingredients are essential for a smooth, homogenous batter. Never over-mix after adding the eggs. For easier slicing, dip your knife in hot water and wipe it clean between each cut. For a finishing touch, drizzle with a high-quality caramel sauce just before serving. Cover leftovers tightly and store in the refrigerator for up to 5 days.
Nutritional Information
While this is an indulgent dessert, it’s helpful to understand what you’re enjoying. The following nutritional data is per serving.
| Nutrient | Amount per Serving |
|---|---|
| Calories | 351 calories |
| Total Fat | 13 grams |
| Carbohydrates | 50 grams |
| Protein | 9 grams |
| Dietary Fiber | 2 grams |
| Sugars | 39 grams |
| Sodium | 206 milligrams |
Remember, a little goes a long way with such a rich dessert. Pair it with a cup of coffee or tea for a perfect balance.
More Irresistible Recipe Ideas
If you loved the comforting, hearty flavors in this cheesecake, you’ll adore our savory takes on classic dishes. For a quick and delicious dinner, try our Healthy Philly Cheesesteak Skillet, which packs all the flavor into a low-carb meal. For a fantastic one-bowl wonder, our Philly Cheesesteak Rice Bowls are a family favorite. And when you need an easy, crowd-pleasing dinner, nothing beats the simplicity of our Sheet Pan Philly Cheesesteak for minimal cleanup.
Conclusion
This Apple Crisp Cheesecake is more than a recipe; it’s a memorable dessert experience. The combination of creamy, fruity, and crunchy elements makes it a standout on any table. While it requires some planning due to the chilling time, every minute is worth it for the spectacular result.
It’s the perfect way to celebrate the flavors of fall or any special occasion. So, gather your ingredients, follow the steps, and get ready to bake a dessert that will earn you rave reviews.
Recipe
Print
Apple Crisp Cheesecake
- Total Time: 10 hr 30 min
- Yield: 10 servings 1x
Description
A spectacular layered dessert combining creamy baked cheesecake, spiced apples, and a crunchy oat crumble topping.
Ingredients
1 1/2 cups graham cracker crumbs
1 tablespoon granulated sugar
1/4 cup melted butter
3 packages (24oz, 750g) cream cheese, softened
2 cups plain Greek yogurt (or sour cream)
1 1/4 cups granulated sugar
2 teaspoons vanilla
4 large eggs
3 cups peeled, sliced, apples (about 3)
1/4 cup granulated sugar
1 teaspoon cinnamon
1/4 cup all purpose flour
1/2 cup rolled oats
1/4 cup brown sugar
1 teaspoon cinnamon
1/4 cup melted butter
Caramel sauce (optional)
Instructions
- Preheat oven to 325°F. Mix crumbs and 1 tbsp sugar, add butter, press into a 9-inch springform pan. Bake 10-12 min. Cool.
- Reduce oven to 275°F. Whip cream cheese until fluffy. Add yogurt, mix. Add 1 1/4 cups sugar, vanilla, eggs; mix just until smooth.
- Pour batter over cooled crust.
- Toss apples with 1/4 cup sugar and 1 tsp cinnamon. Spoon over batter.
- Mix flour, oats, brown sugar, 1 tsp cinnamon. Add 1/4 cup melted butter; stir until clumpy. Sprinkle over apples.
- Place pan on a baking sheet. Bake at 275°F for 1.5-2 hrs, until center is 150°F on a thermometer.
- Turn off oven, prop door open, let cheesecake sit inside for 1 hour.
- Remove, run a knife around edge, cool completely (3-4 hrs). Chill overnight (at least 8 hrs).
- Drizzle with caramel sauce before serving if desired.
Notes
- Ensure all ingredients are at room temperature for a smooth batter.
- Do not over-mix the batter after adding eggs to prevent cracks.
- Chilling overnight is essential for the perfect sliceable texture.
- Store covered in the refrigerator for up to 5 days.
- Prep Time: 30 min
- Cook Time: 2 hrs
- Category: Dessert
- Method: Baked
- Cuisine: American
Nutrition
- Calories: 351 calories
- Sugar: 39 grams sugar
- Sodium: 206 milligrams sodium
- Fat: 13 grams fat
- Carbohydrates: 50 grams carbohydrates
- Fiber: 2 grams fiber
- Protein: 9 grams protein