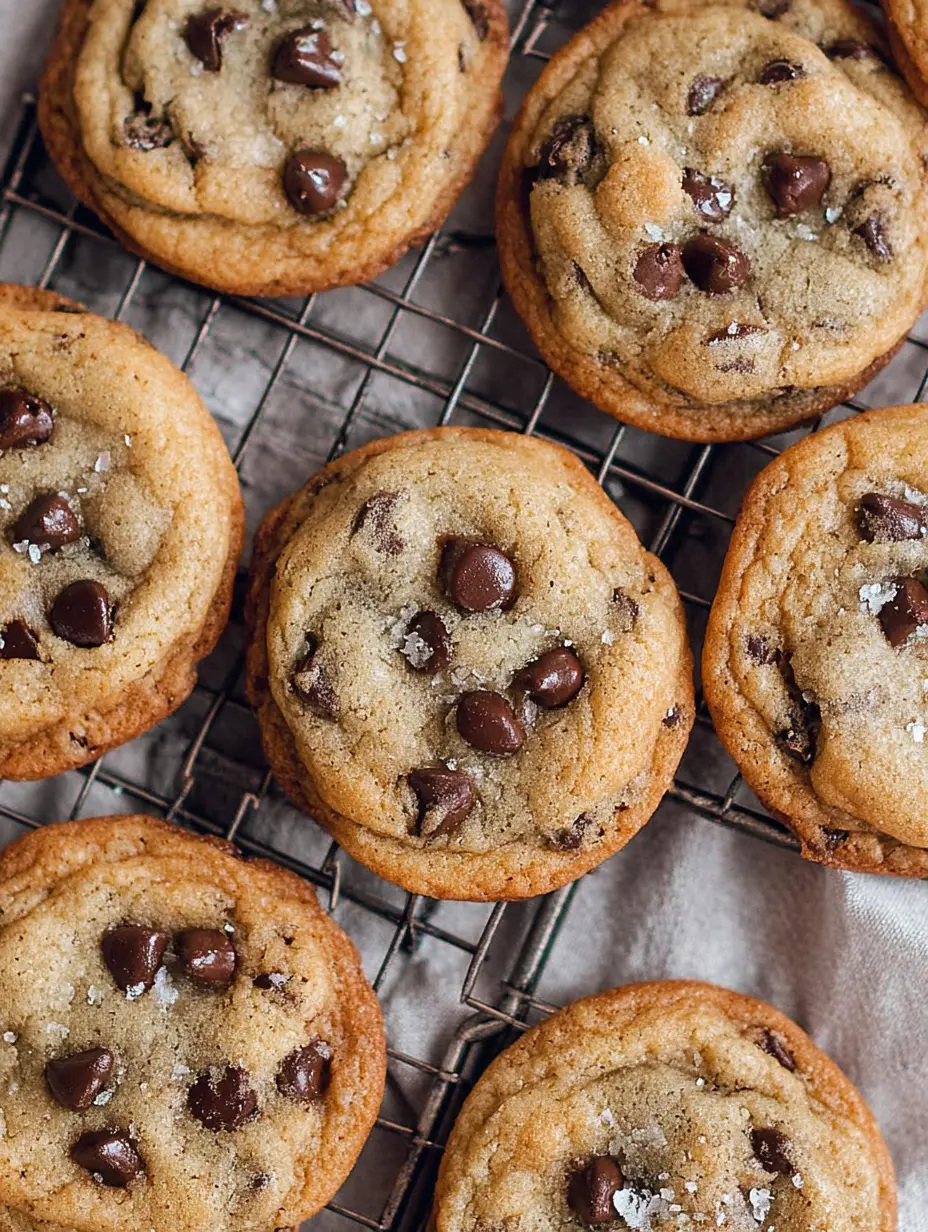
Every baker’s quest for the perfect chocolate chip cookie ends here. The crispy edges, the soft, chewy center, the perfect balance of sweet and salty—this recipe delivers it all. These are not your average cookies; they are bakery-style masterpieces designed for that satisfying crunch leading into a melt-in-your-mouth chocolatey interior.
In this comprehensive guide, we’ll walk through every step to ensure your homemade cookies eclipse any store-bought version. We’ll cover the science behind the crisp edges, the critical role of ingredient temperature, and pro tips for consistent, stunning results every single time.
The Secret Behind the Perfect Crispy Edge
What makes these cookies stand out is their signature texture. Unlike flat, overly crispy cookies or cakey, puffy ones, this recipe achieves the ideal hybrid. The crispy edge is born from two key factors: the sugar ratio and the baking technique. Using a balanced mix of granulated and brown sugars creates a cookie that spreads just enough in the oven, caramelizing at the perimeter while the center remains tender.
The final trick—tapping the hot baking sheet on the counter—deflates the cookies slightly, creating those desirable crinkled, crisp edges and a dense, fudgy center. It’s a simple move with a dramatic impact on texture.
Ingredient Breakdown for Flawless Cookies
Great cookies start with great ingredients. Let’s examine each component:
- All-Purpose Flour: The foundation. Weighing your flour (375g) is highly recommended for accuracy, as scooping can lead to dense cookies.
- Leavening: Baking soda is used alone for the right amount of spread and a slightly craggy top.
- Fat: Unsalted butter, softened to room temperature, is essential for creaming with the sugars to incorporate air, leading to a lighter texture.
- Sugars: A 1:1 ratio of light brown sugar and granulated sugar. The brown sugar adds moisture and chew from its molasses content, while the white sugar promotes spreading and crispness.
- Eggs & Vanilla: Eggs bind the dough and add richness. Pure vanilla extract enhances all the other flavors.
- Chocolate: High-quality semisweet chocolate chips (about 2 1/2 cups) provide the classic, generous chocolate pockets.
- Salt: Kosher salt in the dough balances sweetness. A final sprinkle of flaked sea salt (optional) creates an addictive sweet-salty contrast.
Step-by-Step Instructions for Bakery-Style Cookies
Follow these detailed instructions closely for cookie perfection.
1. Prep & Mix the Dough
Start by whisking your dry ingredients—flour, baking soda, and salt—in a bowl. Set this aside. In the bowl of a stand mixer fitted with the paddle attachment, beat the softened butter, brown sugar, and granulated sugar on medium-high speed for a full 3 minutes. The mixture should become pale, light, and creamy, resembling fluffy frosting. This step is non-negotiable for texture.
Next, add the eggs and vanilla extract. Mix on low speed until just combined, scraping down the sides of the bowl. With the mixer on low, add all the dry ingredients at once. Mix only until no dry flour remains—overmixing develops gluten, leading to tough cookies. Finally, fold in the chocolate chips until evenly distributed.
2. The Critical Chill & Portioning
Transfer the entire bowl of dough to the refrigerator. Chill for 20 minutes while your oven preheats to 350°F (177°C). This chills the butter, preventing the cookies from spreading too fast and thin in the oven. It’s the secret to soft centers. Line your baking sheets with parchment paper or a Silpat mat.
Using a tablespoon measure, scoop heaping, rounded portions of cold dough. Each portion should be roughly the size of a golf ball. This size ensures proper spreading for the ideal crispy edge-to-chewy center ratio. Arrange dough balls on the sheet, leaving ample space for spreading.
3. Bake, Tap, and Cool for Perfection
Bake for 9 to 12 minutes. The cookies are done when the edges are set and just starting to turn golden brown, while the centers still look soft, pale, and underbaked. They will continue to cook from residual heat. Immediately upon removing the sheet from the oven, firmly tap it on your kitchen counter 2-3 times. This deflates the cookies, creating those signature crinkled edges and a denser center.
If using, sprinkle a tiny pinch of flaked sea salt on each cookie. Let cookies cool on the baking sheet for 5 full minutes before transferring to a wire rack. This allows them to set without falling apart. Enjoy warm or once fully cooled.
Pro Tips, Variations, and Storage
Expert Tips: Always use room-temperature ingredients for even mixing. For consistent sizing and baking, consider using a #20 or #24 cookie scoop. Rotate your baking sheet halfway through baking for even browning. If dough becomes too soft while portioning, re-chill it. These cookies pair wonderfully with a classic beverage, much like the elegant simplicity found in a Vanilla Souffle Pancakes with Honey pairs with morning coffee.
Variations: Feel free to experiment! Use dark chocolate chips, or add a cup of chopped nuts like toasted pecans or walnuts.
For a fun twist, substitute 1 cup of the chocolate chips with butterscotch or peanut butter chips.
Storage: Store completely cooled cookies in an airtight container at room temperature for up to 3 days. For longer storage, you can freeze the shaped dough balls on a parchment-lined tray, then transfer to a freezer bag. Bake directly from frozen, adding 1-2 minutes to the baking time.
Nutritional Information
Being mindful of what we eat is part of enjoying treats. Below is the approximate nutritional breakdown per cookie. This classic treat is a crowd-pleaser, similar to how a Classic Lemon Meringue Pie or Classic Strawberry Shortcake Biscuits with Fresh Cream brings joy through balanced, homemade goodness.
| Nutrient | Amount Per Serving |
|---|---|
| Calories | 253 kcal |
| Total Fat | 8 g |
| Carbohydrates | 49 g |
| Fiber | 2 g |
| Sugar | 24 g |
| Protein | 4 g |
| Sodium | 426 mg |
Conclusion: Your New Go-To Cookie
This crispy edge chocolate chip cookie recipe is a guaranteed winner. By understanding the role of each ingredient and mastering the chilling, baking, and tapping techniques, you can produce professional-quality cookies in your own kitchen. The contrast of textures—crisp, buttery edges giving way to a soft, chocolate-filled center—is utterly irresistible.
Whether for a special occasion, a gift, or a well-deserved personal treat, this recipe is one you’ll return to again and again. Happy baking!
The Recipe
Print
Crispy Edge Chocolate Chip Cookies
- Total Time: 27 min
- Yield: 24 servings 1x
Description
Bakery-style chocolate chip cookies with irresistibly crispy edges and soft, chewy centers. The perfect balance of sweet and salty.
Ingredients
3 cups (375g) All-Purpose Flour
1 teaspoon Baking Soda
3/4 teaspoon Kosher Salt
2 sticks (1 cup) Unsalted Butter, softened
1 cup (200g) packed Light Brown Sugar
1 cup (200g) Granulated Sugar
2 large Eggs
2 teaspoons Pure Vanilla Extract
2 1/2 cups Semisweet Chocolate Chips
1 teaspoon Flaked Sea Salt (optional)
Instructions
- Whisk flour, baking soda, and salt in a bowl. Set aside.
- In a stand mixer, cream butter and sugars until light and fluffy (3 mins).
- Mix in eggs and vanilla until just combined.
- Add dry ingredients all at once; mix on low until no dry flour remains.
- Fold in chocolate chips.
- Chill dough for 20 minutes while oven preheats to 350°F (177°C).
- Scoop golf-ball-sized portions onto lined baking sheets.
- Bake for 9-12 minutes until edges are golden and centers are soft.
- Tap baking sheet firmly on counter after removing from oven.
- Sprinkle with optional sea salt. Cool for 5 minutes on sheet before transferring.
Notes
- For best results, weigh your flour and use room-temperature ingredients.
- The 20-minute chill is crucial for texture.
- Tapping the hot sheet creates the signature crinkled edges.
- Store in an airtight container for up to 3 days.
- Dough balls freeze well for baking later.
- Prep Time: 15 min
- Cook Time: 12 min
- Category: Main Course
- Method: Baked
- Cuisine: American
Nutrition
- Calories: 253 kcal
- Sugar: 24 g
- Sodium: 426 mg
- Fat: 8 g
- Carbohydrates: 49 g
- Fiber: 2 g
- Protein: 4 g